Installing disk brakes on a bike can make a huge difference in how your bike stops and handles, especially if you ride in wet or rough conditions. Many people think it’s complicated, but with some patience and the right steps, you can do it yourself.
This guide will walk you through everything, from choosing the right parts to the final adjustments, so your bike will be safer and feel more responsive.
Understanding Disk Brakes
Disk brakes use a metal rotor attached to the wheel hub and a caliper that squeezes the rotor to slow the bike. This system is more powerful and consistent than rim brakes, especially in rain or mud. Most modern mountain bikes and many road bikes now use disk brakes as the standard.
There are two main types of disk brakes:
- Mechanical (cable-actuated): Uses a standard brake cable to move the caliper.
- Hydraulic: Uses fluid in hoses for stronger and smoother braking.
Both systems have their pros and cons. Mechanical systems are easier to install and maintain, while hydraulic systems deliver more power and need less hand force.
What You Need Before You Start
Before you begin, check if your bike frame and wheels can accept disk brakes. Not every bike is compatible.
Check Compatibility
- Frame and Fork Mounts: Look for mounting points (called IS or Post Mounts) near the wheel axles.
- Wheel Hubs: Your wheels must have mounts for rotors—usually 6-bolt or center lock.
- Caliper Clearance: Make sure there is space for the caliper between your fork/frame and the rotor.
If your bike does not have these, you may need to upgrade your frame or wheels.
Tools And Parts Needed
You will need these items:
- Disk brake calipers (mechanical or hydraulic)
- Rotors (usually 160mm or 180mm for mountain bikes)
- Adapters (to fit the caliper to your frame/fork, if needed)
- Bolts (usually supplied with brakes or rotors)
- Allen wrenches (commonly 4mm, 5mm, and 6mm)
- Torque wrench (optional but recommended)
- Cable/housing cutter (for mechanical systems)
- Hydraulic fluid kit (for hydraulic brakes)
- Isopropyl alcohol (for cleaning rotors)
- New wheels (if your old wheels are not compatible)
Cost Estimate
Installing disk brakes can cost between $100 and $400, depending on the brake model and whether you need new wheels. For example, a set of entry-level mechanical brakes with rotors might cost $80, while top-end hydraulics with new wheels can be over $350.
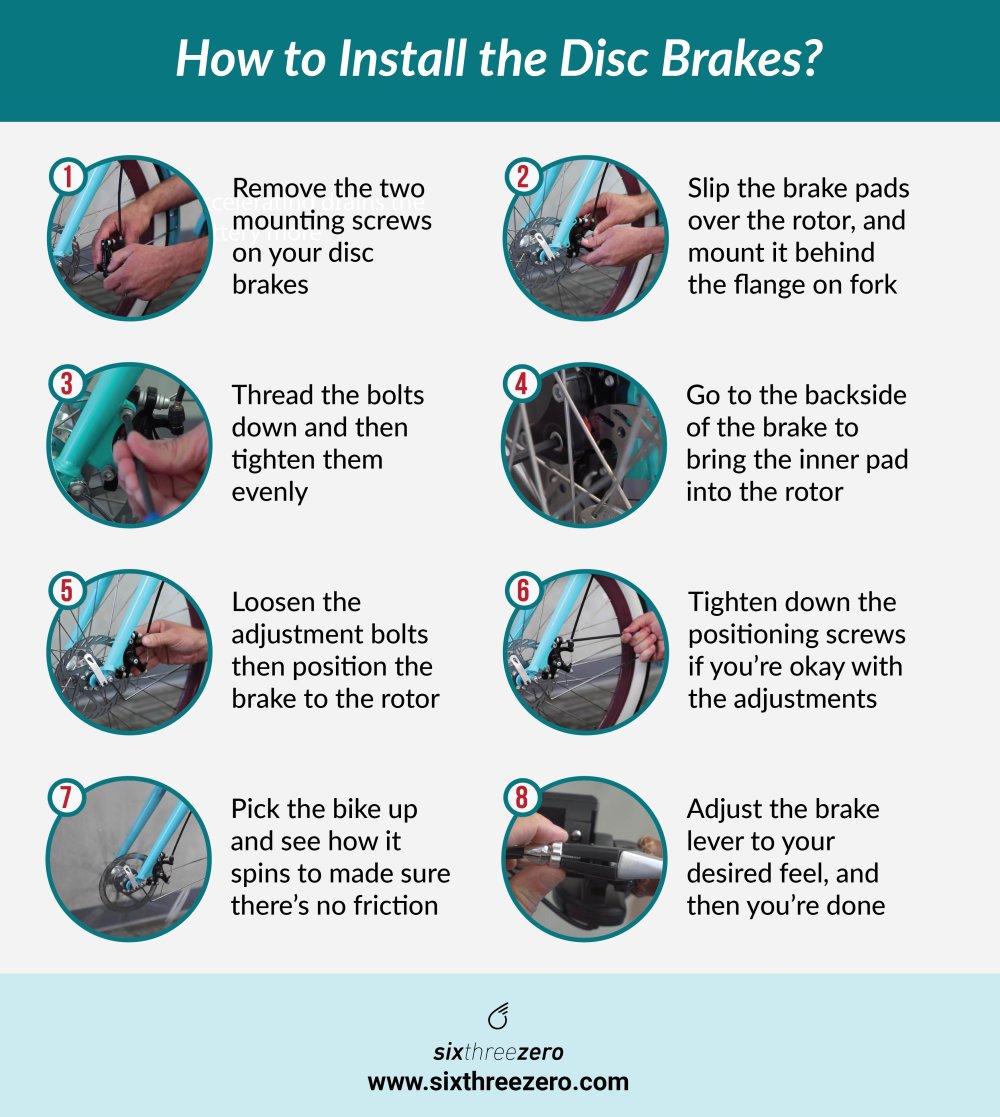
Credit: www.sixthreezero.com
Step 1: Removing Old Brakes And Preparing Your Bike
First, take off your old rim brakes and levers. Remove the wheels. This is a good time to clean your frame and fork—any dirt can affect the install.
- Remove Old Calipers: Use an Allen wrench to unscrew the brake calipers.
- Remove Brake Levers: Loosen the clamp bolts and slide the levers off the handlebar.
- Clean Mounting Surfaces: Wipe the frame, fork, and hubs with isopropyl alcohol.
Pro Tip: If your bike had V-brakes, you’ll notice the old brake bosses. You can leave them, or remove them if they’re threaded, but they won’t affect the new system.
Step 2: Installing The Rotors
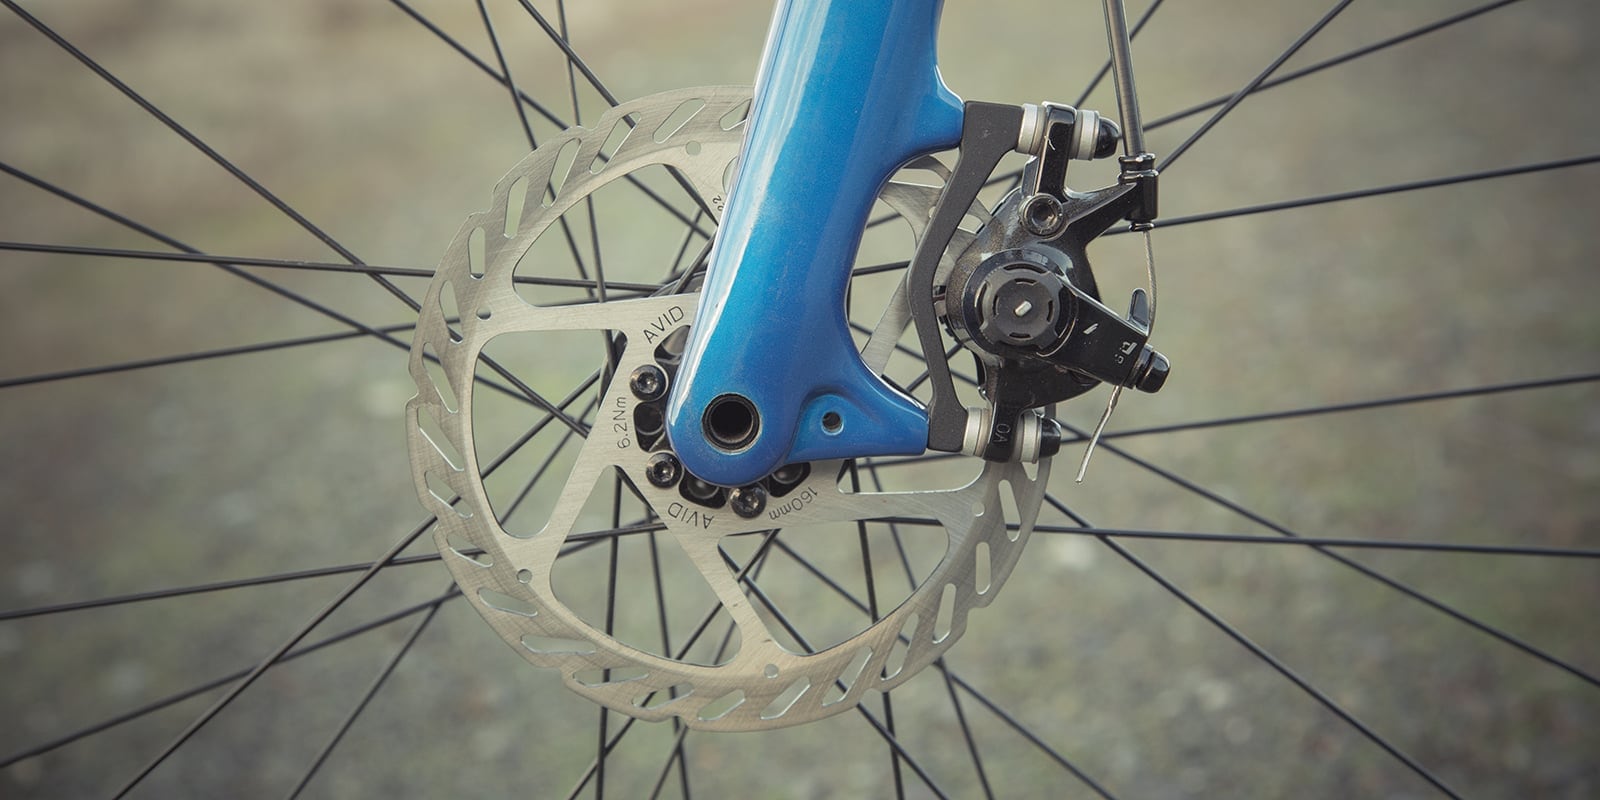
Take your wheels and attach the rotors.
- Align the Rotor: Place the rotor on the hub, lining up the holes.
- Insert the Bolts: For 6-bolt rotors, tighten each bolt in a star pattern (like tightening lug nuts on a car). For center lock, use the lockring and special tool.
- Torque the Bolts: Tighten each bolt to the recommended torque (usually 6 Nm).
| Rotor Size | Common Use | Notes |
|---|---|---|
| 140mm | Road bikes | Lighter, less stopping power |
| 160mm | MTB, hybrids | Balance of weight and power |
| 180mm/203mm | Downhill/Heavy use | More power, heavier |
Non-obvious insight: Always wipe new rotors with alcohol before installing. Factory oils can contaminate the pads and reduce braking power.
Credit: arbetarcentrum.nu
Step 3: Mounting The Calipers
Now, fit the calipers to your bike.
- Choose the Right Adapter: Depending on your rotor size and mounting type, you may need an adapter.
- Attach Caliper to Frame/Fork: Use the bolts and adapters, if needed. Do not fully tighten yet.
- Align Caliper: Install the wheel. Squeeze the brake lever (for mechanical, pull the cable tight; for hydraulic, just squeeze the lever). This centers the caliper over the rotor.
- Tighten Bolts: With the lever still squeezed, tighten the caliper bolts evenly.
Adapter Compatibility Table
| Mount Type | Rotor Size | Adapter Needed? |
|---|---|---|
| IS (International Standard) | 160mm | Yes |
| Post Mount | 160mm | No |
| Post Mount | 180mm/203mm | Yes |
Non-obvious insight: If your caliper rubs after tightening, loosen it again and repeat the alignment. Even a small misalignment can cause noise and wear.
Step 4: Installing Levers And Cables (mechanical Only)
If you’re using mechanical brakes:
- Install New Levers: Slide the new levers onto the handlebar and tighten.
- Route Cable and Housing: Cut the housing to the correct length. Run the cable through the housing, lever, and to the caliper.
- Secure Cable: Clamp the cable at the caliper. Pull it tight, but not so tight that the brake drags.
- Test Lever Feel: Squeeze the lever; there should be a firm feel with no slack.
Tip: Avoid sharp bends in the housing, as this can make the brake feel spongy or weak.
Step 5: Hydraulic Brake Setup (if Applicable)
Hydraulic brakes come pre-bled (fluid already inside), but you might need to shorten the hoses:
- Mount the Levers: Attach to the bars and tighten.
- Route Hoses: Use the frame guides. Make sure the hose does not stretch or kink when you turn the bars.
- Shorten Hoses (if needed): Follow the manufacturer’s instructions. Usually, this means cutting the hose and inserting a new barb and olive.
- Re-bleed System: Use a bleed kit to remove any air bubbles for a firm lever feel.
Note: Bleeding is a skill. If you’re not confident, visit a local bike shop.
Step 6: Final Adjustment And Pad Bedding
With everything installed, make small adjustments:
- Spin the Wheel: The rotor should not rub. If it does, adjust the caliper position.
- Check Lever Reach: Adjust the lever distance to fit your hand size.
- Bed in the Pads: Accelerate to about 10 mph, then brake hard 10-20 times. This helps the pads grip the rotor for full power.
Warning: Do not touch the rotor or pads with bare hands. Oils from your fingers can cause brake squeal and weak braking.
Common Mistakes To Avoid
- Mixing incompatible parts: Disk brakes, rotors, and adapters must match your bike and each other.
- Over-tightening bolts: This can strip threads or warp the rotor. Always use a torque wrench if possible.
- Ignoring rotor direction: Some rotors have arrows; install them facing the correct way.
- Skipping the bedding process: Pads need to be bedded in for best performance.
Troubleshooting Problems
If your brakes don’t feel right after installation, check for these:
- Squealing or noisy brakes: Clean the rotors and pads with isopropyl alcohol. Sand lightly if contaminated.
- Weak braking: Check for air in hydraulic lines or slack in mechanical cables.
- Rotor rub: Re-align the caliper or check if the rotor is bent.
- Levers feel spongy: Bleed hydraulic brakes or check for frayed cables.

Credit: www.youtube.com
Safety Checks Before Riding
Always do these checks before your first ride:
- Squeeze the levers hard: The bike should not move, and the levers should not touch the handlebars.
- Spin the wheels: Make sure there is no dragging or scraping noise.
- Check bolts: All bolts should be tight and secure.
- Test in a safe area: Try stopping at different speeds before riding on busy roads or trails.
Upgrading Wheels For Disk Brakes
If your old wheels don’t have rotor mounts, you need new wheels. When choosing:
- Hub type: 6-bolt or center lock
- Axle size: Must fit your bike (e.g., 9mm QR, 12mm or 15mm thru-axle)
- Rim width: Match your tires
| Wheel Type | Hub Mount | Axle Style |
|---|---|---|
| Standard MTB | 6-bolt | 9mm QR |
| Modern Road | Center lock | 12mm Thru-axle |
| Boost MTB | 6-bolt | 15mm Thru-axle |
Pro Tip: Quality wheels can make a bigger difference to braking than high-end calipers, because a stiff, well-built wheel keeps the rotor aligned.
When To Seek Professional Help
If you feel unsure at any stage, it’s wise to get help from a bike mechanic. Hydraulic systems, in particular, can be tricky for beginners. A shop can also check for frame alignment or recommend the best parts for your riding style.
Where To Learn More
For deeper details on disk brakes and compatibility, the Wikipedia: Bicycle brake systems page offers a technical overview.
Frequently Asked Questions
What Tools Do I Need To Install Disk Brakes On A Bike?
You’ll need Allen wrenches (4mm to 6mm), a torque wrench, isopropyl alcohol, and possibly a cable cutter or hydraulic bleed kit, depending on the system. Most disk brake kits include all the bolts you need.
Can I Add Disk Brakes To Any Bike?
No. Your bike frame and fork must have disk brake mounts, and your wheels must support rotors. If your bike doesn’t, upgrades or a new bike may be required.
Which Is Better: Mechanical Or Hydraulic Disk Brakes?
Hydraulic brakes offer more power and better feel, but mechanical brakes are easier to install and maintain. Choose based on your needs and comfort with maintenance.
How Do I Stop My Disk Brakes From Squealing?
Clean the rotors and pads with isopropyl alcohol. Avoid touching them with bare hands. If they’re still noisy, lightly sand the pads and rotor surface.
Is It Safe To Install Disk Brakes Myself?
Yes, if you follow the steps carefully and check your work. If you’re unsure, get a bike mechanic to check your installation before riding.
Installing disk brakes is a rewarding upgrade that can dramatically improve your bike’s stopping power and safety. Take your time, follow each step, and enjoy the confidence that comes with better brakes.