Changing your bike pedals might seem difficult if you’ve never done it before, but with the right tools and some careful steps, it’s a task you can do at home in less than 30 minutes. Whether you’re upgrading to clipless pedals, replacing worn-out ones, or simply swapping for a different style, knowing how to change bike pedals is a valuable skill for any cyclist.
This guide will walk you through the process, highlight common mistakes, and share tips that even many experienced riders sometimes overlook.
Why Change Your Bike Pedals?
Pedals are your direct link to the bike. They affect comfort, efficiency, and safety. Sometimes, you need to change pedals because:
- Your old pedals are worn or broken.
- You want to try a new riding style (like switching from flat to clipless pedals).
- You’re adjusting your bike fit for better performance or comfort.
- You need to travel and want a lighter or different set of pedals.
Regular inspection and replacement keep your ride smooth and help avoid unexpected breakdowns.
Tools And Items You Need
Before you start, gather the right tools. Using the correct tool makes the job safer and avoids damaging your bike.
- Pedal wrench – usually 15mm, with a thin jaw. Standard wrenches are often too thick.
- 6mm or 8mm Allen key (hex wrench) – some modern pedals use an Allen fitting on the inside.
- Grease – prevents pedals from seizing in the crank arm.
- Clean rag – to wipe away dirt or grease.
- Bike stand (optional) – makes the process easier but isn’t required.
Pro tip: Some pedals require special tools or have unique fittings. Check your pedal model before starting.
Understanding Pedal Threads
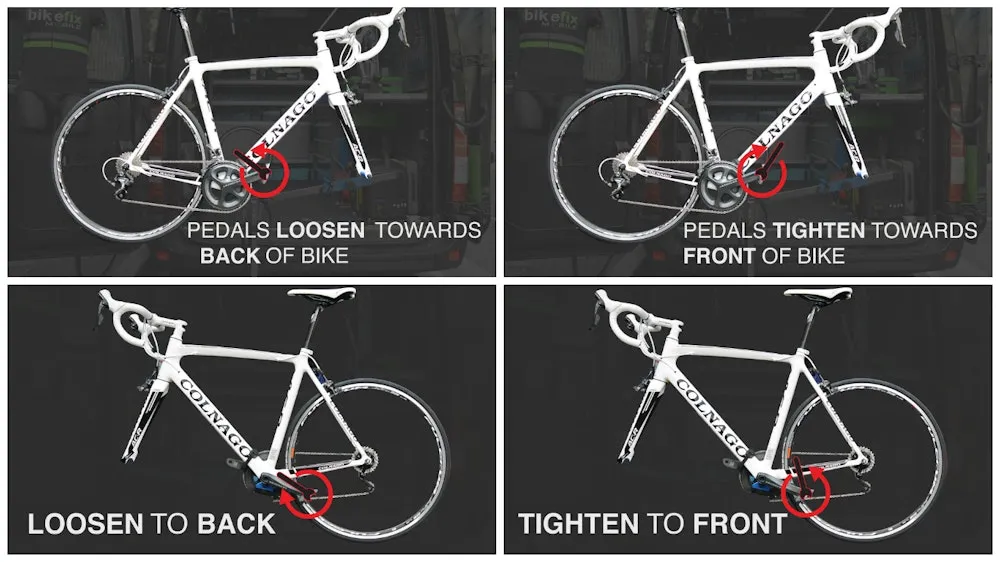
Many beginners don’t realize that left and right pedals are threaded differently. The right pedal (drive side) is right-hand threaded (tightens clockwise). The left pedal is left-hand threaded (tightens counterclockwise).
This design keeps pedals from loosening while you ride. Mixing them up can strip the threads on your crank arms, which is expensive to fix.
Always check for “L” (left) or “R” (right) markings on your pedals before installation.
Preparing Your Bike
Place your bike on a stable surface. If you have a bike stand, secure the bike so the pedals are easy to reach. Otherwise, lean your bike against a wall, making sure it won’t tip over.
Shift your chain onto the biggest chainring. This gives you more space to work and protects your hand from the teeth of the gears.
Wipe any dirt or debris from the pedal area with a clean rag. This helps prevent grit from getting into the crank threads.
Removing The Old Pedals
This is the step where most people struggle, often due to confusion over thread direction or seized pedals. Follow these steps:
- Position the crank arm so it points forward and is parallel to the ground.
- Attach your wrench or Allen key to the pedal axle.
- For wrenches: Fit it snugly on the flat surfaces between the pedal and crank arm.
- For Allen keys: Insert from the inside end of the crank arm.
- Loosen the pedal:
- Right pedal (drive side): Turn counterclockwise to loosen.
- Left pedal (non-drive side): Turn clockwise to loosen.
- Apply steady pressure. Pedals can be tight, especially if not removed for a long time. If the pedal won’t budge, use a longer wrench for more leverage. Avoid hitting the wrench, as this can damage the bike.
- Remove the pedal by hand when it’s loose enough. Set it aside.
Non-obvious insight: If a pedal is really stuck, apply a small amount of penetrating oil to the threads and wait 10–15 minutes. This often frees up seized pedals.
Checking And Cleaning The Crank Threads
Before installing new pedals, inspect the threads inside the crank arms. Look for:
- Dirt or old grease buildup
- Signs of damage (cross-threading or worn threads)
Clean the threads with your rag. If you see any damage, consider having a bike mechanic check the crank arm before installing new pedals.
Greasing The Pedal Threads
Applying bike grease to the pedal threads is a step many people skip, but it’s important. Grease:
- Makes future pedal removal easier
- Prevents threads from seizing
- Reduces the risk of creaking noises
Use a thin layer of grease—don’t overdo it. Apply it evenly around the threads of each pedal.
Installing The New Pedals
- Check for the “L” and “R” markings on the new pedals.
- Align the right pedal with the drive side crank arm. Start threading it by hand, turning clockwise.
- Align the left pedal with the non-drive side crank arm. Start threading it by hand, turning counterclockwise.
Important: Always start threading pedals by hand. If you feel resistance, stop and realign. Forcing pedals can ruin the crank arm threads.
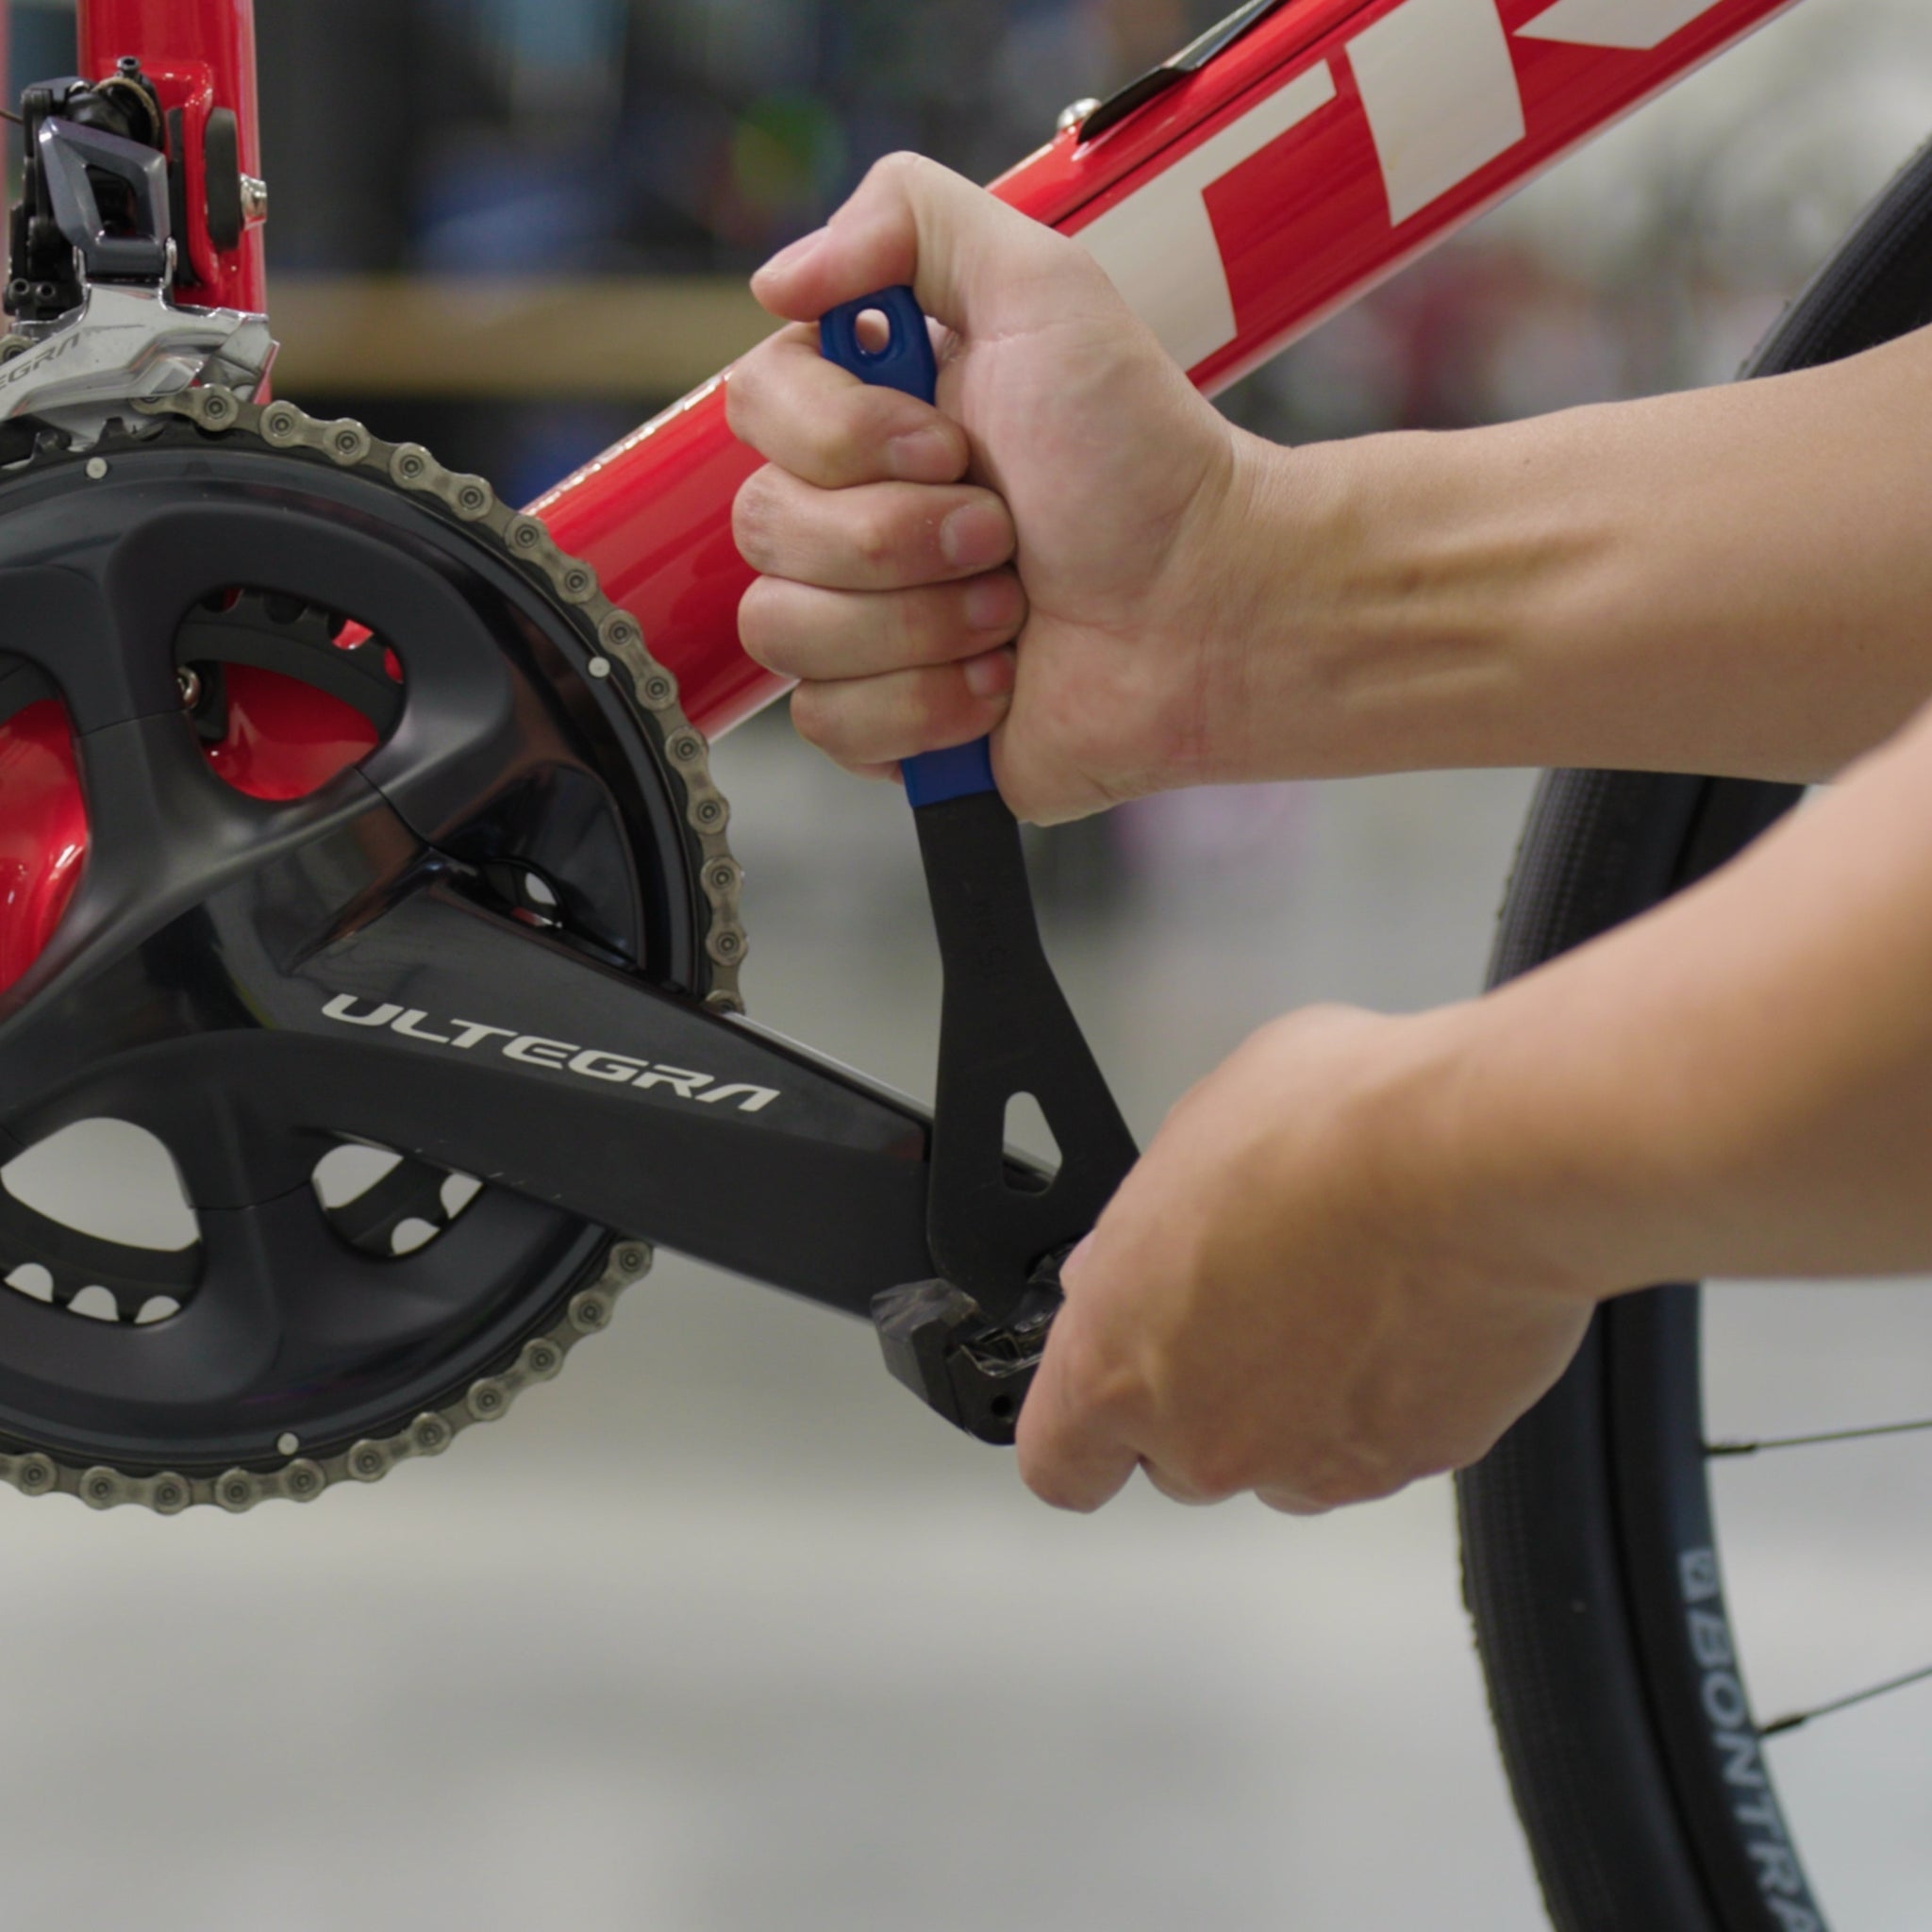
Once each pedal is hand-tight, use your pedal wrench or Allen key to snug them further. Pedals should be tight but not over-tightened. A good guideline is about 35-40 Nm of torque, but if you don’t have a torque wrench, firm hand-tightening is enough.
Credit: www.theproscloset.com
Common Mistakes To Avoid
Many cyclists make simple errors that can lead to expensive repairs or unsafe riding. Be aware of these:
- Mixing up left and right pedals – This can instantly damage your crank arms.
- Not greasing threads – Leads to stuck pedals later.
- Cross-threading – Forcing pedals in at the wrong angle strips the threads.
- Over-tightening – Makes removal very difficult and can harm the crank arm.
- Using the wrong tool – Can round off the pedal flats or Allen fitting.
Types Of Pedals And Their Installation Differences
While the basic process is similar for all pedals, some types have small differences:
Flat Pedals
These are the most common type for city and casual bikes. Usually use a 15mm wrench or 6mm Allen key.
Clipless Pedals
Require more care during installation because they must be tight enough to handle the pulling force when unclipping. Some use an 8mm Allen key. Always check the manufacturer’s recommendations for torque settings.
Platform/hybrid Pedals
These can combine features of flat and clipless pedals. Installation is the same, but always check for any extra washers or spacers provided in the package.
Data Comparison: Pedal Types And Tool Requirements
Here’s a quick reference for the most common pedal types:
| Pedal Type | Common Tool | Thread Direction (Right/Left) |
|---|---|---|
| Flat | 15mm Wrench / 6mm Allen Key | Clockwise / Counterclockwise |
| Clipless (SPD, Look, etc.) | 8mm Allen Key | Clockwise / Counterclockwise |
| Hybrid/Platform | 15mm Wrench | Clockwise / Counterclockwise |
Pro tip: When traveling with your bike, pack the right tool for your pedal type. Many multi-tools do not fit pedal axles.
Safety Checks After Installation
Before you ride, always double-check your work:
- Spin the pedals by hand. They should turn smoothly with no wobble.
- Check for tightness. Try to wiggle the pedal. There should be no movement between pedal and crank.
- Test on a short ride. Listen for any creaks or clicks. If you hear noises, re-check torque.
Never ride with loose pedals—this can damage your bike and is unsafe.
Credit: www.bikeexchange.com
When To Replace Pedals
Knowing when to change pedals is just as important as knowing how. Signs you need new pedals include:
- Visible wear on the pedal body or bearings
- Difficulty spinning (pedals feel rough or grindy)
- Pedal body cracking or bending
- Release mechanism failing on clipless pedals
Most pedals last thousands of kilometers, but aggressive riding, wet conditions, or lack of maintenance can shorten their life.
Cost And Time Estimate
Changing pedals is affordable and quick:
| Item | Estimated Cost (USD) | Time Required |
|---|---|---|
| Pedal Wrench | $10 – $20 | – |
| New Pedals | $20 – $150+ | – |
| Labor (if done at shop) | $10 – $25 | 10 – 20 min |
| DIY Time | – | 10 – 30 min |
Most cyclists can change pedals in under 20 minutes once they know the process.

Credit: www.youtube.com
Extra Tips For A Smooth Pedal Change
- Use gloves if you want to keep your hands clean—pedal axles can be greasy.
- Keep your old pedals as backups or for other bikes.
- Check your shoes and cleats (for clipless systems) after changing pedals for wear or needed adjustments.
- Carry a small tube of grease in your bike toolkit if you travel often.
- If you’re unsure about thread direction, remember: The pedal always tightens toward the front wheel.
Where To Learn More
If you want to see video demonstrations or get more technical details about pedal systems, a great resource is Park Tool’s Pedal Removal Guide. Their visual guides can help you better understand each step.
Frequently Asked Questions
Which Way Do I Turn My Pedals To Remove Them?
The right pedal loosens by turning counterclockwise, while the left pedal loosens clockwise. This is because each pedal has threads designed to tighten in the direction of your pedaling.
Can I Use Regular Grease Or Should I Buy Special Bike Grease?
Regular multipurpose grease works, but bike-specific grease is better. It withstands moisture and vibration, which are common in cycling.
What If My Pedal Is Stuck And Won’t Come Off?
Apply a penetrating lubricant to the thread area, wait 10–15 minutes, then try again. Use a longer wrench for more leverage, but never force it to avoid damaging the crank.
Do I Need To Replace Both Pedals At The Same Time?
No, but it’s best to replace both for even performance and wear. Mixing old and new pedals can feel unbalanced and may cause one side to wear faster.
How Tight Should I Make My Pedals?
Pedals should be firmly snug, about 35–40 Nm of torque. If you don’t have a torque wrench, tighten by hand until secure, then add an extra quarter turn with your wrench.
Changing your bike pedals is a simple job once you understand the process. By following these steps and using the right tools, you’ll keep your bike in top condition and enjoy a safer, more comfortable ride. Taking time to do it right helps you avoid costly mistakes and keeps you confident on every journey.