Working on your own dirt bike can be both rewarding and cost-effective, especially when it comes to maintaining the wheels. A true wheel spins straight, without side-to-side wobble or uneven up-and-down motion. If your wheel is out of true, you’ll feel vibrations, notice uneven tire wear, and possibly damage your bike’s suspension or frame. For riders who want a smoother ride, understanding how to true a dirt bike wheel is a valuable skill. This guide explains each step and shares tips to help even first-timers get solid results.
What Is Wheel Truing And Why Does It Matter?
Wheel truing means adjusting the tension of the spokes so the wheel spins straight and round. Wheels go out of true over time, especially after hard riding, jumps, or hitting rocks. An out-of-true wheel can cause:
- Poor handling: The bike won’t track straight and might pull to one side.
- Premature tire wear: The tire doesn’t contact the ground evenly.
- Brake problems: Especially with disc brakes, the rotor may rub.
- Extra stress on spokes and hubs: Can lead to expensive repairs.
A well-trued wheel makes riding safer, more comfortable, and prolongs the life of your bike.
Tools And Workspace Preparation
Before starting, you need some basic tools and a clean workspace. Here’s what you should have:
- Spoke wrench: Sized to fit your bike’s spoke nipples.
- Truing stand: Holds the wheel and allows you to spin it. If you don’t have one, you can use your bike’s forks with the wheel off the ground.
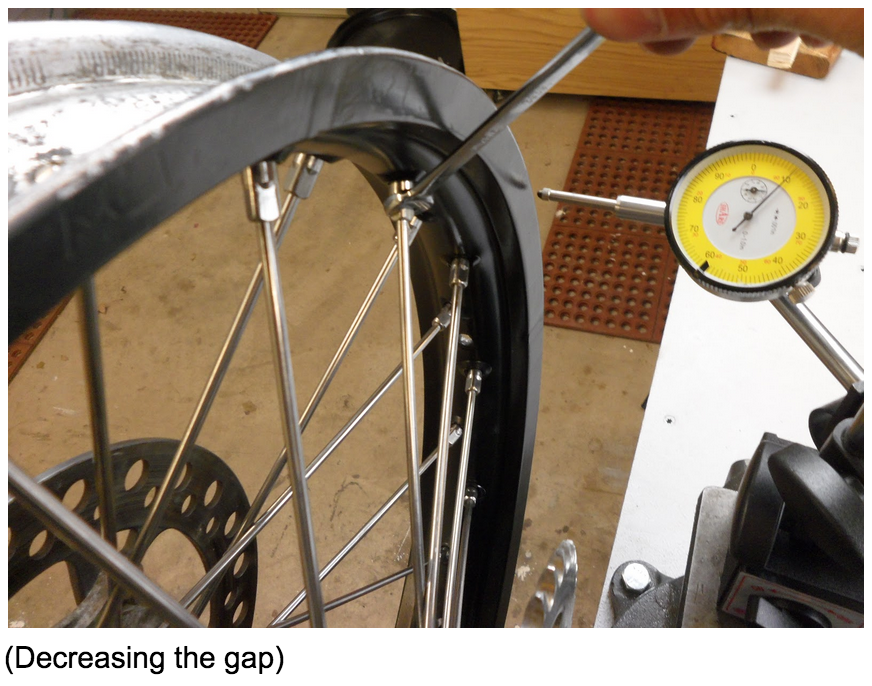
- Dial indicator or zip ties: For checking side-to-side and up-and-down movement.
- Tire lever: If you need to remove the tire for better access.
- Lubricant: A drop of oil or spoke prep helps free stuck nipples.
- Rag: To clean the wheel and spokes.
- Permanent marker or chalk: For marking problem spots.
Tip: Always use the correct size spoke wrench. The wrong size can strip spoke nipples, making truing much harder.
Understanding Dirt Bike Wheel Anatomy
To true a wheel, you need to know the main parts:
- Rim: The metal ring holding the tire.
- Spokes: Thin rods connecting the rim to the hub.
- Nipples: Small nuts at the end of each spoke, used for adjustment.
- Hub: The wheel’s center, connected to the axle.
Dirt bike wheels usually have 32, 36, or 40 spokes, arranged in a cross pattern for strength.
Getting Started: Removing And Inspecting The Wheel
- Remove the wheel: Use the proper wrenches to loosen the axle and slide the wheel out.
- Clean the wheel: Dirt hides cracks or bent spokes. Use a rag and mild cleaner.
- Inspect for damage: Look for bent rims, broken or missing spokes, and cracks. Replace any damaged parts before truing.
- Spin the wheel: Hold it by the axle and spin. Watch for obvious wobbles or hops.
If the rim is severely bent or has a flat spot, truing won’t fix it—you’ll need a replacement.
Mounting The Wheel For Truing
Place the wheel in a truing stand, or use your bike’s frame and zip ties as indicators:
- Attach a zip tie to the fork or swingarm so its tip nearly touches the rim.
- As you spin the wheel, the zip tie will click against high spots, showing where the rim is out of true.
Pro tip: For beginners, using two zip ties (one for side-to-side, one for up-and-down) makes it easier to see both types of movement.
Identifying The Types Of Wheel Wobble
There are two main problems:
- Lateral (side-to-side) wobble: The rim moves left or right as it spins.
- Radial (up-and-down) hop: The rim has high and low spots, making the wheel bounce.
You may see both at once. Address lateral truing first, then radial.

Credit: www.youtube.com
Adjusting Spoke Tension: The Basics
Each spoke pulls the rim toward the hub. Tightening a spoke (clockwise) pulls the rim toward that spoke. Loosening (counterclockwise) lets the rim move away.
- Left-side spokes pull the rim left.
- Right-side spokes pull the rim right.
Never adjust just one spoke at a time. Work in small increments—usually 1/4 turn per adjustment.
Beginner insight: Spokes work in pairs. Tightening one side and loosening the opposite helps move the rim efficiently without over-stressing the wheel.
Step-by-step: How To True A Dirt Bike Wheel
Follow this sequence for best results:
1. Check Overall Spoke Tension
Squeeze pairs of spokes together with your fingers. They should feel firm but not rock-hard. If some are very loose, tighten them gently before starting truing.
2. Locate The Main Wobble
Spin the wheel and use your indicator (zip tie or dial gauge) to find the widest point of the wobble. Mark it with your marker.
3. Make Small Adjustments
At the high spot:
- If the rim is left of center, tighten right-side spokes and loosen left-side spokes near that spot.
- If the rim is right of center, do the opposite.
Work on 2-3 spokes at a time around the problem area. Turn each spoke nipple only 1/4 turn, then spin and re-check.
4. Move To The Next Spot
Continue around the rim, adjusting and re-checking. Don’t rush—small, careful adjustments prevent over-correction.
5. Check For Radial Hops
Once lateral wobble is minimized, move your indicator to the outer edge to watch for hops.
- At a high spot (rim closer to the hub), tighten both left and right spokes near that area.
- At a low spot (rim farther from the hub), loosen both sides slightly.
Again, adjust only a few spokes at a time.
6. Retension And Recheck
When the wheel spins mostly true, go around and gently snug any slightly loose spokes. Don’t overtighten—this can crack the rim.
Real-world tip: Most pro mechanics spin the wheel after every few adjustments to double-check progress. Patience leads to better results.
How Tight Should Dirt Bike Spokes Be?
Spoke tension is critical. Too tight, and you risk damaging the rim or hub. Too loose, and the wheel won’t stay true.
Guidelines:
- Most dirt bike wheels need about 40–60 inch-pounds of tension.
- If you don’t have a spoke tension gauge, use feel: All spokes should have similar tension.
- Listen for a “ping” when tapping with a wrench; dull sounds mean loose spokes.
Non-obvious insight: Spoke tension can vary slightly around the wheel, especially with older rims. Aim for balance, not perfection.
Common Mistakes To Avoid
- Turning spoke nipples too far at once: Big adjustments can make the wheel worse.
- Ignoring loose or broken spokes: Always replace or tighten before truing.
- Using the wrong spoke wrench: This damages the spoke nipple and makes adjustment difficult.
- Forgetting to check radial and lateral movement: Both must be checked for a properly trued wheel.
- Overtightening: This can cause the rim to crack, especially on lightweight dirt bikes.
- Not using any lubricant: Dry spoke nipples can seize, making future adjustments impossible.
When To Seek Professional Help
Truing a mildly out-of-true wheel is a good DIY project. But if you see:
- Cracked rims or hubs
- Several broken or missing spokes
- Large flat spots
- Severe wobbles (over 5mm side-to-side)
Take the wheel to a pro. They have better tools and experience for major repairs.
How Often Should You True Your Dirt Bike Wheel?
- Race riders: Check wheels after every race or hard ride.
- Regular riders: Check every few months, or anytime you feel new vibrations.
- After new spokes or rim: Recheck tension after the first few rides, as new spokes can loosen.
Pro tip: Truing takes practice. If your first try isn’t perfect, that’s normal—small improvements each time lead to a better wheel.

Credit: www.youtube.com
Example: Diy Vs. Shop Truing
Here’s a quick comparison to help decide if you should do it yourself or visit a bike shop.
| Aspect | DIY Truing | Professional Truing |
|---|---|---|
| Cost | Low (just tools) | Medium–High ($25–$60 per wheel) |
| Time Needed | 1–2 hours for beginners | 1–3 days turnaround |
| Precision | Good with practice | Very high, with tension balancing |
| Learning | High skill development | N/A |
Dirt Bike Wheel Types And Truing Difficulty
Not all wheels are the same. Here’s how common dirt bike wheels compare for truing difficulty:
| Wheel Type | Number of Spokes | Truing Difficulty |
|---|---|---|
| Standard steel | 36–40 | Easy–Moderate |
| Aluminum alloy | 32–36 | Moderate |
| High-performance (enduro/race) | 32–40 | Moderate–Hard |
Non-obvious insight: Wheels with more spokes are generally stronger and easier to true precisely, as each adjustment has less impact on rim position.
Credit: www.diymotofix.com
Practical Tips For First-timers
- Always write down spoke tension before starting, if possible.
- Take a photo of spoke patterns if you plan to remove spokes.
- Never skip cleaning—dirt hides damage.
- Use a light oil on spoke threads for easier adjustments.
- If unsure, practice on an old wheel first.
After Truing: Final Checks
Once the wheel spins true:
- Recheck spoke tension all around.
- Make sure no spokes are rattling loose.
- Install the wheel back on your bike.
- Test ride at low speed—listen for clicking or rubbing.
- Recheck after the first ride.
Proper truing is an ongoing process. Regular checks will keep your dirt bike rolling smoothly.
Frequently Asked Questions
How Do I Know If My Dirt Bike Wheel Needs Truing?
Signs include visible rim wobble, uneven tire wear, brake rubbing, or a “pulsing” feeling when riding. If you notice any, spin the wheel and watch for sideways or up-and-down movement.
Can I True A Wheel With A Tire Still Mounted?
Yes, but it’s easier with the tire off, especially for checking spoke tension and seeing the rim. For minor corrections, you can leave the tire on, but be careful not to damage the tube.
How Tight Should I Make The Spokes?
Spokes should be firm but not over-tightened. If you have a tension gauge, aim for 40–60 inch-pounds. Otherwise, make sure all spokes have similar tension and make a clear “ping” when tapped.
What If A Spoke Nipple Is Stuck?
Apply a drop of light oil and let it soak for a few hours. If it doesn’t loosen, avoid forcing it—stripped nipples are hard to fix. Sometimes, gentle heat helps, but only with caution.
Are There Resources For More Advanced Wheel Building?
Yes. For detailed guidance, consider reading guides from the Park Tool website. They offer step-by-step videos and troubleshooting for all wheel types.
Taking time to true your dirt bike wheel pays off in ride quality and safety. With patience and practice, you’ll improve your skills and enjoy smoother, more reliable rides—on or off the beaten path.