Removing the front wheel of a bike might sound simple, but doing it safely and correctly requires attention to detail. Whether you want to fix a flat tire, transport your bike, or clean it properly, knowing the right way to remove the front wheel is essential.
Many beginners worry about damaging the bike, losing small parts, or not being able to put the wheel back. With the right steps and a bit of care, you can remove your front wheel confidently, even if you have never done it before.
This guide covers all types of bikes, from city commuters to mountain bikes. It explains the differences between wheel attachment systems, shows practical tips to avoid common mistakes, and highlights what to do if the wheel feels stuck. After reading, you will know not just how to take the wheel off, but how to make the whole process smooth and stress-free.
Understanding Your Bike’s Front Wheel System
Before you begin, it’s important to know what kind of wheel attachment system your bike uses. Most modern bikes have either a quick release skewer or a thru-axle. Some older bikes and budget models may use bolt-on axles.
| Attachment System | Common On | Removal Tool Needed |
|---|---|---|
| Quick Release | Road, Hybrid, Entry MTB | None (by hand) |
| Thru-Axle | Modern MTB, High-end Road | Allen/Hex Key (often 5mm/6mm) |
| Bolt-On | Old/Low-cost Bikes | Wrench (usually 15mm) |
Knowing your system saves time and prevents damage. Most beginners forget to check this and only realize once they’re stuck.
Tools You May Need
For many bikes, you won’t need any special tools, but some require simple hand tools. Gather these before starting:
- Bicycle stand (optional, for stability)
- 5mm or 6mm Allen key (thru-axle)
- 15mm wrench (bolt-on axles)
- Gloves (to keep hands clean)
- Rag (for cleaning and wiping grease)
Keep all small parts like nuts, washers, or springs in a safe place to avoid losing them.
Preparing Your Bike
Proper preparation makes everything easier and prevents accidents or scratches.
- Shift the gears: Move the chain to the smallest front chainring (if you have gears). This gives more space for the wheel to come out.
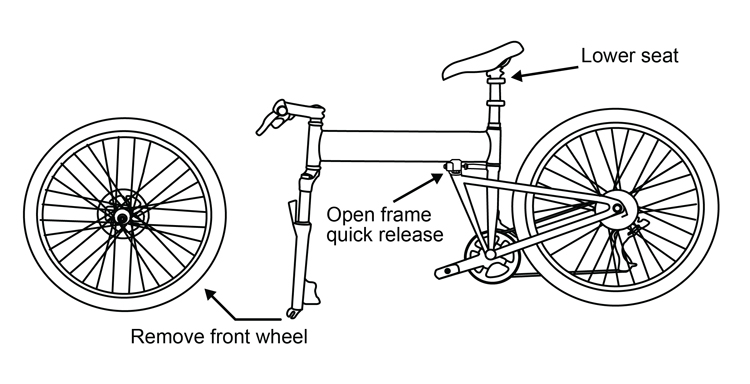
- Turn off brakes if needed: Some rim brakes (like V-brakes or caliper brakes) might pinch the tire, making it hard to remove the wheel. There is usually a small lever or button to release the brake tension.
- Flip the bike or use a stand: If you don’t have a bike stand, gently turn the bike upside-down, resting it on the saddle and handlebars. Place a towel underneath to protect the seat and controls.
- Check for accessories: Remove any fenders, lights, or mudguards that might block the wheel.
Removing A Quick Release Front Wheel
The quick release system is very common and designed for easy removal without tools.
- Open the lever: The quick release lever sits on one side of the axle. Pull it outwards to the open position.
- Loosen the nut: On the opposite side, turn the small nut a few times to loosen the tension. Do not remove it completely.
- Drop the wheel: Gently lift the fork and the wheel should slide down. If it doesn’t, check if the fork has safety tabs (“lawyer lips”)—these may require extra loosening.
- Remove the wheel: Once clear, pull the wheel out. Be careful if your bike has disc brakes; do not touch the rotor.
Non-obvious insight: Many beginners forget to loosen the nut enough to clear the safety tabs. Forcing the wheel out can bend the fork or damage the skewer.
Credit: countrystylechwf.com
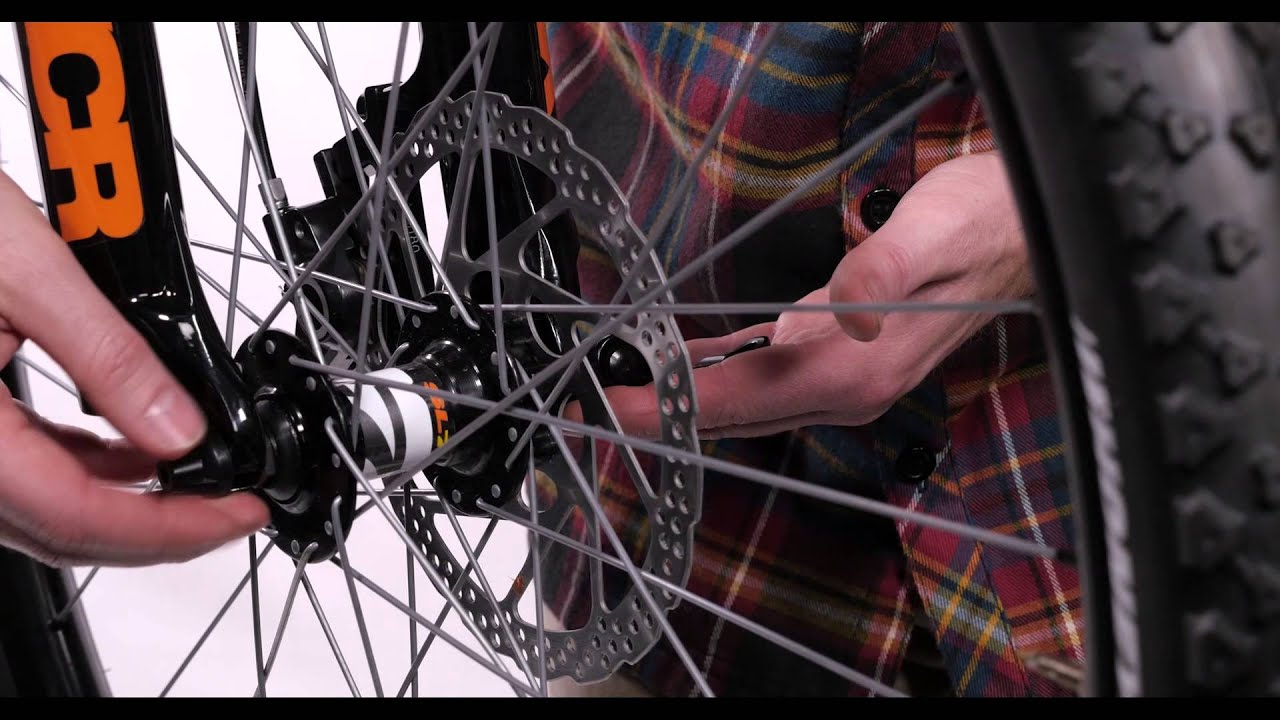
Removing A Thru-axle Front Wheel
Thru-axles are found on most high-end and mountain bikes. They are stiffer and require a tool.
- Locate the axle: Thru-axles look thicker and pass through the entire fork and hub.
- Unscrew the axle: Use the correct size Allen key (usually 5mm or 6mm). Turn counter-clockwise until the axle slides out.
- Support the wheel: As the axle comes out, hold the wheel to prevent it from falling.
- Remove the wheel: Gently pull the wheel down and out. Watch for disc brake rotors and do not touch them.
Practical tip: If the axle feels stuck, apply a little bicycle grease when you reinstall it. This prevents future sticking and makes removal easier.
Removing A Bolt-on Front Wheel
Less common now, bolt-on axles use nuts on each side.
- Use a wrench: Loosen both nuts (usually 15mm) by turning them counter-clockwise.
- Hold the wheel: As you loosen, support the wheel so it does not fall.
- Remove washers: Some bikes have small washers under the nuts. Take them off and keep safe.
- Pull the wheel out: Gently slide the wheel downward.
Beginner mistake: Not loosening both sides fully can make removal difficult and damage threads. Always check both nuts are free.
Dealing With Different Brake Types
Brakes can affect how easily the wheel comes out.
Rim Brakes
Rim brakes squeeze the wheel rim to stop the bike. Sometimes, the space is too narrow for the tire to pass.
- Release the brake: There is usually a small lever or button near the brake pads. Push or pull to release the tension.
- Check brake alignment: When reinstalling, make sure the brake pads do not rub the tire.
Disc Brakes
Disc brakes use a metal rotor attached to the wheel hub.
- Be careful with the rotor: Do not touch the disc with your fingers; oil or dirt can affect braking.
- Insert a spacer: If you leave the wheel off for a long time, put a clean spacer or piece of cardboard between the brake pads to prevent them from sticking together.
Drum Or Roller Brakes
These are rare but may be found on city bikes.
- Disconnect the brake cable: Look for a quick-release or simple nut to disconnect.
- Remove the wheel: Follow the bolt-on steps.
What To Do If The Wheel Is Stuck
Sometimes, the wheel feels stuck, even after all nuts or axles are removed.
- Check for hidden washers: Some bikes have anti-theft washers or spacers.
- Fork tabs: Safety tabs may need extra loosening of the quick release nut.
- Corrosion: On old bikes, rust can freeze the axle. Use a little spray lubricant and gently tap with a rubber mallet if needed.
- Brake interference: Make sure the brakes are fully released.
Never force the wheel out with excessive strength. If it does not come out with gentle pressure, double-check each step.
Credit: www.youtube.com
Comparing Removal Methods
Different systems make wheel removal easier or harder. Here’s a quick comparison:
| System | Ease of Removal | Tools Needed | Common Problems |
|---|---|---|---|
| Quick Release | Very Easy | None | Forgetting safety tabs, not opening brake |
| Thru-Axle | Moderate | Allen Key | Stuck axle, misaligned rotor |
| Bolt-On | Moderate | Wrench | Lost washers, overtightening |
Tips For Safe And Smooth Removal
- Protect your hands: Use gloves to avoid grease.
- Keep parts organized: Place all nuts, washers, or skewers in a small dish.
- Watch the fork: Support the bike when the wheel is out, as the fork may fall forward and get scratched.
- Check tire pressure: Sometimes, letting a little air out makes it easier to pass through tight brakes.
- Note the order of parts: Take a photo before disassembly if you are unsure about reassembly.
A common error is mixing up the order of springs and nuts on quick releases. Remember, the thin end of the spring faces inward toward the hub.
Reinstalling The Front Wheel
Getting the wheel back on is as important as taking it off.
- Align the wheel: Make sure the axle sits correctly in the fork dropouts.
- Secure the attachment: Tighten the quick release, thru-axle, or nuts firmly, but do not overtighten.
- Check the brakes: Reconnect and test the brakes before riding. Spin the wheel to make sure it does not rub.
- Test before use: Squeeze the front brake and rock the bike forward to check if the wheel is secure.
Non-obvious insight: Many people forget to center the wheel in the fork. A misaligned wheel can cause poor handling or brake rubbing.
Maintenance Tips After Removal
- Clean the axle and fork: Dirt and old grease can make future removal harder.
- Lubricate moving parts: A little grease on the axle threads or quick release skewer prevents rust.
- Inspect for wear: Check the axle, hub bearings, and brake pads for any damage or wear. Replace if necessary.
- Check for missing parts: Springs, washers, or nuts are small and easy to lose—make sure they are all present.
Regular maintenance not only makes removal easier next time but also improves the overall safety of your bike.

Credit: www.youtube.com
When To Remove The Front Wheel
There are many reasons you might need to remove the front wheel:
- Fixing a flat tire
- Transporting the bike in a car or bag
- Storing the bike in a small space
- Replacing the tire or tube
- Cleaning hard-to-reach areas
- Adjusting or servicing the brakes or fork
If you plan to travel with your bike, practice removing and reinstalling the wheel at home first.
Common Mistakes To Avoid
- Not supporting the fork: When the wheel is out, the fork can hit the ground and get scratched or bent.
- Forgetting brake release: Trying to force the wheel through closed brakes can damage the pads or rim.
- Losing small parts: Springs, washers, and nuts are easy to lose—always keep them together.
- Touching the disc rotor: Oil from your fingers can reduce braking power.
- Overtightening bolts: This can strip threads or damage the axle.
Learning from these mistakes can save you time and avoid unnecessary repairs.
Troubleshooting: What To Do If Something Goes Wrong
- Wheel will not come out: Double-check that all attachment points are loose and brakes are fully open.
- Axle will not move: Apply light lubricant and try again with the correct tool.
- Wheel does not spin freely after reinstalling: Ensure it is centered and the brakes are not rubbing.
- Strange noises after reinstalling: Check that all parts are tightened and in the correct order.
If you face a problem you cannot solve, consult your local bike mechanic. Sometimes, a second set of eyes can spot an issue quickly.
Safety Check Before Riding Again
Always perform a final safety check before riding:
- The wheel is centered and secure
- The quick release or bolts are tight (but not overtightened)
- The brakes work properly and do not rub
- The tire is inflated to the correct pressure
A quick test ride in a safe area can confirm everything is working well.
Frequently Asked Questions
How Do I Know If My Bike Has A Quick Release Or Thru-axle?
Quick releases have a lever that opens by hand, while thru-axles are solid and require an Allen key or sometimes a lever to remove. If you are unsure, check your bike’s manual or look for online guides with photos.
Do I Need To Deflate The Tire To Remove The Front Wheel?
Usually, you do not need to deflate the tire unless the brakes are very tight. If the wheel cannot fit through the brake pads, let out a little air until it passes easily.
Can I Remove The Front Wheel If My Bike Has Disc Brakes?
Yes, you can. Be careful not to touch the disc rotor and avoid squeezing the brake lever while the wheel is out. Insert a spacer between the pads if the wheel will be off for a while.
What Should I Do If I Lose A Washer Or Spring?
Replacement parts are available at most bike shops. Do not ride without all original parts. Each washer and spring helps keep the wheel secure and the attachment system working properly.
Is It Safe To Transport My Bike With The Front Wheel Removed?
Yes, many people do this for car transport or air travel. Always secure the fork to prevent damage, and keep all small parts together. Use a fork block or dropout protector if possible. For more detailed travel tips, see this guide.
Removing the front wheel of a bike is a simple skill that can save you time and money. With the right knowledge and a careful approach, you can handle this task with confidence. Remember to stay organized, work methodically, and always put safety first.
Once you are comfortable with the process, you will find it much easier to maintain, transport, and enjoy your bike wherever you go.