Checking the engine oil level in your bike is a small task, but it makes a big difference. Many riders forget it, but your engine’s health depends on oil. Not enough oil, and your engine can overheat or wear out fast.
Too much oil, and you risk leaks or damage. If you want your bike to run smooth and last longer, learning how to check the oil level is essential. The process is easy, but there are steps you must follow for an accurate reading.
In this guide, you’ll learn exactly how to check engine oil level in a bike, what tools you need, the most common mistakes, and extra tips that many beginners miss.
Why Checking Engine Oil Level Matters
Engine oil is more than just a lubricant. It keeps engine parts moving smoothly, reduces friction, and carries heat away from critical components. When oil levels are correct, your bike performs better and lasts longer. If the oil level drops too low, metal parts can grind together and cause damage.
Overfilled oil can also make the engine work harder and lead to leaks.
Many modern bikes have sensors, but these are not always reliable. Manual checking is still the best way to ensure the correct level. Even a small mistake can mean the difference between years of trouble-free riding and expensive repairs.
Tools And Materials Needed
To check your bike’s oil, you don’t need many tools, but a few items make the task cleaner and easier:
- Clean rag or paper towel – For wiping the dipstick or oil window.
- Gloves (optional) – If you want to avoid oil on your hands.
- Stable stand or center stand – To keep your bike upright and level.
- Owner’s manual – Check the correct oil checking method for your model.
- Good lighting – Helps you see oil level markings clearly.
Many bikes are checked with a dipstick; some use a sight glass. The process is similar but varies slightly. Always check your manual if you’re unsure.

Credit: www.youtube.com
Steps To Check Engine Oil Level In A Bike
Let’s break down the process. Following these steps closely will give you an accurate reading every time.
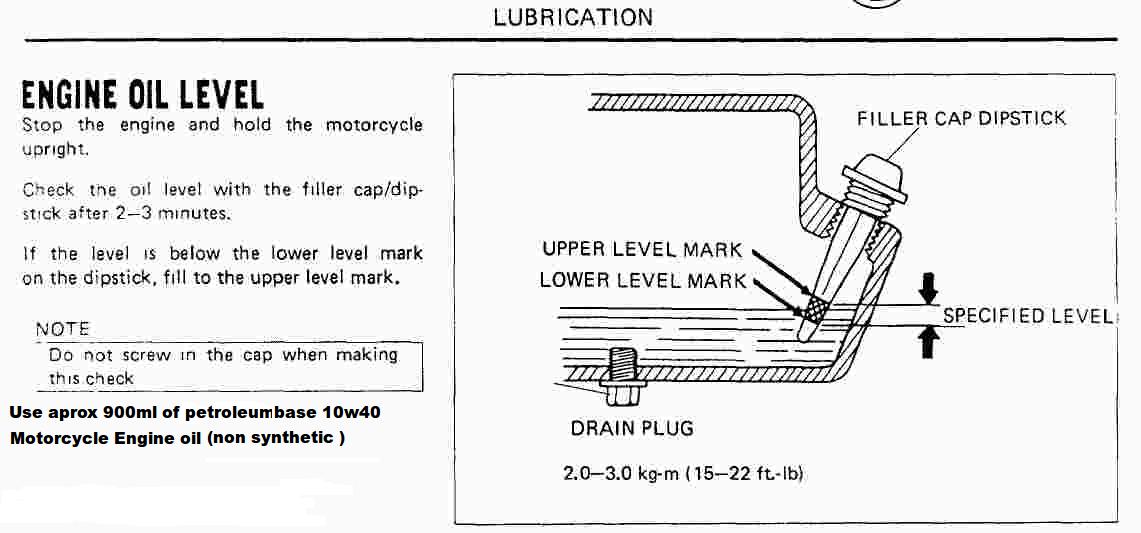
1. Warm Up Your Bike
Start your engine and let it idle for 2–3 minutes. This circulates the oil and brings it to normal operating temperature. Cold oil sits thicker and lower, which can give a false reading.
Tip: Do not check oil immediately after riding hard. Wait a few minutes for hot oil to settle.
2. Switch Off And Park On Level Ground
Turn off the engine. Place the bike on its center stand or keep it upright. Avoid checking the oil with the bike on its side stand, as it can cause a false low reading.
Non-obvious insight: Even a small tilt can change the reading by up to 10–20%. Always keep the bike perfectly vertical.
3. Locate The Dipstick Or Sight Glass
- Dipstick: Usually found on the engine case, often with a round, screw-in cap.
- Sight glass: A small window on the lower engine case.
If you’re not sure, your owner’s manual will show the exact location.
4. Clean The Area
Wipe dirt or oil around the dipstick or sight glass. This prevents contamination when you open the cap.
5. Remove The Dipstick (if Applicable)
For bikes with a dipstick:
- Unscrew and remove the dipstick.
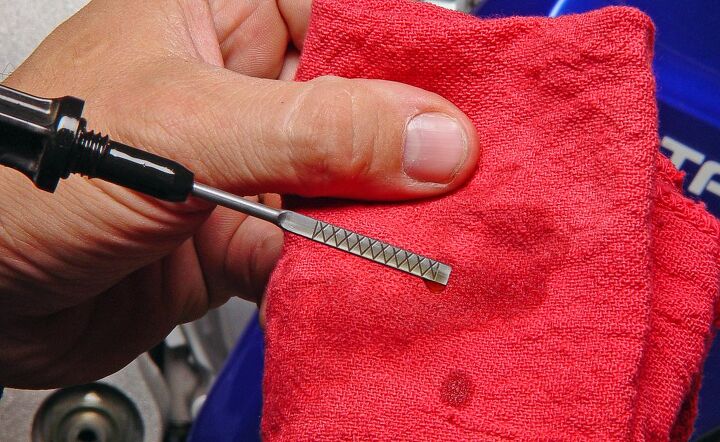
- Wipe it clean with your rag.
- Reinsert the dipstick fully (do not screw in, unless manual says so).
- Remove it again and check the oil level.
For sight glass bikes, simply look through the window.
6. Read The Oil Level
- On the dipstick, there are usually two marks: Low (L) and Full (F), or “Min” and “Max.”
- On the sight glass, oil should be between the two lines or dots marked on the casing.
| Indicator Type | Correct Oil Level | What to Do If Low |
|---|---|---|
| Dipstick | Between Min and Max | Add oil to reach Max |
| Sight Glass | Oil at center of window | Add oil slowly, check often |
If the oil is below the minimum, add oil slowly. If it’s above the maximum, drain some oil out—too much oil can cause foaming or leaks.
7. Top Up If Needed
Use only the recommended oil type and grade for your bike. Add small amounts at a time, checking the level after each addition. Overfilling is a common mistake.
8. Secure Everything
Replace the dipstick or cap tightly. If you spilled oil, clean up before starting the engine.
Extra tip: Some bikes require the dipstick to be screwed in for measurement, others do not. Always double-check your manual.
Common Mistakes To Avoid
Riders often make simple errors when checking oil. These can lead to incorrect readings or engine problems.
- Checking on a side stand – This always gives a low reading.
- Not warming up the engine – Cold oil sits lower and is harder to measure.
- Overfilling – Adding too much oil can cause leaks or frothing.
- Mixing oil types – Use only the type and grade listed in your manual.
- Forgetting to clean the dipstick – Old oil can hide the real level.
Another less-known mistake is not waiting long enough after turning off the engine. Oil takes a minute to settle in the crankcase. If you check too soon, you might overfill.
How Often Should You Check Oil Level?
Most manufacturers recommend checking the oil every 500–1000 km or at least once a month. If you ride in hot weather, dusty conditions, or do long trips, check more often. Older bikes or those with leaks may need weekly checks.
Data point: Studies show that regular oil checks can reduce engine wear by up to 30% compared to owners who check only during service visits.
Different Types Of Bikes And Oil Checking Methods
Not all bikes are the same. Here’s a quick comparison of the most common types and their oil checking process.
| Bike Type | Oil Check Method | Special Note |
|---|---|---|
| Standard/Commuter | Dipstick or sight glass | Upright position needed |
| Sport Bike | Sight glass | May need help to hold upright |
| Cruiser | Dipstick | Often checks unscrewed |
| Off-Road | Dipstick | Oil level critical for dusty use |
What If The Oil Looks Dirty Or Milky?
While checking the oil level, also look at the oil’s color and texture.
- Clean oil: Golden or light brown, transparent.
- Dirty oil: Dark brown or black, may need changing soon.
- Milky oil: White or foamy, could mean water is mixing with oil—a sign of a gasket leak or bigger problem.
If you see milky oil, do not ride. Get your bike checked by a mechanic.
Choosing The Right Engine Oil
Using the right oil is as important as the oil level itself. Your owner’s manual will specify the correct grade (like 10W-40 or 20W-50) and type (mineral, semi-synthetic, or full synthetic).
Quick Comparison Of Oil Types:
| Oil Type | Best For | Lifespan (km) |
|---|---|---|
| Mineral | Older bikes, easy riding | 2,000–3,000 |
| Semi-Synthetic | Daily commute, mixed use | 4,000–6,000 |
| Full Synthetic | Performance, sports, touring | 7,000–10,000 |
Non-obvious insight: Using a higher grade synthetic oil does not always give better protection unless your engine is designed for it. Always follow the manufacturer’s recommendation.
Credit: tboltusa.com
Signs Your Bike May Have Low Engine Oil
If you forget to check, your bike might show signs of low oil:
- Engine feels hot quickly
- Knocking or ticking sounds
- Oil warning light comes on
- Reduced acceleration
- Oil smell or smoke from exhaust
If you notice any of these, stop and check your oil as soon as possible.
What To Do If Oil Level Is Low
If you find your bike’s oil level is below the minimum:
- Add only the recommended oil type.
- Top up in small amounts, checking the level each time.
- Avoid overfilling.
- If oil keeps dropping fast, check for leaks or consult a mechanic.
Tip: Carry a small bottle of engine oil when traveling long distances.
When To Change The Engine Oil
Checking oil level is not the same as changing oil. Most bikes need an oil change every 3,000–6,000 km or every 6 months, whichever comes first. If oil looks dirty or the engine runs rough, change it sooner.
For more information on engine oil types and their function, you can read this Wikipedia article on Motor oil.
Frequently Asked Questions
How Do I Know If My Bike Has A Dipstick Or A Sight Glass?
Check your owner’s manual or look at the engine casing. A dipstick usually has a cap that you unscrew, while a sight glass looks like a small round window near the lower engine case.
Can I Check Engine Oil Right After Riding?
It’s best to wait a few minutes after switching off your bike. Hot oil needs time to settle back into the crankcase. Checking immediately can give a high reading.
Is It Bad To Overfill The Engine Oil?
Yes. Overfilling can cause oil to foam, reduce lubrication, and damage engine seals. Always keep the oil between the minimum and maximum marks.
How Often Should I Check My Bike’s Oil Level?
Check at least once a month, or every 500–1000 km. Check more often if you ride daily, in hot weather, or on long trips.
What Do I Do If My Oil Looks Milky?
Milky oil usually means water is mixing with the oil, possibly from a blown gasket. Do not ride your bike. Take it to a mechanic for inspection.
Caring for your bike’s engine oil is a simple habit that pays off with better performance and fewer breakdowns. By following these steps, you protect your engine and enjoy worry-free riding every time.
Credit: www.motorcycle.com