Attaching a bike trailer can transform your regular bicycle into a powerful tool for family adventures, grocery runs, or even light commuting. Many first-timers feel anxious about connecting a trailer, but the process is straightforward if you understand your bike and the trailer’s attachment system.
Done right, the trailer will stay secure and safe, giving you peace of mind while you ride.
Let’s dive into the entire process, from understanding trailer types to making sure your ride is stable and safe. Whether you’re carrying a child, a pet, or cargo, this guide gives you everything you need to attach a bike trailer confidently—even if you’re new to cycling.
Understanding Bike Trailer Attachment Types
Before you start, it’s important to know that not all bike trailers attach the same way. The way you connect your trailer depends on its hitch system and your bike’s frame type.
Common Hitch Systems
1. Axle-mounted Hitches
These attach directly to your bike’s rear axle. They’re popular because they’re strong and can handle bumps well. Many child and cargo trailers use this method.
2. Seat Post Hitches
These clamp onto the seat post. They’re easier to install and remove but may not be as stable for heavy loads.
3. Chainstay Hitches
Less common, these attach to the chainstay tube (part of the bike frame near the rear wheel). They work best for lightweight trailers.
4. Quick-release Hitches
Designed for bikes with a quick-release skewer on the rear wheel. These replace the skewer with a special one that includes a hitch point.
Which Hitch Is Best For You?
The right hitch depends on your needs. If you’re carrying children or heavy cargo, axle-mounted hitches are the safest and most stable. For light loads or occasional use, a seat post hitch may be enough. Always check your bike’s compatibility—some carbon frames or disc brakes need special adapters.
What You Need Before Attaching
Gather these items before starting:
- Bike trailer with all parts (hitch, safety strap, pins)
- Wrenches or Allen keys (usually 15mm or 5/6mm)
- Bike owner’s manual (for axle info)
- Trailer manual
- Adapter kit (if your bike has a thru-axle or disc brakes)
- Lubricant (optional, for stuck bolts)
Inspect your bike and trailer for any damage before connecting. Check tire pressure, as towing adds weight.
Step-by-step: How To Attach A Bike Trailer
Let’s walk through the process for the most common attachment—an axle-mounted hitch. If you have a different system, the steps are similar but check your trailer’s manual for details.
1. Prepare Your Bike
Shift your bike into a low gear to make handling easier. Prop your bike upright—use a kickstand if you have one, or lean it gently against a wall.
2. Remove The Rear Wheel (if Needed)
Many axle-mounted hitches require you to remove the rear wheel’s skewer:
- Use a wrench or quick-release lever to loosen the axle nut or skewer.
- Slide the wheel slightly out if needed.
If your trailer uses a quick-release hitch, you’ll replace the skewer entirely.
3. Attach The Hitch Connector
- Place the hitch connector onto the axle (or quick-release skewer).
- Make sure the connector sits flat against the bike frame.
Some hitches have a “tab” or “slot” that fits into the frame for extra security.
- If you use a thru-axle or special frame, install the adapter first (follow the adapter instructions).
4. Reinstall The Rear Wheel
- Slide the wheel back into place, making sure the hitch stays aligned.
- Tighten the axle nuts or quick-release lever firmly. The wheel should spin freely with no wobble.
5. Connect The Trailer Arm
- Line up the trailer arm (the metal bar coming from the trailer) with the hitch connector.
- Insert the hitch pin or locking bolt through the holes.
Most systems use a pin with a spring clip or a locking mechanism to keep it secure.
6. Attach The Safety Strap
Always use the safety strap. Wrap it around the bike frame or axle, then clip it back to the hitch arm. This backup strap will keep the trailer attached if the main hitch fails.
7. Check Everything
- Wiggle the trailer. There should be little or no movement at the hitch.
- Spin the rear wheel to check for rubbing or interference.
- Make sure all pins, clips, and bolts are tight and locked.
Attaching A Seat Post Or Chainstay Hitch
If your trailer uses a seat post or chainstay hitch, you won’t need to touch the rear wheel.
- Open the clamp on the trailer’s hitch arm.
- Slide it onto your seat post (or chainstay).
- Tighten the bolts or quick-release lever until snug.
- Attach the safety strap as above.
This type is easier for quick changes but check the clamp regularly, as it can loosen over time.
Special Situations: Disc Brakes, Thru-axles, And E-bikes
Many modern bikes have disc brakes or thru-axles. These features sometimes need special adapters for trailer hitches.
- Disc brake bikes: Check for enough space between the disc and frame. Some hitches won’t fit without a spacer.
- Thru-axles: You’ll need a thru-axle adapter. These replace your original axle with one designed for a hitch.
- E-bikes: The motor or wiring may block the hitch. Check with your bike or trailer manufacturer for compatibility.
If you’re unsure, your local bike shop can recommend the right adapter.
Comparing Common Hitch Systems
Here’s a simple comparison to help you decide which hitch works best for your setup.
| Hitch Type | Best For | Installation Ease | Stability |
|---|---|---|---|
| Axle-mounted | Child/Cargo | Moderate | High |
| Seat post | Light loads | Easy | Medium |
| Chainstay | Small trailers | Easy | Low-Medium |
| Quick-release | Varied | Moderate | High |

Credit: www.wikeeurope.com
Safety Checks Before Your First Ride
It’s tempting to hit the road right away, but a few extra checks make a big difference in safety and handling.
Trailer Stability
- Pull the trailer by hand first. Listen for rattles or movement.
- Check for any gaps or misalignment at the hitch.
- Make sure the trailer wheels are fully attached and inflated.
Bike Handling
- Try a short ride in a quiet area.
The bike will feel heavier and longer, especially when turning.
- Test braking. With a trailer, you need more stopping distance.
Passenger Safety
- For child trailers: Buckle all harnesses, close windows/doors, and add a helmet (if required by law).
- For pets: Use a leash or harness to prevent jumping out.
- For cargo: Secure loose items so they don’t shift.
Mistakes To Avoid
Attaching a bike trailer sounds simple, but some easy-to-miss mistakes can lead to trouble:
1. Not Using The Safety Strap
Skipping the strap means a single failure could separate the trailer from your bike.
2. Loose Bolts Or Pins
Always double-check every bolt, pin, and clip before riding.
3. Wrong Hitch Type
Using the wrong hitch for your bike or trailer may cause poor handling or damage.
4. Overloading
Never exceed the trailer’s weight limit. Too much weight can damage your bike or trailer and make riding dangerous.
5. Ignoring Tire Pressure
Low tire pressure increases drag and risk of a flat.
Practical Tips For A Smooth Ride
A few expert tricks can make towing a trailer much easier, especially if you’re new to the experience.
- Practice in an empty parking lot. Get used to wider turns, slower stops, and the extra length.
- Use a mirror. A handlebar or helmet mirror helps you keep an eye on the trailer.
- Plan your route. Avoid steep hills, tight trails, or heavy traffic if possible.
- Signal early. Cars and other cyclists may not expect your longer, slower bike.
- Check the trailer often. After your first few rides, stop and inspect all attachment points.
How Bike And Trailer Types Affect Attachment
Not all bikes are created equal. Here’s how your bike type can change the attachment process:
- Road bikes: Lightweight frames may need special adapters. Avoid overloading.
- Mountain bikes: Usually strong enough for most trailers but check for disc brake clearance.
- Hybrid/commuter bikes: Generally easiest to attach trailers to.
- Folding bikes: Many won’t fit standard hitches.
- Fat bikes: Wider axles need special hitches.
Likewise, the trailer type matters:
- Single-wheel trailers: Attach only at the axle or quick-release.
- Two-wheel trailers: More forgiving, but still need the right hitch.
If you’re unsure, check your bike and trailer manuals or ask a local bike shop.

Credit: www.youtube.com
Sample Installation: Attaching A Popular Kid Trailer
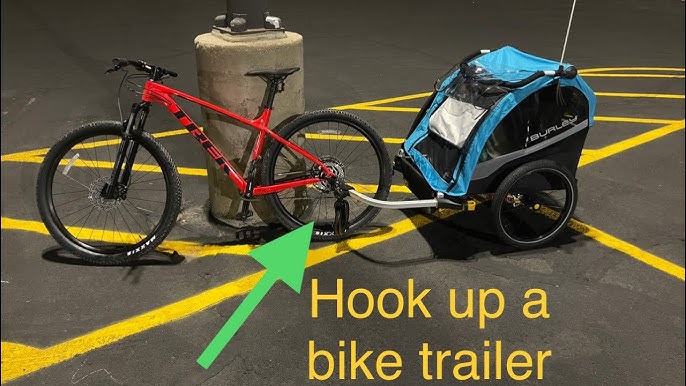
Let’s look at a real-world example. The Burley Bee is a well-known child trailer. Here’s how you’d attach it:
- Remove your bike’s rear quick-release skewer.
- Slide the Burley hitch onto the skewer, flush with the frame.
- Reinstall the skewer and tighten.
- Attach the trailer arm to the hitch with the included pin.
- Wrap the safety strap around the frame.
- Double-check all connections.
This process takes about 10 minutes the first time. After that, connecting or removing the trailer takes less than two minutes.
Durability And Weather Considerations
Bike trailers and hitches are built for outdoor use, but maintenance extends their life.
- After rain or snow: Dry and lubricate moving parts to prevent rust.
- Check for wear: Inspect the hitch, pins, and straps for signs of damage.
- Winter riding: Use extra caution—ice and snow reduce traction, and salt can corrode metal parts.
If you ride often in bad weather, consider a trailer cover or fenders for added protection.
Cost Comparison: Axle Adapter Kits
Some bikes need an adapter kit to fit a trailer. Here’s a quick look at typical prices and value.
| Adapter Type | Average Price (USD) | Compatible With | Notes |
|---|---|---|---|
| Standard axle hitch | 15-25 | Most bikes | Fits regular axles |
| Thru-axle adapter | 45-75 | Disc brake/thru-axle bikes | Bike-specific sizing |
| Seat post clamp | 10-20 | Seat post hitches | Less stable |
It’s worth investing in the right adapter for safety and peace of mind.
Cleaning And Maintenance After Each Use
Keeping your trailer and hitch clean makes attachment and removal easier and extends their lifespan.
- Wipe off dirt and road salt after each ride.
- Check for loose bolts and retighten as needed.
- Lubricate moving parts (like pins or hinges) once a month.
- Store indoors if possible to prevent rust.
A clean, well-maintained trailer is safer and more enjoyable to use.
Credit: www.youtube.com
When To Seek Professional Help
If you’re struggling to fit the hitch, or if your bike doesn’t seem compatible, don’t force it. A professional at your local bike shop can check fit, recommend adapters, and install the trailer safely. Many shops will do this for a small fee, and you’ll get peace of mind knowing it’s done right.
For more on hitch systems and trailer safety, check out the Wikipedia page on bicycle trailers.
Frequently Asked Questions
How Much Weight Can A Bike Trailer Carry?
Most child trailers can carry 40–100 lbs (18–45 kg), while cargo trailers range from 60–125 lbs (27–57 kg). Always check your trailer’s manual—overloading is dangerous and can damage your bike or trailer.
Can I Attach A Trailer To Any Bike?
Not all bikes are compatible. Most hybrids, mountain bikes, and some road bikes work with standard hitches. Bikes with thru-axles, disc brakes, or carbon frames may need special adapters or may not be suitable. Check compatibility before buying.
Do I Need Tools To Attach A Bike Trailer?
Usually, you’ll need a wrench or Allen key to install the hitch. Some trailers (especially seat post types) use quick-release levers and need no tools. Always keep the basic tools with you for adjustments.
Is It Safe To Ride In Traffic With A Trailer?
Yes—if your trailer is attached correctly and you follow road rules. Use reflectors, flags, and lights on the trailer. Ride defensively, signal early, and avoid busy streets if possible, especially if you’re new to towing a trailer.
Can I Use A Bike Trailer With An E-bike?
Many e-bikes can pull trailers, but check that the motor or battery doesn’t block the hitch. Some e-bikes have special frames or wiring. Always check with your e-bike and trailer manufacturers for compatibility.
Attaching a bike trailer is a skill that opens up new adventures and practical options. With the right hitch, proper safety checks, and regular maintenance, you’ll find it’s easier and more rewarding than you might expect. Enjoy the ride!