So you want to build a bobber bike—a motorcycle stripped down to its purest form, with a low-slung look and a rebellious spirit. It’s more than just a project; it’s a journey into custom culture, mechanical skills, and personal style. This guide will walk you through every step, from planning to riding. Whether you’re a beginner or have some garage experience, you’ll find answers, practical tips, and insights that can save you time and money.
What Is A Bobber Bike?
A bobber is a custom motorcycle with a minimalist design. The term “bobber” comes from the practice of “bobbing” or shortening the fenders and removing unnecessary parts to make the bike lighter and sleeker. Bobbers often have a solo seat, a simple paint job, and a tough, no-nonsense look. Unlike choppers, bobbers keep the frame close to stock, making them easier to build at home.
Planning Your Bobber Build
Before picking up a wrench, you need a clear vision. Planning will help you avoid costly mistakes and wasted time.
1. Set Your Budget
Building a bobber can cost anywhere from $2,000 to $10,000, depending on the parts, tools, and whether you’re buying new or used. Make a list of essential expenses: donor bike, tools, parts, paint, and registration fees.
2. Choose Your Donor Bike
Popular choices include older Harley-Davidson Sportsters, Honda Shadows, and Yamaha XS650s. These bikes have simple frames and good parts availability.
3. Decide Your Style
Look at pictures for inspiration. Do you want a classic 1940s look or something more modern? Decide on color, handlebars, wheels, and seat type early.
4. Check Local Laws
Some modifications are not street-legal everywhere. Check your local DMV rules for issues with fenders, lights, or exhaust noise.
Pro Tip: Many beginners forget to budget for small items like cables, wiring, and hardware. These can add up quickly.
Gathering Tools And Workspace
You don’t need a professional workshop, but some basic tools are necessary.
| Essential Tools | Optional Upgrades |
|---|---|
| Socket set (metric/SAE) | Welder (MIG/TIG) |
| Wrenches and screwdrivers | Angle grinder |
| Jack or motorcycle lift | Torque wrench |
| Drill and bits | Air compressor |
| Wire cutters and strippers | Paint sprayer |
Make sure you have a clean, well-lit space. A simple garage works fine if it’s dry and secure.
Non-obvious insight: Keep a digital camera or your phone handy. Take photos as you disassemble your donor bike. This helps a lot during reassembly.
Stripping Down The Donor Bike
This is where the transformation begins.
1. Remove Unnecessary Parts
Take off the front and rear fenders, passenger seat, side covers, and any plastic trim. Remove the stock mirrors and turn signals if you plan to use custom ones.
2. Label Everything
As you remove parts, label wires, bolts, and connectors. Store small items in zip-lock bags.
3. Inspect The Frame
Check for rust, cracks, or damage. If you find serious issues, repair them before moving ahead.
Caution: Some bikes have integrated electrical systems. Cutting the wrong wire can disable the ignition or lights. Study your wiring diagram and work slowly.
Customizing The Frame
A true bobber has a “bobbed” look—simple, clean, and often with a lower stance.
Rear Fender And Frame
Most bobbers use a short rear fender, sometimes mounted close to the tire.
- Cut the stock rear fender or buy a bobber fender.
- Some builders “hardtail” the frame—removing rear suspension for a rigid look. This is optional but traditional.
- Weld or bolt fender struts for support.
Seat Setup
Bobbers usually have a solo seat, often a springer type.
- Remove the passenger seat and mounts.
- Install a solo seat with springs or a custom bracket.
Practical example: On a Honda Shadow, you can use a universal solo seat kit with minor drilling.
Foot Controls
You may want to move the foot controls forward for a more relaxed ride. Forward controls kits are available for many models.
Wheels, Tires, And Suspension
A bobber’s stance depends a lot on its wheels and tires.
| Component | Bobber Style | Stock |
|---|---|---|
| Front Tire | 16-21” classic ribbed | 16-19” regular |
| Rear Tire | Wide, vintage look | Medium width |
| Rims | Spoked (chrome/black) | Spoked or alloy |
| Suspension | Lowered or rigid | Stock height |
- For a classic look, choose fat tires and spoked wheels.
- Lowering the suspension makes the bike look tougher, but can reduce comfort.
- If you keep the rear shocks, consider shorter shocks for a lower ride.
Common mistake: Using very wide tires can cause clearance problems with the chain or fender. Measure carefully before buying.

Credit: www.youtube.com
Handlebars, Controls, And Lighting
Handlebars change both style and comfort.
- Ape hangers (tall bars) create a dramatic look but can be tiring.
- Drag bars (straight, low) offer a more aggressive riding position.
- Mini apes and Z-bars are popular options.
Replace the grips, levers, and mirrors with styles that match your vision. For controls, you may need longer cables if using taller bars.
Lighting And Wiring
Bobbers often use:
- Small round headlights
- Bullet-style or vintage taillights
- Minimalist turn signals (sometimes hidden under seats or fenders)
If you change the lighting, check that the bulbs and wiring are compatible with your bike’s voltage.
Pro Tip: Use an aftermarket wiring harness if the stock one is too complex or damaged. This saves hours of troubleshooting.
Fuel Tank And Exhaust
Fuel Tank
A “peanut” style tank is common on bobbers—small, rounded, and simple.
- You can use a universal tank or modify the stock one.
- Make sure the petcock and fuel line fit your carburetor or injection system.
Exhaust
Custom pipes are almost expected on a bobber.
- Short, straight pipes give a raw sound but may be too loud for street use.
- “Fish tail” or “turn out” tips look classic.
- Always check local laws for noise limits.
Hidden insight: Wrapping exhaust pipes with heat tape not only adds style but protects your legs from burns.
Brakes And Safety
Never overlook safety. Upgrading brakes is smart, especially if you change wheels or add weight.
- Inspect brake pads, lines, and rotors. Replace if worn.
- Consider upgrading to steel-braided lines for better feel.
- Test all lights, horn, and signals before riding.
Some builders forget to adjust the rear brake after lowering the suspension, which can lead to poor braking performance.
Painting And Finishing Touches
Paint Transforms A Bobber From “project” To “pride.”
- Prep the frame and tank by sanding and cleaning.
- Use a primer before color. Two or three coats of paint, finished with a clear coat, give the best results.
- Pinstripes and old-school logos add personality.
If you’re not confident with spray painting, a local shop can do a basic tank for $150–$300.
Finishing touches include:
- Custom badges or decals
- Leather tool roll or saddlebag
- Vintage speedometer or minimalist digital display
Credit: everestkitchennc.com
Legal And Registration Steps
After building your bobber, you need to make it street-legal.
- Check all lights and signals for correct operation.
- Mount a license plate in a visible spot.
- Visit your local DMV for inspection, if required.
- Get insurance with your bike’s new specs.
Many new builders miss the step of updating the registration to reflect custom changes. This can cause trouble at inspection time.
First Ride And Adjustments
Your first ride is exciting, but go slow.
- Check all bolts and fasteners.
- Listen for strange noises.
- Test brakes and steering at low speed.
It’s common to find small issues—loose wires, rattling fenders, or sticky controls. Fix these before longer rides.

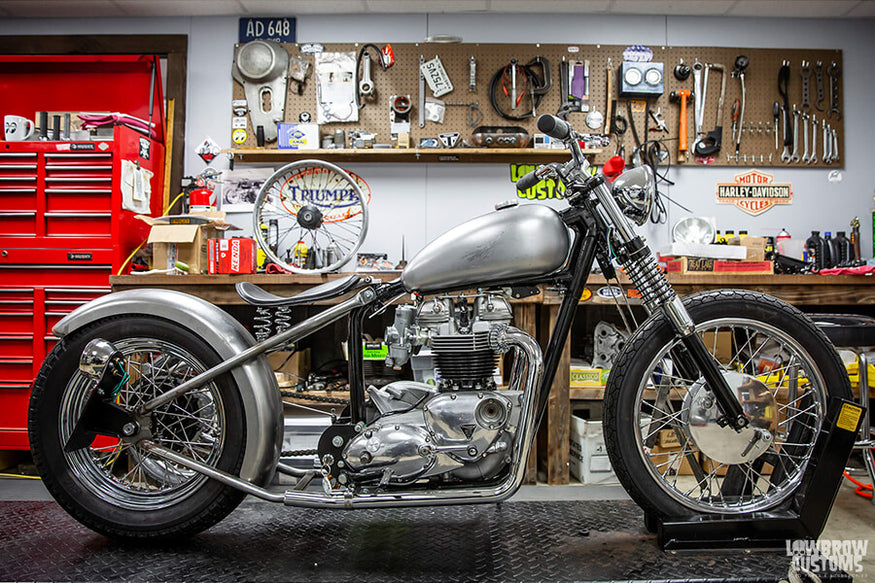
Credit: www.lowbrowcustoms.com
Costs And Timeline
Here’s a summary of the typical costs and time needed for a bobber build:
| Item | Budget Option | Premium Option |
|---|---|---|
| Donor Bike | $800 | $4000 |
| Parts & Upgrades | $600 | $3500 |
| Paint & Finish | $150 | $1000 |
| Tools | $200 | $1000 |
| Total | $1750 | $9500 |
| Time Required | 40–80 hours | 100+ hours (detailed custom work) |
Non-obvious insight: Buying a partially completed project can save you weeks of work, but make sure the previous builder did quality work.
Common Mistakes And How To Avoid Them
- Not planning wiring changes before cutting.
- Choosing parts that don’t fit your frame or wheels.
- Painting before test-fitting all parts.
- Forgetting to document changes for legal inspection.
Patience is key—rushing leads to costly errors.
Getting Inspiration And Help
Many builders share their process on forums and YouTube. If you get stuck, search for your donor bike model plus “bobber build. ” The community is friendly and happy to help.
For further reading and inspiration, check out the bobber motorcycle Wikipedia page.
Building a bobber bike is a rewarding challenge. Every decision, from fender length to paint color, becomes part of your story. Take your time, double-check your work, and enjoy the ride—not just the result.
Frequently Asked Questions
How Long Does It Take To Build A Bobber Bike?
Most first-time builders spend between 40 to 100 hours on a basic bobber project. If you’re learning as you go, expect a few months of weekend work.
What Is The Best Bike To Use For A Bobber Build?
Popular choices include the Harley-Davidson Sportster, Honda Shadow, and Yamaha XS650. These bikes have simple frames and lots of aftermarket support.
Do I Need Welding Skills To Build A Bobber?
Not always. Many parts can be bolted on with basic tools. However, for hardtail conversions or custom brackets, welding is helpful. If you don’t weld, a local shop can do these jobs for you.
Are Bobber Bikes Comfortable To Ride?
Bobbers look cool but often sacrifice comfort for style. Hardtail frames and thin seats can be rough on long rides. For daily use, keep some suspension and choose a padded seat.
Is It Legal To Ride A Custom Bobber On Public Roads?
Yes, if you follow local laws. Make sure your bike has working lights, signals, mirrors, and a license plate. Some modifications (like loud pipes or missing fenders) may not be legal everywhere, so check with your DMV.
Building your own bobber is more than just a project—it’s an experience. Every ride becomes a celebration of your creativity and hard work. Enjoy every mile!