Changing a tube on your bike may sound difficult, but with the right guidance, anyone can do it. Whether you ride for fun, fitness, or daily commuting, a flat tire can happen anytime. Knowing how to change a bike tube saves time, money, and frustration. Many new riders avoid learning this skill, thinking it is only for experts. In reality, with some simple tools and clear steps, you can fix a flat quickly and get back on the road. This guide covers everything you need—tools, step-by-step instructions, safety tips, and common mistakes to avoid.
Tools And Materials You Need
Before you start, gather the right tools. Having these ready will make the process smoother.
- Spare tube: Make sure it’s the correct size for your wheel (check the numbers on your tire).
- Tire levers: Two plastic levers help remove the tire without damage.
- Bicycle pump: A floor or hand pump, with a head that matches your valve type (Presta or Schrader).
- Patch kit (optional): Useful if you don’t have a spare tube.
- Gloves (optional): To keep hands clean.
- Multi-tool: Only needed if your bike has axle nuts or rim brakes that must be loosened.
Many people forget to check the valve type—Presta is skinny with a small nut, Schrader is wide like a car tire. Using the wrong pump or tube is a common beginner mistake.
Removing The Wheel From The Bike
You can’t change the tube with the wheel still on the bike. The process is different for front and rear wheels.
Removing The Front Wheel
- Shift your bike into the lowest gear if possible. This is not required for the front but helps if you are also removing the rear.
- Open the quick release lever or loosen the axle nuts using your multi-tool.
- Lift the wheel off the fork.
Removing The Rear Wheel
- Shift into the smallest rear gear (smallest cog). This makes it easier to remove and reinstall.
- Open the quick release lever or loosen the axle nuts.
- Pull the derailleur back gently and slide the wheel out.
Tip: If your bike has rim brakes, you might need to release them for the wheel to come out easily.
Releasing The Tire From The Rim
A flat tire means the tube is deflated, but sometimes the tire still sticks to the rim.
- Deflate the tube completely if any air remains.
- Press the tire’s sidewall away from the rim all the way around. This is called “breaking the bead.”
- Insert a tire lever under the edge (bead) of the tire and hook it to a spoke.
- Place the second lever a few inches away and lever the tire over the rim.
Sometimes one lever is enough, but stubborn tires need two. Avoid using metal tools, as they can damage the rim or pinch the tube.
Removing The Old Tube
Now you can take out the damaged tube.
- Pull one side of the tire off the rim fully.
- Find the valve and pull it out of the rim hole.
- Slide the rest of the tube out.
- Check the inside of the tire and the rim for sharp objects like glass or thorns.
Many people forget this last step and quickly get another flat. Even a tiny piece of glass can ruin your new tube.
Checking For Damage And Cleaning
Before inserting a new tube, examine everything carefully.
- Run your fingers along the inside of the tire to feel for sharp points.
- Check the rim tape (a strip covering the spoke holes) for cracks or movement.
- Inspect the tire for cuts, holes, or excessive wear.
A clean and undamaged tire is key for the new tube to last.
Preparing And Installing The New Tube
It’s time to get your new tube ready.
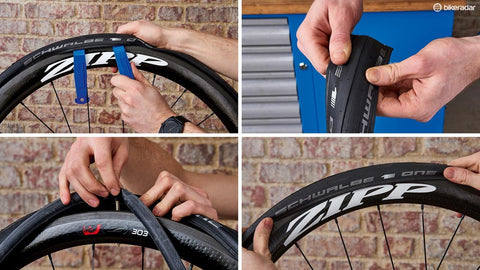
- Inflate the new tube just enough to give it shape (about one or two pumps).
- Place the valve through the rim hole, making sure it’s straight.
- Gently tuck the tube inside the tire all the way around.
A tube that is twisted or pinched during installation will fail quickly.
Credit: www.cycl.co.uk
Reinstalling The Tire Onto The Rim
This is the step where most beginners struggle.
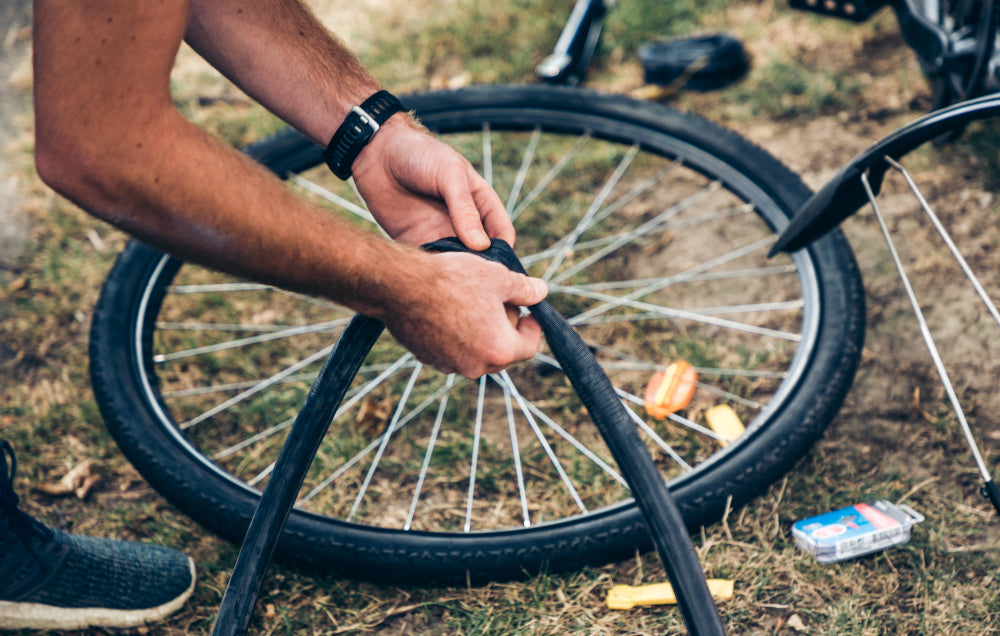
- Starting opposite the valve, use your thumbs to push the tire bead back inside the rim.
- Work around the wheel evenly, pushing small sections at a time.
- When you get to the last part, it may be tight. Use your tire levers only if necessary, and be careful not to pinch the tube.
Check that the tube is not sticking out anywhere and that the valve is straight.
Inflating The Tube
Now, you’re ready to add air.
- Attach the pump to the valve (open the Presta valve by unscrewing the small nut first).
- Inflate to the recommended pressure, written on the tire’s sidewall (often 40–60 psi for mountain bikes, 80–120 psi for road bikes).
- While inflating, check the tire all the way around to make sure the bead is seated and the tube isn’t bulging out.
Tip: If you hear a popping sound or see part of the tube, stop and fix it before continuing.
Credit: www.decathlon.com
Reinstalling The Wheel On The Bike
With the tube inflated and the tire seated, you can put the wheel back.
- For the front wheel, line up the axle with the fork and insert it fully.
- For the rear wheel, guide the chain onto the smallest cog and push the derailleur back as you lift the wheel into the dropouts.
- Tighten the quick release or axle nuts securely.
- Reconnect the brakes if you released them earlier.
Give the wheel a spin to make sure it is centered and not rubbing on the brakes.
Testing And Final Checks
Before you ride, do a quick check to avoid surprises.
- Squeeze the tire to ensure it is fully inflated.
- Spin the wheel and check for wobbles.
- Test the brakes.
- Listen for any unusual sounds.
If everything looks and feels right, you’re ready to ride.
Common Mistakes And How To Avoid Them
Even experienced riders make mistakes. Here are a few to watch out for:
- Pinching the tube with the tire lever during installation.
- Leaving sharp objects in the tire, causing another flat.
- Over-inflating the tube, leading to a blowout.
- Forgetting to check the valve type and using the wrong pump or tube.
- Not seating the tire bead properly, which can cause the tire to come off the rim.
Always take your time with each step, especially when you’re new to the process.
Example: Step-by-step Timeline
Here’s a realistic timeline for changing a tube if you’re a beginner:
| Step | Time Needed (minutes) |
|---|---|
| Gather tools | 2 |
| Remove wheel | 3 |
| Remove tire and tube | 5 |
| Check for damage | 2 |
| Install new tube | 4 |
| Reinstall wheel | 3 |
| Test and check | 1 |
A total of about 20 minutes is realistic for your first few tries. With practice, you can do it in under 10 minutes.
Comparing Patch Kit Vs. New Tube
Sometimes you don’t have a spare tube. Here’s how patching compares to replacing:
| Feature | Patch Kit | New Tube |
|---|---|---|
| Repair Time | 5–10 minutes | 3–5 minutes |
| Durability | Temporary | Permanent |
| Cost | Low | Medium |
| Tools Needed | Patch kit, sandpaper, glue | New tube, tire levers |
Using a new tube is faster and more reliable. Patch kits are good for emergencies or small punctures.
How To Choose The Right Tube Size
Picking the wrong size tube is a common problem. Here’s what to check:
- Wheel diameter: Usually 26″, 27.5″, 29″ for mountain bikes or 700c for road bikes.
- Tire width: Printed on the sidewall, such as 700x28c (700mm diameter, 28mm width).
- Valve type: Presta or Schrader.
If you are unsure, bring your old tube to the bike shop for a match.
| Tire Size Marking | Tube Size Needed | Valve Type |
|---|---|---|
| 26 x 1.75 | 26 x 1.5–2.1 | Schrader or Presta |
| 700 x 28c | 700 x 28–32c | Presta |
| 29 x 2.0 | 29 x 1.75–2.4 | Presta |
Always buy a tube within the range for your tire size. Too narrow or wide can cause poor fit or more flats.
Credit: www.youtube.com
Extra Tips For Success
- Carry a spare tube and levers on every ride, even for short distances.
- Practice at home before you need to fix a flat on the road.
- Use baby powder on the tube before installation. This can help prevent pinching.
- Keep your bike clean. Dirt makes it harder to see small cuts or sharp objects.
- Check tire pressure regularly to reduce the chance of flats.
One non-obvious insight: A slightly under-inflated tire is more likely to get a pinch flat, especially if you hit a pothole. Riding with the correct pressure protects both the tube and the rim.
Another: If you have “tubeless” tires, the process is different, as these use sealant instead of a tube. Make sure to know which system your bike uses.
Frequently Asked Questions
How Do I Know If My Tube Is Presta Or Schrader?
Presta valves are long and thin, often with a small nut at the top. Schrader valves look like car tire valves—short and wide. Check your tube before buying a replacement or a pump.
Can I Patch A Tube Instead Of Replacing It?
Yes, patching works for small punctures. However, a new tube is more reliable. Patching on the road is possible, but it may not last as long as a new tube.
What Should I Do If I Keep Getting Flats?
Check your tire and rim carefully for sharp objects. Make sure your tire pressure is correct. Sometimes cheap or old tires cause repeated flats. Consider upgrading to puncture-resistant tires.
Is It Safe To Ride Right After Changing A Tube?
Yes, if you followed all steps correctly. Spin the wheel and check that the tire is seated and the brakes work. If you hear any air escaping or see bulging, stop and recheck.
Where Can I Find More Detailed Maintenance Guides?
For more details about bike maintenance and repairs, check out guides from Sheldon Brown, a well-known expert in cycling.
Learning how to change a bike tube is a simple skill that gives you confidence and independence. With practice, you’ll be ready for any flat tire, anytime, anywhere. Take your time, follow the steps, and you’ll be back on your bike in no time.