Keeping your bike running smoothly is not just about riding; it’s about regular care, too. One of the most important—but often ignored—parts is the bike cassette. This group of sprockets at the back of your bike is where your chain meets the gears. Over time, it collects dirt, grime, and old lubricant. This can cause poor shifting, noisy rides, and even faster wear on your chain and cassette. Cleaning your cassette might look tricky, but with the right steps, it is straightforward and will make a big difference in your bike’s performance and your riding experience.
This article explains exactly how to clean a bike cassette, whether you are a casual rider or a dedicated cyclist. You will learn which tools to use, how often to clean, and what mistakes to avoid. You will also find easy-to-understand comparisons between cleaning methods, practical tips, and answers to common questions.
Let’s make your bike feel new again.
Why Cleaning Your Cassette Matters
Many riders focus on cleaning their frame or wheels, forgetting the drivetrain. The cassette collects the most dirt from the road and your chain’s lubrication. Over time, this grime causes:
- Poor shifting: Dirty cassettes make it harder to change gears smoothly.
- Chain wear: Grit between the teeth wears out your chain faster.
- Noise: Squeaking or grinding sounds often come from a dirty cassette.
- Expensive repairs: Replacing a worn cassette and chain costs much more than regular cleaning.
A clean cassette lasts longer and keeps your rides smooth. Neglecting it can mean more maintenance costs and a less enjoyable ride.
Tools And Materials You Need
You don’t need a workshop to clean your cassette, but some tools make the job easier. Here’s what you will need:
- Bike stand (optional, but very helpful)
- Cassette removal tool (lockring tool and chain whip) for deep cleaning
- Stiff brush or old toothbrush
- Degreaser (bike-specific or citrus-based)
- Rags or paper towels
- Bucket of warm water with mild soap
- Chain cleaning tool (optional)
- Gloves (to keep your hands clean)
- Lubricant (bike chain lube, not WD-40)
Pro tip: A cassette brush is shaped perfectly for cleaning between the sprockets. If you do not have one, an old toothbrush or even a wooden chopstick wrapped in a rag works well.
How Often Should You Clean Your Cassette?
How often you clean depends on your riding conditions:
- Every 100-200 km if you ride in wet, muddy, or dusty conditions.
- Every 300-400 km for dry road riding.
- After every ride if you notice sticky shifting or hear grinding noises.
Many beginners think they only need to clean when the bike looks dirty. In reality, most cassette wear happens before you see visible dirt. Regular, light cleaning is better than waiting for a deep clean.
Quick Clean Vs. Deep Clean: What’s Best?
There are two main ways to clean your cassette: with it on the bike (quick clean) or off the bike (deep clean). Both have advantages. Here’s a direct comparison:
| Cleaning Method | Time Needed | Tools Needed | Best For |
|---|---|---|---|
| Quick Clean (On Bike) | 10-20 minutes | Brush, rag, degreaser | Regular maintenance, after every few rides |
| Deep Clean (Off Bike) | 30-45 minutes | Cassette tool, chain whip, brush, degreaser | Heavy grime, after rain/mud, once a month |
Beginners often miss: Quick cleans are enough for light dirt, but only a deep clean will remove stubborn grime stuck between the sprockets.
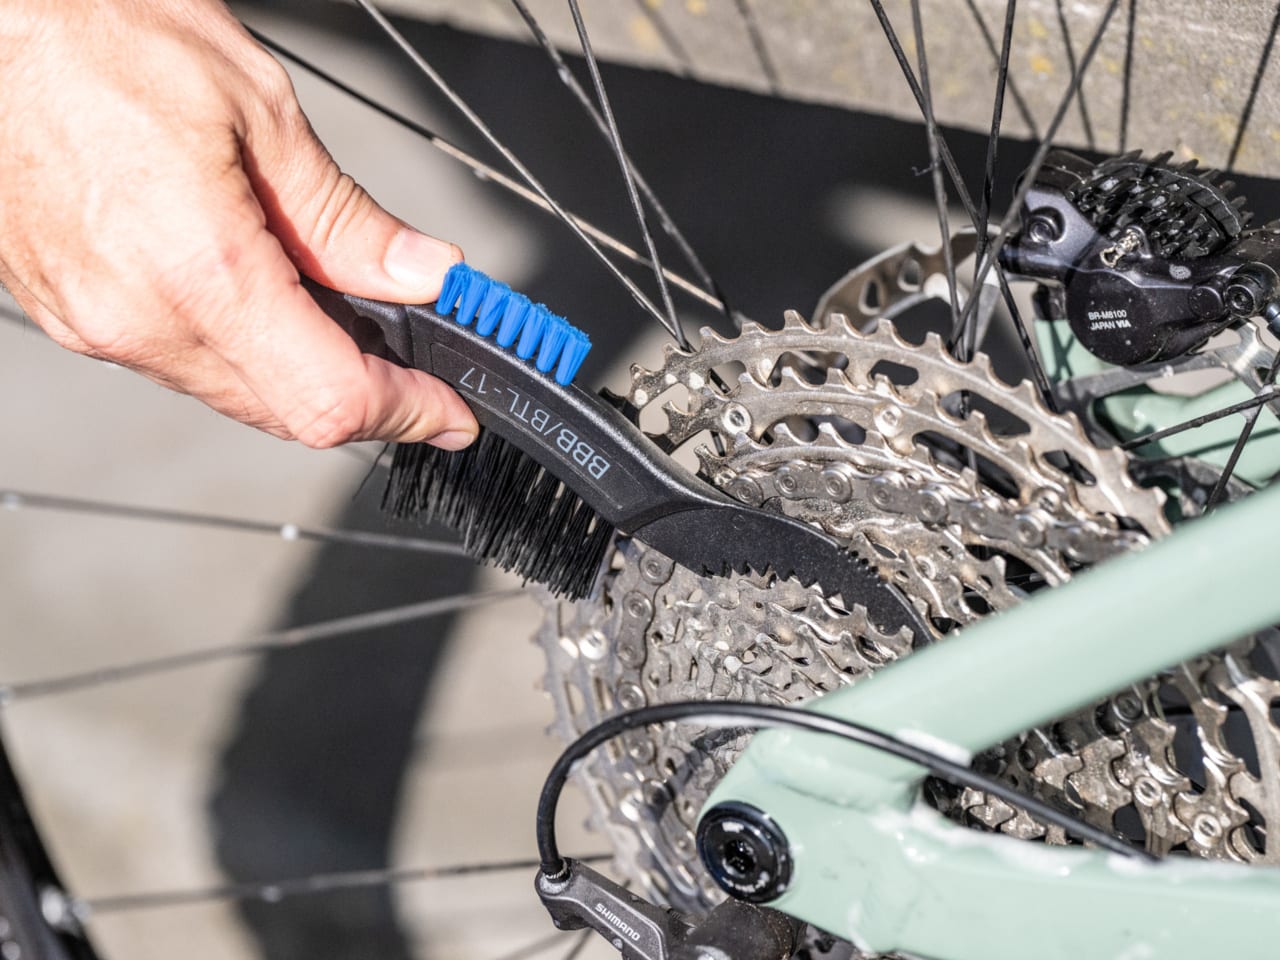
Step-by-step: Cleaning Cassette On The Bike
If you want a fast, regular clean, you do not need to remove the cassette. Here is how:
- Place your bike on a stand or flip it upside down for easier access.
- Shift to the smallest gear at the back. This gives the most space to work.
- Spray degreaser generously over the cassette. Let it sit for 2-3 minutes to loosen dirt.
- Scrub between the sprockets with a brush. Move the pedals backward to rotate the cassette.
- Use a rag to wipe each sprocket. A shoe lace or a strip of cloth can get into tight spaces.
- Rinse with water (if using a water-safe degreaser). Wipe dry with a clean rag.
- Re-lubricate the chain after cleaning, since degreaser also removes oil.
Extra tip: Never use high-pressure water, as it can push dirt into your bearings.
Common mistake: Many skip drying and lubrication. Always finish by drying and applying a drop of lube to prevent rust.
Step-by-step: Deep Cleaning By Removing The Cassette
For a deep clean, you must remove the cassette. It may look difficult, but it is very doable with simple tools.
Removing The Cassette
- Remove the rear wheel from your bike.
- Fit the cassette lockring tool onto the lockring.
- Hold the cassette steady with a chain whip.
- Turn the lockring tool counterclockwise (usually) to loosen and remove the lockring.
- Slide the cassette off the freehub. Keep sprockets and spacers in order.
Note: Take a quick photo before removing the cassette to remember the order of sprockets and spacers.
Cleaning Each Sprocket
- Soak sprockets in a container with degreaser for 5-10 minutes.
- Scrub each sprocket with a stiff brush or old toothbrush.
- Clean inside the gaps and teeth to remove all dirt.
- Rinse with water and let dry completely.
Practical tip: Use a wooden skewer or thin screwdriver to remove packed-in dirt from teeth.
Reinstalling The Cassette
- Slide sprockets and spacers back onto the freehub in the correct order.
- Screw the lockring back in by hand, then tighten with the lockring tool.
- Reinstall the wheel on the bike.
- Check shifting and make small adjustments if needed.
Key insight: Deep cleaning is not needed after every ride, but it prevents the buildup that makes shifting rough and speeds up cassette wear.
Choosing The Right Degreaser
Not all degreasers are the same. Some are strong and remove all oil, while others are gentle and better for the environment. Here’s a quick comparison:
| Type of Degreaser | Strength | Environmental Impact | Best Use |
|---|---|---|---|
| Citrus-based | Medium | Low (biodegradable) | Regular cleaning |
| Petroleum-based | High | High (not eco-friendly) | Heavy grime, deep cleaning |
| Soap & Water | Low | Very low | Light dirt, after every ride |
Non-obvious advice: Always check your frame and component manufacturer’s advice. Some modern bikes use materials that do not like strong chemicals.
Drying And Lubrication
After cleaning, drying the cassette is very important. Any water left behind can lead to rust, especially if you store your bike in a damp place.
- Use a clean, dry rag to wipe down each sprocket.
- Let the cassette air dry for at least 10 minutes before riding or storing.
- Apply lubricant to the chain, not the cassette. Wipe away any extra oil.
Why not lube the cassette? Only the chain needs oil. Extra lubricant on the cassette attracts more dirt. This is a common mistake even experienced cyclists make.
Credit: bbbcycling.com
Signs Your Cassette Needs Cleaning
Many riders wait for a problem before cleaning. Here are warning signs you should not ignore:
- Shifting feels slow or the chain skips gears.
- Grinding, clicking, or squeaking noises from the rear wheel.
- Visible black grime between sprockets.
- Chain looks dirty even after cleaning the chain itself.
- Chain slips under pressure—this can mean cassette or chain wear.
Experienced tip: If you clean your chain but not your cassette, dirt will quickly transfer back to the chain, making your work useless.
Preventing Cassette Wear
A clean cassette lasts much longer and saves you money in the long run. Here’s how to reduce wear:
- Clean and lube your chain regularly—this keeps both chain and cassette in good shape.
- Avoid cross-chaining (using extreme gear combinations like big ring front and biggest cog back).
- Replace your chain before it stretches too much. A worn chain destroys cassette teeth fast.
- Do not use household oils as lubricants. Use only bike-specific products.
- Check for wear every few months using a chain checker tool.
Interesting fact: Research shows that a well-maintained cassette can last up to 10,000 km, while a neglected one might only last half as long.
Common Mistakes To Avoid
Even careful riders make errors when cleaning their cassette. Here are the most frequent:
- Using high-pressure water: This pushes dirt inside bearings and causes rust.
- Forgetting to dry and lube: Skipping these steps leads to rust and poor shifting.
- Mixing up sprocket order: When reinstalling, always check the correct order.
- Using the wrong degreaser: Some strong chemicals can damage rubber seals or paint.
- Oiling the cassette: Only the chain should be lubricated.
Uncommon insight: Never use kitchen oils or WD-40 as chain lube—they attract more dirt and do not protect your parts.
When To Replace Your Cassette
Cleaning helps, but every cassette wears out with time. Signs you need a new one:
- Chain slips even after installing a new chain.
- Teeth look sharp or hooked instead of flat-topped.
- Noticeable skipping when you pedal hard.
If in doubt, take your bike to a reputable shop. They can measure wear and help you choose the right replacement.

Credit: www.youtube.com
How To Store And Maintain Your Cassette
If you switch between different wheels or cassettes (for example, road and gravel), store your spare cassette clean and dry in a sealed bag or box. Before reinstalling, wipe with a dry rag to remove dust.
Tip: Write the number of kilometers or rides on a sticker and keep it with the cassette. This helps you track wear over time.
Frequently Asked Questions
How Do I Know If My Cassette Needs Cleaning?
Watch for slow or noisy shifting, visible grime, or a dirty chain even after cleaning. If you hear grinding or feel the chain skipping, it’s time to clean.
Can I Clean My Cassette Without Removing It?
Yes. Most dirt can be removed with a brush, degreaser, and a rag. For stubborn grime, deep cleaning by removing the cassette is best.
What Kind Of Degreaser Should I Use?
A bike-specific degreaser is safest. Citrus-based degreasers are effective and eco-friendly. Avoid strong household cleaners, as they can damage parts. For more information, see Sheldon Brown’s Guide.
How Often Should I Clean My Cassette?
In wet or dusty conditions, clean every 100-200 km. For dry, clean roads, every 300-400 km is enough. More frequent cleaning is better than waiting for problems.
Is It Safe To Use Wd-40 On My Cassette?
WD-40 can clean, but it is not a lubricant. Always use bike-specific chain oil after cleaning. Never use WD-40 as your only lubricant.
Keeping your bike cassette clean is simple but makes a huge difference in how your bike rides and how long your parts last. With regular cleaning, the right tools, and attention to detail, you’ll enjoy smooth, quiet, and reliable rides every time.

Credit: www.reddit.com