Learning to ride a bike is a big moment for any child. For many families, bike training wheels are the key to building confidence and balance. Installing them the right way is not just about safety—it also helps your child enjoy the process and move on to two wheels when ready. Whether you’re a first-time parent, a grandparent teaching a new generation, or even helping an older child who needs extra support, this guide will help you do the job correctly.
The process is simple if you follow each step with care. This article covers every detail: choosing the right training wheels, understanding the tools, handling tricky bike frames, and making adjustments as your child improves. You’ll also see real-world tips that most instructions skip. Let’s make sure your child’s first rides are safe, fun, and full of smiles.
Why Training Wheels Matter
Training wheels are more than just extra wheels. They give stability and help kids focus on pedaling, steering, and braking without the fear of falling. For beginners, especially those aged 3 to 7, training wheels create a safe space to learn basic cycling skills.
But not all training wheels are the same. Some fit only certain bike sizes. Others are adjustable and grow with your child’s confidence. Choosing wisely makes the learning process smoother and less frustrating.
Choosing The Right Training Wheels
Before you start installing, you need to pick the right set. Here are the main factors to consider:
Bike Size Compatibility
Training wheels are usually designed for bikes between 12-inch and 20-inch wheels. Check your bike’s wheel size (it’s often printed on the tire’s sidewall) before buying. Using the wrong size can cause instability or make installation impossible.
| Wheel Size | Recommended Age | Training Wheel Size |
|---|---|---|
| 12 inch | 3-5 years | Small/Standard |
| 16 inch | 4-6 years | Standard |
| 20 inch | 5-8 years | Large/Heavy Duty |
Frame And Axle Type
Not all bikes have the same rear axle setup. Most children’s bikes use a solid rear axle with nuts, but some have quick-release levers. Training wheels usually need a solid axle to attach properly. If your bike has a quick-release, you may need an adapter.
Weight Limit
Each set of training wheels has a maximum weight rating. Check the packaging to make sure it matches your child’s weight. Exceeding this can bend the wheels or cause them to break.
Material And Build Quality
Look for steel arms and sturdy plastic or rubber wheels. Cheap sets may wobble or wear out quickly, making learning harder. Spending a few extra dollars often leads to a safer, longer-lasting product.
Adjustability
Choose training wheels with adjustable height. This lets you raise them as your child improves, helping them learn balance gradually.
Non-obvious tip: Many parents forget to check if the training wheels are compatible with coaster brakes (the kind you pedal backward to stop). Some training wheels block the pedal arm. Always check reviews or ask before buying.
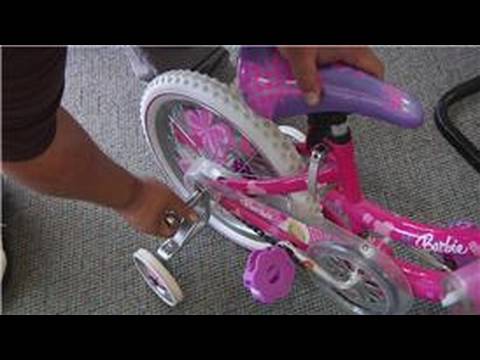
Credit: www.youtube.com
Tools And Preparation
Before you start, gather these basic tools:
- Wrench set (usually 13mm or 15mm)
- Adjustable wrench (for odd-sized nuts)
- Flathead screwdriver (if your set has locking tabs)
- Pliers (for stubborn bolts)
- Bike stand or a way to hold the bike upright
Lay out all the parts from your training wheels kit. You should have:
- Two wheels
- Two support arms
- Mounting brackets or plates
- Nuts and bolts
- Washers (sometimes included)
Double-check the instructions in your kit, as some brands have small differences.
Step-by-step Installation
Follow these steps for a typical children’s bike with a solid rear axle.
1. Secure The Bike
Prop the bike upright. If you don’t have a bike stand, lean it against a wall or ask someone to hold it steady. Working on a flat surface helps.
2. Remove The Rear Axle Nuts
Using your wrench, loosen and remove the nuts on both sides of the rear wheel. Keep these nuts—you’ll need them again. If there’s a chain guard or any plastic covers, remove them to access the axle.
3. Position The Training Wheel Brackets
Slide the mounting brackets onto the axle ends, one on each side. The arm should angle downward and slightly back, not straight out. Make sure the bracket holes line up with the axle.
4. Attach The Support Arms
Insert the support arms into the brackets. Most arms have several height settings. Start with the wheels about 0.5 to 1 inch above the ground. This allows the bike to tip slightly, which helps your child learn balance. Secure the arms with the bolts and washers provided.
Pro tip: If you set the training wheels perfectly level with the ground, the bike won’t tip at all. This feels safer but can make it harder for your child to learn to balance later. A little tilt is best.
5. Reattach The Axle Nuts
Put the original axle nuts back on and tighten them with your wrench. Make sure everything is snug but not over-tightened. Double-check that the wheel spins freely and the chain is not pinched.
6. Secure And Test
Give each training wheel a firm shake. They should not move or wobble. Spin the rear wheel to ensure it does not rub against the support arms. Check the brakes to confirm nothing is blocked.
7. Fine-tune The Height
With your child sitting on the bike, check the training wheel height again. Both wheels should touch the ground, but the bike should lean slightly from side to side. Adjust up or down as needed. Tighten all bolts.
8. Replace Chain Guard (if Removed)
If you removed a chain guard, put it back on. Make sure it does not interfere with the training wheels or their brackets.
9. Final Safety Check
Inspect all connections. Ensure the wheels are not loose, and nothing rattles. It’s wise to check the tire pressure and give the whole bike a quick once-over.
Common Mistakes And How To Avoid Them
Many beginners make small errors that can affect safety or learning. Here are mistakes to watch out for:
- Mounting the arms upside down – The support arms should angle down and slightly back, not up or straight out.
- Over-tightening bolts – This can strip threads or crush the bike frame.
- Training wheels too low – If they sit flat on the ground, your child won’t learn to balance and may find it hard to steer.
- Ignoring axle compatibility – Some bikes have different axles that require special mounting hardware.
- Skipping regular checks – Training wheels can loosen after a few rides. Check them every week, especially after falls.
Non-obvious insight: On some bikes, the rear derailleur or brake arm can block the support arms. Try switching sides or using spacers if you run into this problem.
Adjusting Training Wheels As Your Child Improves
Training wheels are not meant to stay on forever. The goal is to gradually raise them as your child becomes more confident. Every few weeks, adjust the height so the bike tips more side to side. This encourages your child to balance on the main two wheels.
Here’s a simple adjustment schedule:
| Riding Confidence | Training Wheel Height | Adjustment |
|---|---|---|
| First rides | 0.5 inch off ground | Both touch evenly |
| Comfortable pedaling | 1 inch off ground | Bike can tip slightly |
| Ready for balance | 2+ inches off ground | Only for safety backup |
When your child can ride with the training wheels barely touching, it’s time to try without them. Celebrate this step—it’s a big achievement!
Special Cases: Bikes With Gears, Suspension, Or Unusual Frames
Some modern kids’ bikes have special features that make training wheel installation harder:
- Bikes with gears: The derailleur may block the mounting area. Look for training wheels with extended arms or ask your bike shop for help.
- Bikes with rear suspension: These often need custom brackets. Standard training wheels might not fit safely.
- Aluminum or carbon frames: These frames are lighter but can be damaged by over-tightening. Use a torque wrench if possible.
If your bike doesn’t match the usual setup, check the manufacturer’s website for compatible training wheels or seek advice from a local bike shop.
Practical example: A parent tried to add training wheels to a 20-inch mountain bike with a quick-release axle and rear disc brakes. The solution was to use an axle extender and a special bracket kit. Sometimes, it’s worth paying for professional installation when the setup is complex.
Safety Tips For First Rides
After installing training wheels, keep these tips in mind:
- Always fit your child with a proper helmet that meets local safety standards.
- Choose a flat, open space for practice—avoid hills, busy streets, or rough surfaces.
- Check the brakes before every ride.
- Teach your child to start and stop using the pedals and brakes, not their feet.
- Supervise closely, especially in the first few sessions.
Data point: According to the U.S. Consumer Product Safety Commission, over 260,000 children under 15 are treated in emergency rooms each year for bicycle injuries. Most can be prevented with good supervision and equipment checks.

Credit: dliras.us
When To Remove Training Wheels
Look for these signs that your child is ready to ride solo:
- They ride smoothly and rarely tip onto the training wheels.
- They can start and stop confidently.
- They ask to try without them.
Remove one training wheel first if your child is nervous. This lets them practice balancing on one side. Many children skip this step, but it’s helpful for anxious riders.
When you do remove both, be ready for a few wobbles—and lots of proud smiles.
Maintenance And Troubleshooting
Keep training wheels in good shape by:
- Checking all bolts and nuts weekly.
- Cleaning the wheels if they get muddy.
- Replacing worn or bent parts.
If a wheel bends or breaks, replace it right away. Never ride with damaged wheels—they can cause falls.
If you hear rattling or notice the bike pulling to one side, re-check the alignment and all fasteners.

Credit: www.suyogrubber.com
Frequently Asked Questions
How Do I Know If Training Wheels Will Fit My Child’s Bike?
Check the wheel size (printed on the tire) and look at the rear axle type. Most training wheels fit 12–20 inch bikes with a solid axle. If your bike has a quick-release, you may need an adapter.
Can I Install Training Wheels On A Bike With Gears?
Yes, but it’s more complicated. The rear derailleur can block standard brackets. You’ll need training wheels with extended arms or a special mounting kit. Ask your bike shop for help if unsure.
How Tight Should I Make The Bolts?
Tighten until snug, so nothing moves if you try to wiggle the wheels, but do not overtighten. Too much force can damage the frame or strip the threads. If you have a torque wrench, use the settings in your training wheel instructions.
How Often Should I Check The Training Wheels?
Check all nuts, bolts, and alignment every week and after any falls. Training wheels can loosen with use, especially if your child rides on rough ground.
Where Can I Find High-quality Training Wheels?
Most bike shops and online stores carry good options. For trusted advice, see this Sheldon Brown Training Wheels Guide.
Helping your child learn to ride is a memorable experience. When you take time to install training wheels the right way, you give them both safety and confidence. Check your work, adjust as they grow, and celebrate every small victory. With patience and the right tools, you’ll help them enjoy the ride—and soon, they’ll be ready for life on two wheels.