Installing new handlebars on your bike might seem intimidating, but with the right guidance and tools, it’s a process most people can manage at home. Whether you want to upgrade for comfort, style, or better performance, understanding each step is key to a smooth installation.
This guide will walk you through the process, highlight critical mistakes to avoid, and answer the questions most riders have about the job.
Why Change Your Handlebars?
Many riders swap handlebars for a better fit, improved bike control, or to change their riding position. The right handlebars can reduce wrist pain, improve aerodynamics, and make long rides much more comfortable. For mountain bikers, wider bars can add stability.
Road cyclists might prefer a shape that helps them ride faster and longer. Choosing the right bars is about matching your body and your riding style.
Tools And Materials Needed
Before you start, gather all the tools and parts required for a safe and effective installation. Here’s what you’ll need:
- New handlebars (specific to your bike type)
- Allen wrenches (4mm, 5mm, 6mm are most common)
- Torque wrench (for precise tightening)
- Grease (for some bolts)
- Bike stand (optional, but helpful for stability)
- Screwdrivers
- Tape measure or ruler
- Isopropyl alcohol (for cleaning surfaces)
- New grips or bar tape (if replacing)
- Cutter (for trimming brake/shift cables if needed)
- Zip ties (for cable management)
Having everything ready means less stress and a smoother process.

Credit: www.youtube.com
Understanding Handlebar Types
Not all handlebars are the same, and the installation can change based on the type you choose. Here’s a look at the main types:
| Handlebar Type | Best For | Common Diameter |
|---|---|---|
| Flat Bars | Mountain bikes, hybrids | 31.8mm, 25.4mm |
| Drop Bars | Road bikes | 31.8mm, 26.0mm |
| Riser Bars | Trail/Enduro MTB | 31.8mm |
| Bullhorn Bars | Track/fixie bikes | 25.4mm, 31.8mm |
Check your bike’s stem clamp size and ensure your new handlebars match this measurement.
Preparing Your Bike
Start with a clean, stable workspace. If possible, use a bike stand to keep your bike upright and steady. Shift your bike into the smallest chainring and cog. This reduces cable tension and makes removal easier.
- Remove any accessories like lights or computers from your handlebars.
- Take a photo of your cockpit setup. This helps you remember where levers and grips were positioned.
A common beginner mistake is skipping this photo, which makes reassembly much harder.
Removing Old Handlebars
To remove your current handlebars safely:
- Loosen and remove grips/bar tape. For flat bars, slide off grips. For drop bars, unwrap the tape. Use isopropyl alcohol to help loosen sticky grips.
- Remove brake and shifter levers. Loosen the clamp bolts and slide them off. For integrated shifters, you may need to disconnect cables.
- Loosen stem faceplate bolts. Unscrew evenly in a cross pattern. Do not remove all bolts on one side first—this can damage the stem.
- Carefully lift away the handlebars. Keep all bolts and small parts in a safe place.
If your cables are internally routed, note their path to avoid confusion later. Many people forget to check this, causing headaches during reinstallation.
Installing The New Handlebars
Step 1: Check Handlebar Compatibility
Before fitting the new bars, double-check that the clamp diameter matches your stem. If not, you’ll need a compatible stem or shims. Forcing mismatched parts can cause unsafe riding conditions.
Step 2: Attach Handlebars To Stem
- Place the new handlebars in the stem clamp.
- Refit the faceplate, tightening bolts by hand first.
- Use a torque wrench to finish tightening, following the recommended torque (often 4–6 Nm for most stems).
- Ensure the bars are centered. Use the markings on the bar or measure from each end to the stem.
| Torque Setting | Component | Typical Value |
|---|---|---|
| Stem Faceplate | 4–6 Nm | Handlebar clamp |
| Brake Lever Clamp | 5 Nm | Levers to bars |
Never overtighten; you risk crushing lightweight aluminum or carbon bars.
Step 3: Set Bar Angle And Rotation
Rotate the handlebars for your preferred riding position. For flat bars, the sweep should feel natural to your wrists when sitting on the bike. For drop bars, the drops should angle slightly downwards, not parallel to the ground.
Sit on your bike and check comfort. Small adjustments now will save you pain later.
Step 4: Reinstall Levers, Grips, And Accessories
- Slide brake and shift levers back onto the bars.
- Position them so your hands can reach comfortably. For drop bars, the levers should align with the bottom of the bar.
- Tighten clamp bolts to specification.
- Reinstall grips (for flat or riser bars) or new bar tape (for drop bars).
- Reattach mirrors, bells, lights, or computers.
If you’re using new grips, a small amount of alcohol or grip glue can help slide them on. For bar tape, start at the end and wrap tightly toward the center.
Step 5: Adjust Cable Lengths (if Needed)
Sometimes, your new handlebars are wider or have a different shape, making cables too short or too long. If they are too short, you’ll need to install new, longer cables.
- Check that cables and hoses reach their components without tight bends.
- Trim excess cable, and crimp cable ends to prevent fraying.
- Reroute cables neatly with zip ties if necessary.
If you’re unsure, visit a local bike shop for this step—cable replacement can be tricky without experience.

Credit: funnmtb.com
Final Checks Before Riding
Before your first ride, always do a safety check:
- Squeeze the brakes firmly. Make sure levers do not slip or rotate.
- Turn the bars side-to-side to ensure cables don’t pull tight or snag.
- Check for any creaks or movement at the stem or handlebar clamp.
- Make sure all bolts are tightened to the correct torque.
A short test ride in a safe area is wise before heading out for longer trips.
Common Mistakes To Avoid
Even experienced riders make mistakes when changing handlebars. Here are the most common:
- Not using a torque wrench—Leads to overtightening and damage.
- Forgetting to align handlebars properly—Can cause wrist pain and poor control.
- Mismatched clamp sizes—Makes installation unsafe.
- Cutting cables too short—Forces expensive replacements.
- Not checking for hidden damage—Cracks in bars or stem can cause crashes.
Paying attention to these areas will keep you safe and save frustration.
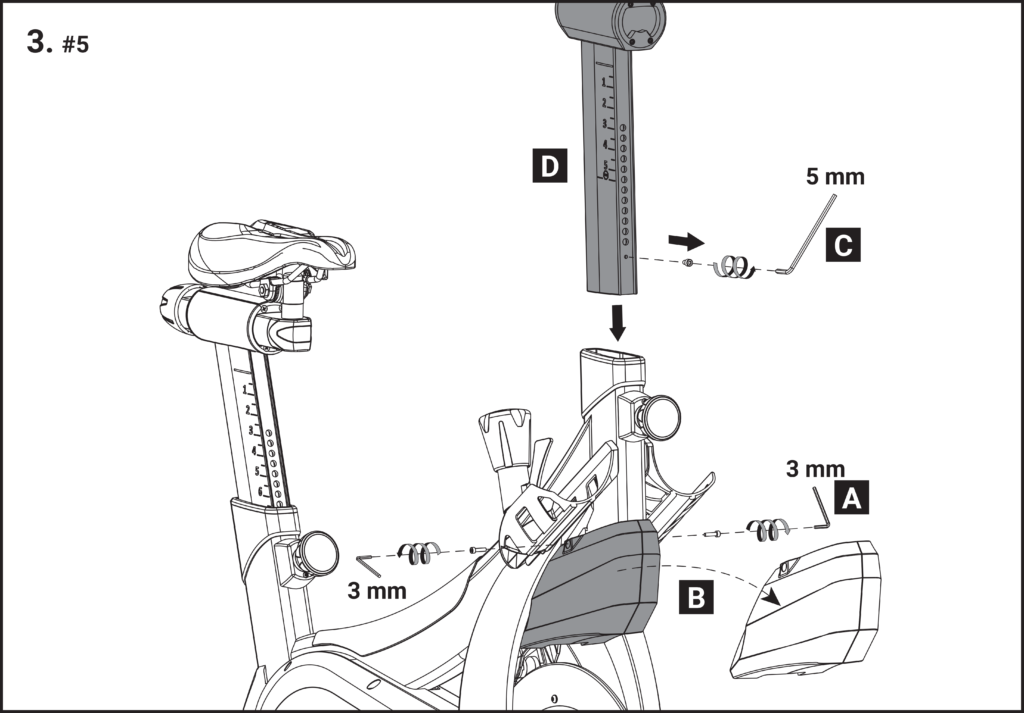
Credit: manuals.stagesindoorcycling.com
How To Choose The Right Handlebars
Selecting the best handlebars isn’t just about style. Consider:
- Riding position: Do you want to sit upright or more forward?
- Width: Wider bars offer more control but can feel slow. Narrow bars are faster but less stable.
- Material: Aluminum is durable and affordable. Carbon is lighter but more expensive.
- Rise and sweep: These affect comfort and handling.
Here’s a quick comparison:
| Material | Weight | Durability | Cost |
|---|---|---|---|
| Aluminum | Medium | High | Low |
| Carbon | Low | Medium | High |
| Steel | High | Very High | Medium |
Always measure your shoulders and match handlebar width for best comfort.
Tips For A Perfect Installation
- Mark your preferred lever position with tape before removing.
- Clean all parts with isopropyl alcohol to remove grease before installing.
- Use assembly paste for carbon bars to prevent slipping.
- Test your riding position before final tightening.
- Keep all removed parts in a labeled bag for easy reassembly.
Many riders overlook the importance of test rides. Small adjustments after a short ride often make a big difference in comfort.
When To Seek Professional Help
If you’re unsure about cable routing, hydraulic brakes, or carbon components, visiting a bike shop is a smart choice. Mistakes with these systems can be expensive or dangerous. Professionals have tools and experience to spot problems before they cause issues.
Real-world Example
Alex, a weekend cyclist, switched from flat to drop bars for longer rides. He measured the stem clamp, bought matching bars, and followed each installation step. However, after installation, his cables were too short and shifted poorly. He visited a bike shop, where they replaced and rerouted the cables correctly.
Afterward, Alex’s rides became more comfortable and efficient. This example shows how planning and expert help can make a big difference.
Safety And Legal Considerations
Always check your local laws regarding required bike components. For example, some regions require bells or lights mounted on handlebars. After making changes, ensure your bike still meets these requirements. For further reading on cycling safety, visit the National Highway Traffic Safety Administration.
Frequently Asked Questions
How Do I Know If My Handlebars Are Compatible With My Bike?
Check the stem clamp diameter and match it to your new handlebars. Most modern bikes use 31. 8mm, but older bikes may use 25. 4mm or 26. 0mm. Measure both with a caliper for accuracy.
Do I Need To Replace Cables When Changing Handlebars?
Not always. If your new handlebars are a similar width and shape, your old cables might work. If the bars are much wider or have a different shape, you’ll likely need new, longer cables.
What Torque Should I Use For Handlebar Bolts?
Most stem faceplate bolts require 4–6 Nm of torque. Always check the manufacturer’s instructions, as overtightening can crack bars or stems.
Can I Install Carbon Handlebars Myself?
Yes, but be extra careful. Use a torque wrench and assembly paste. Never overtighten bolts, and inspect for cracks before and after installation.
How Do I Wrap Bar Tape Correctly?
Start at the bar ends and wrap toward the stem, overlapping each layer by half. Pull firmly but not too tight. Finish with electrical tape at the top, and plug the bar ends with caps.
Upgrading your handlebars can transform your cycling experience. Taking the time to do it right means you’ll ride safer, more comfortably, and with better control. With careful attention to detail and the right tools, most riders can tackle this project at home, but don’t hesitate to get professional help for a perfect result.