Building your own dirt bike is more than just a project—it’s a journey that mixes creativity, hands-on skills, and passion for off-road riding. Whether you’re a teenager dreaming of your first bike, a parent supporting a young rider, or a hobbyist who loves to tinker, making a dirt bike from scratch can be deeply rewarding. But it’s also a complex process. You need to think about design, parts, safety, and budget. Many people start with excitement but get stuck halfway because they underestimate the planning and effort needed.
In this guide, you’ll learn every step—from designing your dirt bike and picking the right parts, to assembling and testing it. You’ll get practical advice, clear warnings about common mistakes, and some insights you won’t find in most YouTube videos.
Ready to turn your dream into a real, roaring machine? Let’s dive in.
Planning Your Dirt Bike Project
Before you buy anything or pick up a tool, you need a plan. This step saves you money, time, and frustration.
Decide What Kind Of Dirt Bike You Want
- Size: Will it be for a child, teen, or adult? The frame and engine size must fit the rider.
- Purpose: Is this bike for trails, motocross, or just fun around the yard?
- Budget: Building from scratch usually costs less than buying new, but can still add up.
Sketch Your Design
Draw your bike on paper. Mark where the engine, wheels, handlebars, and seat will go. This simple sketch helps you see if everything fits and lets you plan for modifications.
Research Local Laws
Some areas have rules about building and riding dirt bikes, especially for young riders. Check what’s legal in your city or country. In some places, homemade bikes can’t be ridden in public parks or trails.
Make A Parts List
Write down every part you need. Divide the list into:
- Essential: Frame, engine, wheels, suspension, brakes, chain, fuel tank.
- Optional: Plastics/fairings, lights, speedometer.
Many beginners forget small but critical items like throttle cables, nuts, bolts, and wiring. These “minor” parts can stop your project if you miss them.
Choosing The Right Parts
Picking the right components is where most first-timers struggle. Quality, compatibility, and cost all matter.
Frame
You have three main options:
- Buy a new dirt bike frame from a store or online supplier. This is safest and often easiest.
- Use a frame from a broken dirt bike. Many people buy a used, damaged bike and rebuild it.
- Build your own frame from metal tubing. This needs welding skills and special tools.
Frame Comparison
| Frame Source | Skill Needed | Cost | Safety |
|---|---|---|---|
| New | Basic | High | Very Safe |
| Used/Salvaged | Intermediate | Medium | Depends on Condition |
| Homemade | Advanced (Welding) | Low | Risky if not done right |
If you’re not experienced with welding and measuring, it’s smarter to start with a pre-made frame.
Engine
The engine is your bike’s heart. Most dirt bikes use single-cylinder, four-stroke engines, but two-strokes are popular for racing.
- Size: 50cc (kids), 125cc (teens, beginners), 250cc+ (adults, advanced).
- Source: Buy new, salvage from a used bike, or use an engine from a small motorcycle or ATV.
- Mounting: Check that your engine fits the frame. Engine mounts must line up, or you’ll need to modify the frame.
Suspension
A good suspension lets you ride over bumps without losing control.
- Forks (Front): Most people use telescopic forks from a motorcycle or dirt bike.
- Rear Shock: Can be a single shock absorber or twin shocks, depending on frame design.
- Travel: More “travel” (movement up and down) means better handling on rough ground.
Wheels And Tires
Wheels must be strong and the right size for the frame and brakes.
- Front wheel: Often 19-21 inches.
- Rear wheel: Usually 16-18 inches.
- Tires: Use knobby tires for grip in mud and dirt. Don’t use street tires—they slip easily off-road.
Brakes
Don’t cut corners here. Reliable brakes keep you safe.
- Disc brakes are best for off-road.
- You’ll need matching brake calipers, levers, and cables or hydraulic lines.
Other Key Parts
- Handlebars: Choose a style that feels comfortable.
- Seat: A padded, dirt bike-specific seat is essential.
- Fuel Tank: Plastic tanks are lighter, but metal is more durable.
- Chain and Sprockets: These must match your engine’s output and wheel size.
Tools And Workspace
You don’t need a fancy workshop, but you do need space and the right tools.
Must-have Tools
- Socket and wrench set
- Screwdrivers
- Pliers
- Allen keys
- Torque wrench (for engine and critical bolts)
- Jack or bike stand (to hold your frame)
- Drill and bits
- Angle grinder (for cutting metal, if modifying frame)
- Welding machine (only if building or changing the frame)
Workspace Tips
- Work on a flat, clean floor.
- Good lighting helps you see small details.
- Keep all bolts and small parts in labeled containers.
Step-by-step Assembly
This is where your dirt bike comes to life. Go slow—rushing leads to mistakes.
1. Prepare The Frame
Clean and inspect your frame. Look for cracks or weak spots. If needed, sand and paint the frame to prevent rust.
2. Install The Engine
Mount the engine securely. Use the right bolts and torque them to the manufacturer’s specs. If the engine doesn’t fit perfectly, you may need to adjust the mounts or use adapters.
3. Attach The Suspension
Install front forks first, then the rear shock(s). Double-check that all bolts are tight. Suspension must move smoothly with no sticking.
4. Add Wheels And Tires
Slide in the axles and secure the wheels. Spin each wheel to check for wobbles or rubbing. Inflate tires to the recommended pressure.
5. Fit The Brakes
Install brake discs, calipers, and connect lines or cables. Test the brake levers—they should feel firm, not spongy. Adjust as needed.
6. Mount Handlebars And Controls
Attach the handlebars. Install throttle, clutch, and brake levers. Connect cables, but don’t overtighten.
7. Add Seat And Plastics
Bolt on the seat, side panels, and fenders. Make sure nothing blocks the chain or wheels.
8. Install Chain And Sprockets
Line up the chain with both sprockets. Adjust tension—too tight, and it can snap; too loose, and it can fall off.
9. Fuel System
Mount the fuel tank. Connect the fuel line to the carburetor or fuel injector. Add a fuel filter if possible.
10. Wiring
Connect any needed electrical parts: ignition, kill switch, maybe lights. Use zip-ties to keep wires neat and away from hot parts.
11. Fluids
Add engine oil (check manual for type and amount) and fuel. If your bike has a separate gearbox or cooling system, fill those too.
12. Final Check
Inspect every bolt, nut, and cable. Spin the wheels, squeeze the brakes, twist the throttle. Don’t skip this step!

Credit: www.youtube.com
First Start-up And Safety Checks
Starting your homemade dirt bike is exciting, but take precautions.
Pre-start List
- Double-check oil and fuel.
- Make sure the chain is properly tensioned.
- Test all controls.
First Engine Start
- Move the bike outside—never start in a closed garage.
- Set the choke (if needed), turn on fuel, and kick or push the starter.
- Let the engine idle for a few minutes. Listen for strange noises.
Safety Test Ride
- Wear helmet, gloves, boots, and long sleeves.
- Ride slowly at first. Test brakes, throttle, and steering.
- Avoid busy streets—use an open, safe area.
Fine-tuning And Adjustments
No homemade dirt bike runs perfectly the first time. Expect to make small tweaks.
Common Adjustments
- Carburetor tuning: If the engine sputters or stalls, adjust the air-fuel screw.
- Chain tension: Check after the first ride.
- Brake adjustment: Make sure brakes grab evenly and fully release.
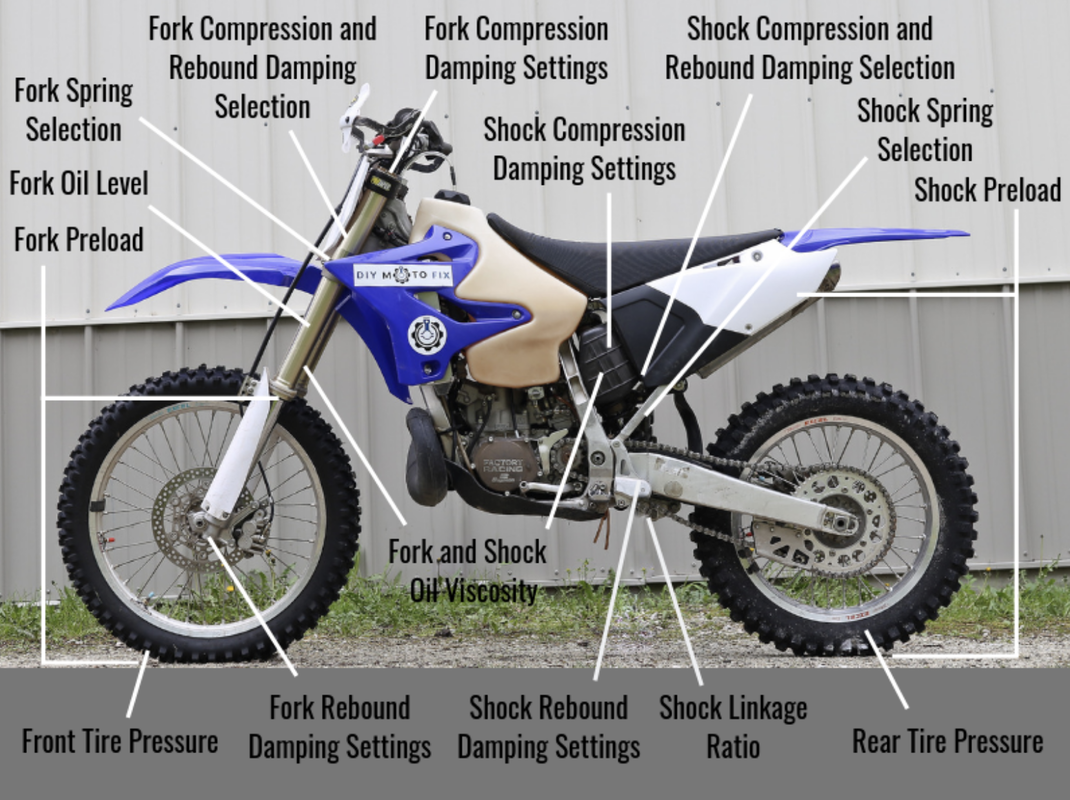
Upgrades
Once your bike runs well, you can add upgrades:
- Better suspension for smoother rides.
- Aftermarket exhaust for more power.
- Custom graphics for style.
Credit: www.diymotofix.com
Common Beginner Mistakes
Even skilled builders make errors. Here’s what to avoid:
- Underestimating the budget: Small parts and tools add up fast.
- Mixing incompatible parts: Not every engine fits every frame.
- Ignoring safety: Weak brakes or loose bolts can cause crashes.
- Skipping research: Watch build videos, read forums, and ask for advice.
- Rushing assembly: Take your time—fixing mistakes later is harder.
Realistic Costs And Time
How much will your homemade dirt bike cost? It depends on the parts you use and what you already own.
| Part | Low Cost | High Cost |
|---|---|---|
| Frame | $100 | $400 |
| Engine | $120 | $600 |
| Wheels & Tires | $80 | $300 |
| Brakes | $40 | $120 |
| Suspension | $60 | $250 |
| Other Parts & Tools | $80 | $300 |
| Total Estimate | $480 | $1,970 |
Time needed: For a first build, expect 20–40 hours over several weekends, especially if you need to learn new skills.
Credit: www.dirtlegal.com
Two Insights Most Beginners Miss
First, compatibility matters more than price. Many people buy cheap parts online, only to find they don’t fit together. Always check measurements and part numbers before ordering.
Second, test ride in stages. Don’t wait until the bike is 100% finished. Test the rolling frame, then with engine, then fully assembled. This helps you catch problems early.
Where To Find Help And Inspiration
There are many online forums and YouTube channels where experienced builders share tips. If you’re stuck, ask questions—most riders love helping newcomers. For technical details, the Wikipedia Dirt Bike page is a good reference.
Frequently Asked Questions
How Hard Is It To Build A Dirt Bike From Scratch?
Building a dirt bike is challenging, especially for beginners. It requires basic mechanical skills, patience, and time. If you follow steps carefully and ask for help when stuck, most people can succeed.
Can I Use Parts From Different Motorcycle Brands?
Yes, but check compatibility. For example, engine mounts, wheel axles, and brake systems must match your frame. Mixing parts can save money, but may need extra modifications.
Is It Legal To Ride A Homemade Dirt Bike?
It depends on your local laws. In many places, homemade bikes can be used on private property or off-road trails, but not on public roads. Always check rules before riding.
How Do I Choose The Right Engine Size?
Pick an engine that matches the rider’s size and skill. For kids, 50–70cc is safe. For adults or experienced teens, 125–250cc is common. More power means more speed, but also more risk.
What Safety Gear Should I Wear?
Always wear a helmet, gloves, sturdy boots, and long sleeves. For serious riding, add knee pads, elbow guards, and a chest protector.
Creating your own dirt bike takes effort and patience, but the feeling of riding something you built is unbeatable. Stay safe, enjoy the process, and remember: every great builder started with a single project—just like you.