Putting new grips on your bike can make a big difference in your riding comfort and control. Old grips can become slippery or torn, making your hands hurt or slip during a ride. Fresh grips not only look good but also help you hold your handlebars better, especially on long rides or bumpy roads.
Many cyclists avoid changing grips because they think it is difficult or requires special tools. But with the right steps and some simple tips, anyone can do it—even if you’re new to bike maintenance.
This guide will show you, step by step, how to put grips on a bike. You’ll learn about the types of grips, tools you need, and how to remove old grips. We’ll cover tricks to make installation easier, mistakes to avoid, and how to keep your new grips in top shape.
Whether you ride a mountain bike, road bike, or a city bike, these instructions will help you get the job done correctly. Let’s get your bike feeling new again.
Understanding Bike Grips
Bike grips are more than just rubber on your handlebars. They affect how you handle the bike and how comfortable your hands feel. There are two main types: slide-on grips and lock-on grips.
- Slide-on grips are simple rubber or foam tubes that slide over the handlebar. They are common on many bikes and are usually cheaper.
- Lock-on grips have a hard plastic core and metal rings (collars) at the ends. These collars clamp the grip to the handlebar with small screws. Lock-on grips are popular for mountain bikes because they stay in place even during rough rides.
Choosing the right grip depends on your riding style, hand size, and the weather where you ride. For example, lock-on grips are best for wet or muddy conditions because they do not twist.
Tools And Materials You’ll Need
Before you start, gather the items you’ll need. This will save time and make the process smoother.
- New bike grips (make sure they fit your handlebars—most handlebars are 22.2 mm diameter at the grip area)
- Rubbing alcohol or grip glue (for slide-on grips)
- Allen key (often 2.5 mm or 3 mm for lock-on grips)
- Small flathead screwdriver or butter knife
- Compressed air (optional, for easy grip removal/installation)
- Scissors or utility knife (for cutting old grips if needed)
- Clean rag for wiping handlebars
Here’s a quick comparison of tools needed for each grip type:
| Tool | Slide-On Grips | Lock-On Grips |
|---|---|---|
| Rubbing Alcohol/Grip Glue | Yes | No |
| Allen Key | No | Yes |
| Knife/Screwdriver | Maybe | Maybe |
| Compressed Air | Optional | Optional |
Removing Old Grips
The first step is to take off your old grips. This can be easy or difficult, depending on how long they have been on and the type of grip.
- Slide-On Grips:
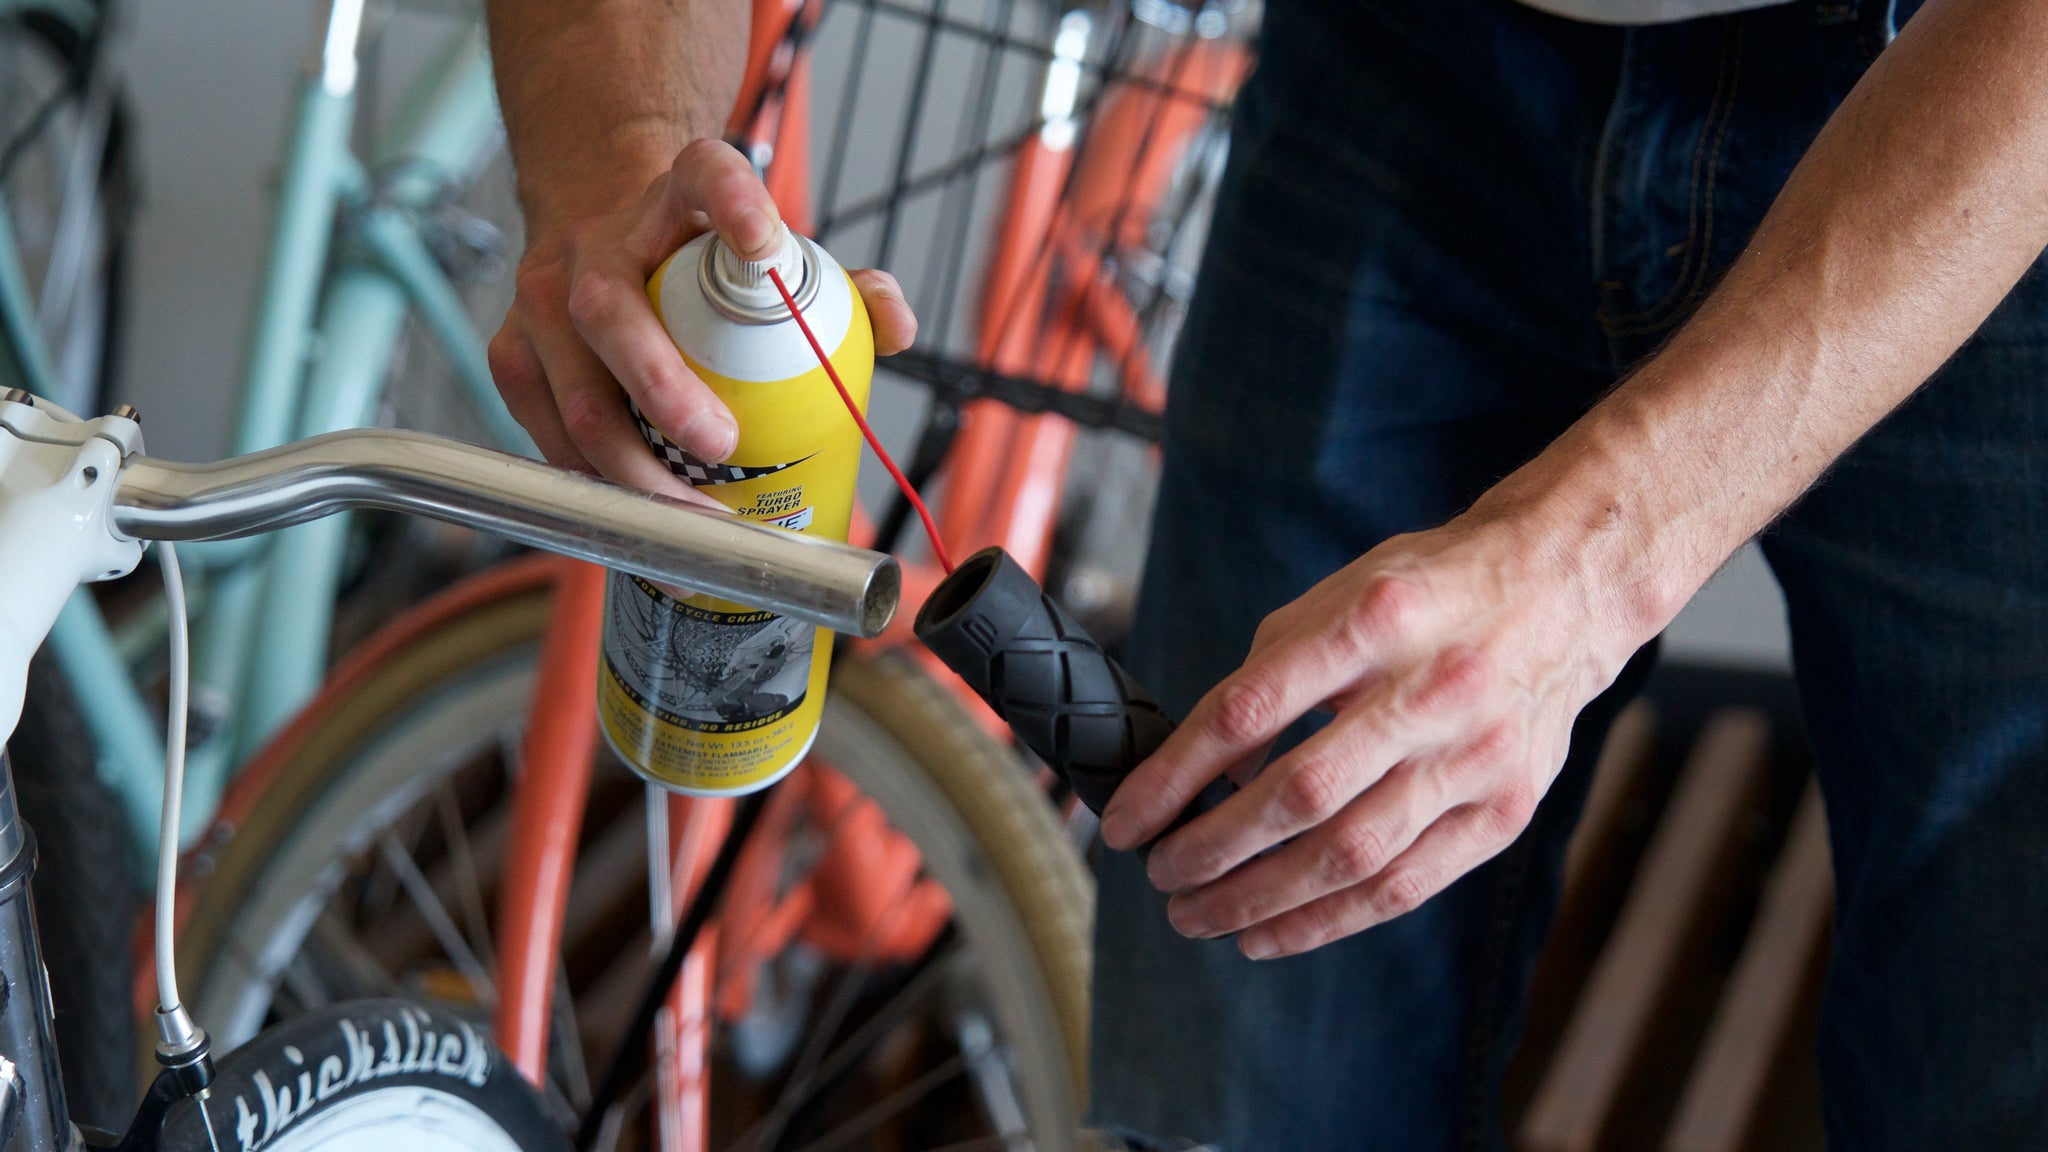
Try twisting the grip with your hand. If it’s stuck, use a small screwdriver to gently lift the edge and spray a little rubbing alcohol or soapy water underneath. Twist and pull until the grip slides off. If the grip is dry or breaking, use scissors or a utility knife to cut it off.
Be careful not to scratch your handlebar.
- Lock-On Grips:
Find the small screws at the grip ends. Use an Allen key to loosen them. The grip should slide off easily. If it’s tight, wiggle it gently while pulling.
Tip: If you have an air compressor, you can blow air under the grip to loosen it. This works for both types and is fast and safe.
Preparing The Handlebars
Once the grips are off, it’s important to clean the handlebar area. Dirt, glue, or oil can make new grips slip or not fit well.
- Use a rag and rubbing alcohol to wipe the handlebar ends. Make sure there’s no leftover glue or pieces of old grip.
- Check for rust or sharp edges. Smooth them with sandpaper if needed. Rough spots can tear new grips or hurt your hands.
A clean handlebar helps your new grips last longer and stay in place.
Credit: www.purecycles.com
Installing New Slide-on Grips
Slide-on grips can be tricky because they fit tightly. Here’s how to do it without too much effort.
- Lubricate the Inside:
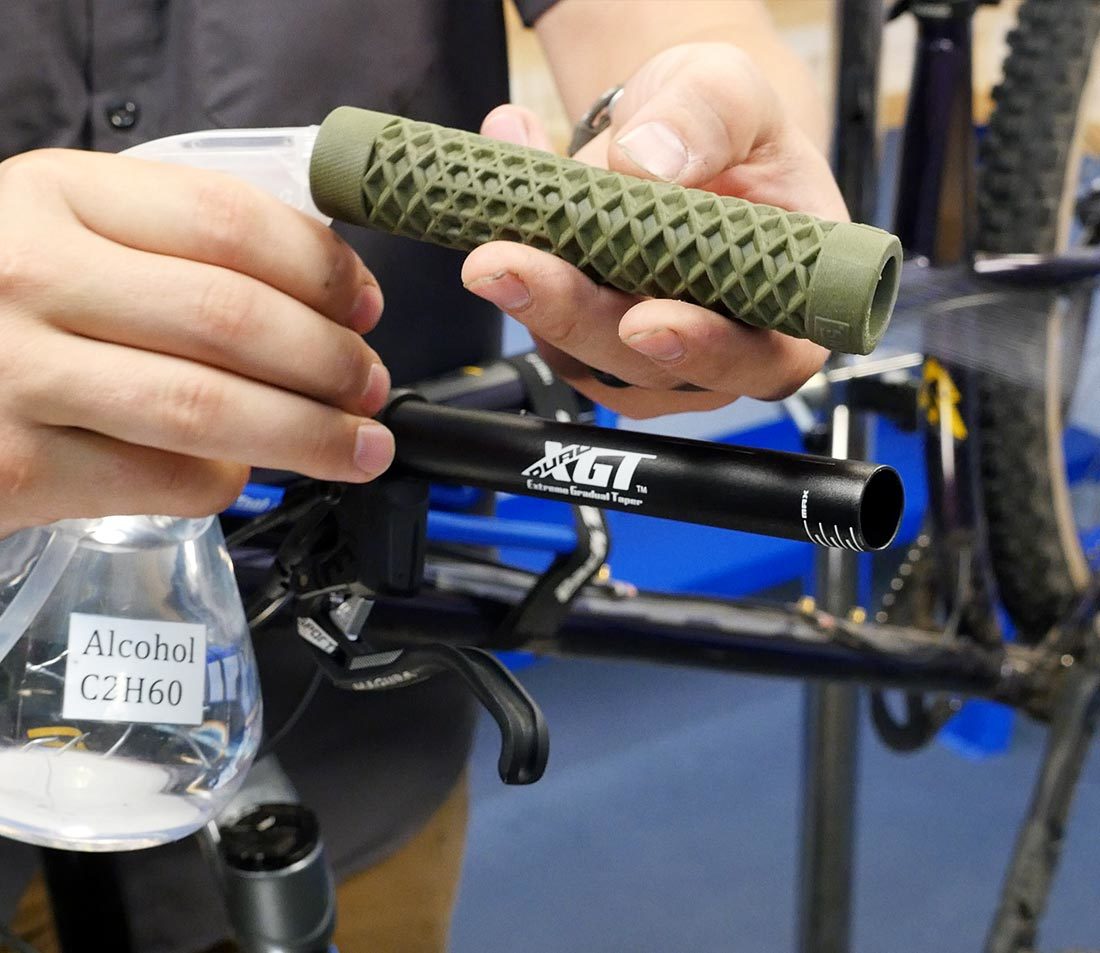
Pour a small amount of rubbing alcohol inside the grip and on the handlebar. Rubbing alcohol helps the grip slide on but dries fast, so act quickly. Do not use oil or grease; these will make the grip slip later.
- Slide On the Grip:
Align the grip and push it onto the handlebar. Twist as you push. If it gets stuck halfway, add a bit more rubbing alcohol. Don’t force too hard; you don’t want to tear the grip.
- Let It Dry:
Wait at least 30 minutes for the alcohol to evaporate. The grip should feel solid and not rotate. If you used grip glue, follow the instructions—usually, the glue needs 1–2 hours to set.
Non-obvious insight: In hot weather, slide-on grips become softer and easier to install. If it’s cold, warm the grips in hot water (not boiling) for a few minutes to make them more flexible.
Installing New Lock-on Grips
Lock-on grips are easier and more secure, but you’ll need an Allen key.
- Position the Grips:
Slide the grip onto the handlebar. Make sure the clamp collars are at the correct position (usually at the ends). Some grips have a left and right side—check for markings.
- Align and Tighten:
Rotate the grip so any pattern lines up the way you like. Insert the screws and tighten them with the Allen key. Do not overtighten; most screws only need 2–3 Nm of torque. Too much force can strip the threads.
- Check for Movement:
Try twisting the grip. If it moves, tighten the screws a little more. If it still moves, check for dirt or oil under the grip.
Non-obvious insight: Some lock-on grips come with plastic end plugs. Push these into the handlebar ends to protect the bars and your hands if you fall.

Credit: dliras.us
Common Installation Mistakes
Many first-timers face problems when putting on new grips. Here’s how to avoid them:
- Using oil or grease: These make the grip slip during rides. Only use rubbing alcohol or special grip glue.
- Not cleaning handlebars: Dirt or old glue stops the grip from sticking. Always clean before installing.
- Overtightening lock-on screws: This can break the collar or strip the screw. Tighten firmly, but not too much.
- Not letting glue/alcohol dry: Riding before the grip is dry can twist or push it off. Always wait until it’s secure.
- Mixing left and right grips: Some grips are shaped differently for each hand. Check before installation.
Keeping Your New Grips In Good Shape
Once your grips are on, a little care helps them last longer and feel better.
- Keep them clean: Wipe with a damp cloth after muddy or sweaty rides.
- Avoid harsh cleaners: These can dry out the rubber and make it crack.
- Check for movement: Every few weeks, twist the grips to make sure they are still tight. If they move, re-tighten or reinstall.
- Protect from sun: When not using your bike, park in the shade. UV rays make grips hard and brittle over time.
Comparing Grip Types: Slide-on Vs. Lock-on
Choosing between slide-on and lock-on grips can be confusing. Here’s a comparison to help you decide which is better for your needs.
| Feature | Slide-On Grips | Lock-On Grips |
|---|---|---|
| Installation | Harder (needs alcohol or glue) | Easier (just tighten screws) |
| Grip Security | Can slip if wet | Very secure |
| Comfort | Softer, more cushion | Usually firmer |
| Weight | Lighter | Heavier (metal collars) |
| Price | Cheaper | More expensive |
| Best For | Casual, road bikes | Mountain, aggressive riding |
Step-by-step Example: Replacing Grips On A Mountain Bike
Let’s walk through an example to see the process in action.
- Remove bar-end plugs with a screwdriver. Set them aside.
- Spray rubbing alcohol under the old grips with a straw tip. Twist and pull them off.
- Wipe the handlebar with a clean rag and check for glue or rust.
- Fit new lock-on grips by sliding them on. Make sure the logos face up.
- Tighten both collar screws with an Allen key—do not overtighten.
- Insert new bar-end plugs and push firmly.
- Check both grips by twisting. If they don’t move, you’re done.
This process usually takes less than 15 minutes for an experienced person. Beginners might need 20–30 minutes the first time.
Troubleshooting: If Your Grips Won’t Go On
Sometimes, new grips feel impossible to install. Here’s what to do:
- Grip too tight? Warm the grip in hot water for 2–3 minutes. This softens the rubber and makes it easier to slide.
- Still stuck? Spray a little more rubbing alcohol on the handlebar and inside the grip. Twist as you push.
- Grip stops halfway? Back it off, add more alcohol, and try again.
- Handlebar end flares out? Sand the edge a little to remove any sharp lip.
If you have access to compressed air, blow air into the end of the grip as you push. This lifts the grip and helps it slide easily.
How Often Should You Replace Grips?
Most riders change grips every 1–2 years, but it depends on your riding. If you ride daily or in hot weather, grips wear faster. Signs you need new grips:
- Rubber feels hard or sticky
- Grips spin or move easily
- Visible cracks or tears
- Hands hurt after short rides
Fresh grips not only feel better but also help you ride more safely.
Comparing Popular Grip Brands
Here’s a look at some popular grip brands and what they offer.
| Brand | Type | Price Range | Special Features |
|---|---|---|---|
| Ergon | Lock-On | Medium–High | Ergonomic shape, hand support |
| ODI | Lock-On | Medium | Many patterns/colors |
| Race Face | Slide-On, Lock-On | Low–Medium | Soft rubber, good value |
| ESI | Slide-On | Medium | Silicone, lightweight |
| Bontrager | Lock-On | Medium | Integrated bar ends (some models) |
Safety Tips For Installing Grips
Installing grips is usually safe, but keep these points in mind:
- Always cut away from your body if using a knife to remove old grips.
- Wear gloves if you have sensitive skin or use strong cleaning agents.
- Make sure both grips are tight before riding—loose grips can cause crashes.
- Test your brake and shifter function after installing grips. Sometimes new grips can block the controls.
Where To Learn More
If you want to see videos or read more about grip installation, check out guides from trusted cycling organizations or your favorite bike brands. A useful resource is the Wikipedia page on bicycle handlebars for more technical information.
Frequently Asked Questions
How Do I Know What Size Grips To Buy?
Most flat handlebars use a standard diameter of 22.2 mm at the grip area. Measure your handlebar if you are unsure. Some kids’ bikes and old cruisers may be different.
Can I Use Soap And Water To Help Install Grips?
Yes, but use only a small amount. Too much soap can leave the grip slippery for days. Rubbing alcohol is better because it dries quickly.
What Should I Do If My Grip Keeps Twisting?
Remove the grip, clean the handlebar and inside of the grip with alcohol, and reinstall. If it still twists, try grip glue or switch to lock-on grips for more security.
Is It Safe To Cut Grips To Make Them Shorter?
Yes, but use a sharp knife and cut straight. Some grips are designed to be cut shorter for twist shifters or narrow handlebars. Do not cut lock-on collars.
How Long Does It Take For New Grips To Fully Set?
For slide-on grips with rubbing alcohol, wait 30–60 minutes. If you use grip glue, check the product instructions—usually 1–2 hours. Lock-on grips are ready as soon as screws are tight.
Putting new grips on your bike is a simple way to upgrade your comfort and control. With the right steps and a little patience, you can do it yourself and enjoy smoother, safer rides for months to come.
Credit: www.parktool.com