Setting the sag on your dirt bike is one of the most important adjustments you can make for performance, comfort, and safety. Whether you’re a trail rider or a motocross racer, the right sag helps your suspension work as it should, giving you control over bumps, jumps, and corners.
Many riders overlook this simple step, but dialing in your sag can be the difference between a great ride and a frustrating one. Let’s explore how to set sag on a dirt bike with confidence, accuracy, and a few pro tips most beginners miss.
What Is Sag And Why Does It Matter?
Sag is the amount your bike’s suspension compresses under weight. There are two main types: static sag (the bike’s own weight) and rider sag (with you on the bike). Getting these numbers right is key. Too little sag, and your suspension feels stiff. Too much, and your bike can bottom out or handle poorly.
Why does this matter? Suspension is not just about comfort. The right sag lets your tires track the ground, keeps your geometry correct, and helps you brake, accelerate, and corner with confidence. Every manufacturer recommends a sag range for their bikes—usually 95–115mm for rider sag on the rear, but always check your manual.
Tools And Preparation
Before you start, gather these items:
- Tape measure or sag scale (in millimeters)
- Stand to hold your bike upright
- T-handles or spanner wrenches (for adjusting preload collars)
- Notepad or phone (to record measurements)
- Helper (optional, but makes things easier)
Your bike should be clean and the chain properly adjusted. Tires must be at the correct pressure. Small changes here can affect your measurements.
Understanding Rear Suspension Sag
Most of the time, riders focus on the rear sag because it has the biggest effect. Here’s what you need to know:
- Static sag is measured with the bike supporting its own weight, no rider.
- Rider sag (also called race sag) is measured with you, in full gear, sitting or standing in your normal riding position.
Setting rear sag correctly helps maintain the bike’s balance front-to-rear. Too much sag can cause your front end to push wide in corners. Too little, and the bike may feel twitchy or harsh over bumps.
Step-by-step Guide: Setting Rear Sag
1. Lift The Bike (fully Extended Position)
Place your bike on a stand so the rear wheel is off the ground, and the suspension is fully extended. This is called the “zero” point.
- Measure from the rear axle to a fixed point directly above (like a spot on the fender or a bolt). Write down this number (let’s call it M1).
- Static Sag Measurement
Take the bike off the stand and let it rest under its own weight (no rider, not holding the bike up). Bounce the suspension a few times to settle it, then let it stand upright.
- Measure from the same points as before. Write this number as M2.
- Static sag = M1 – M2.
- Rider Sag Measurement
Wear all your riding gear. Sit (or stand, if that’s how you ride) in your normal position. Ask a helper to balance the bike upright.
- Measure the same way. Write this as M3.
- Rider sag = M1 – M3.
- Adjust Preload to Achieve Correct Sag
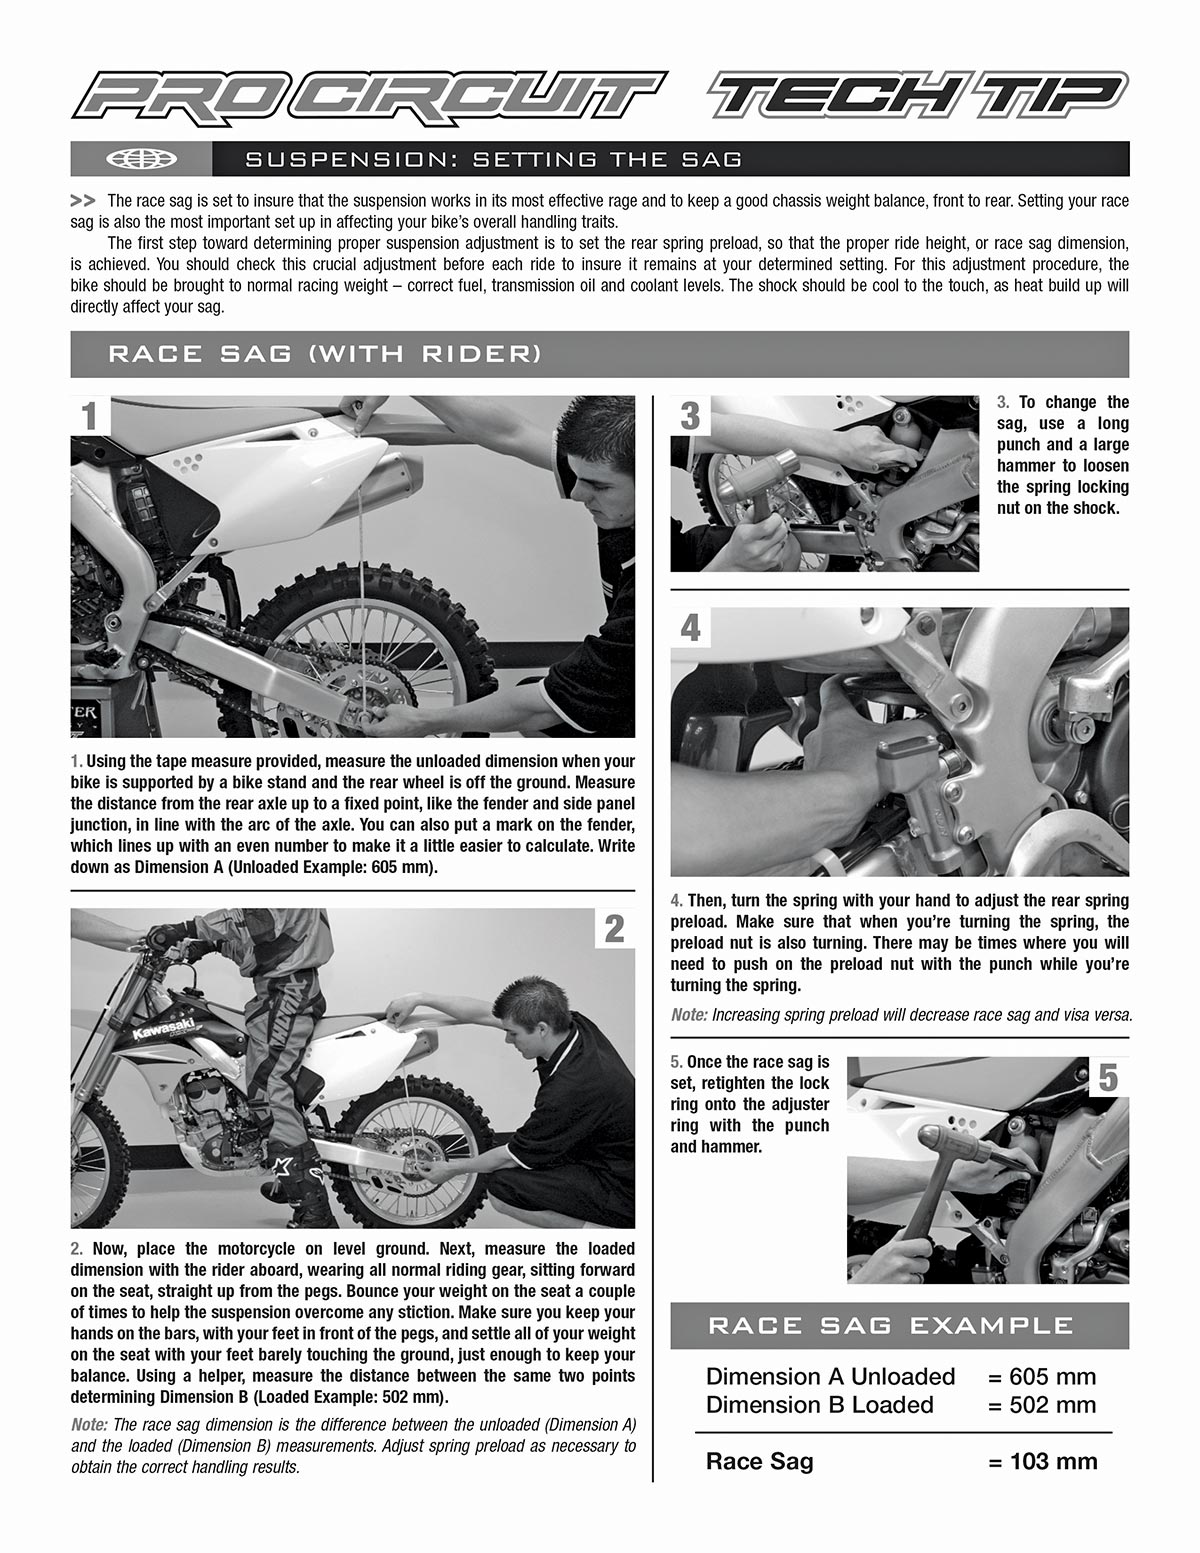
If your rider sag isn’t in the recommended range (usually 95–115mm for most bikes), you need to adjust the spring preload. This is done at the shock’s collar.
- Less sag: Turn the preload collar clockwise to compress the spring.
- More sag: Turn the collar counter-clockwise to release spring tension.
Make small adjustments (about 2–3mm at a time), then repeat the measurements.
Example Sag Calculation
Suppose:
- M1 (fully extended) = 600mm
- M2 (static) = 570mm
- M3 (rider) = 500mm
Static Sag = 600 – 570 = 30mm
Rider Sag = 600 – 500 = 100mm
If your manual recommends 100mm, you’re set.

Credit: www.wikihow.com
Front Suspension Sag
While rear sag is most critical, setting the front sag can refine your handling. The process is similar but with a few differences.
Measuring Front Sag
1. Lift The Front End
Put the bike on a stand so the front wheel hangs free. Measure from the front axle to a point on the lower triple clamp. Record this as F1.
2. Resting On Own Weight
Let the bike stand without a rider, then measure again (F2).
3. With Rider
Sit or stand in your riding position, gear on, and have a helper balance the bike. Measure (F3).
- Static sag (front) = F1 – F2
- Rider sag (front) = F1 – F3
Most bikes aim for 55–70mm front rider sag.
Adjusting Front Sag
Front sag is changed by adjusting preload (if available) or changing fork springs. Most stock forks have limited adjustment, so if you’re outside the recommended range, you may need different springs. It’s less common to adjust front preload at home compared to the rear.
Recommended Sag Numbers
Here’s a quick comparison for common dirt bike types:
| Bike Type | Rear Rider Sag | Front Rider Sag | Static Sag (Rear) |
|---|---|---|---|
| Motocross | 100-105mm | 60-70mm | 30-40mm |
| Enduro/Trail | 105-115mm | 55-65mm | 35-45mm |
| Mini Bike (85cc) | 75-85mm | 50-60mm | 25-35mm |
Always check your bike’s service manual for the exact numbers.
Credit: dirtbikemagazine.com
Common Mistakes When Setting Sag
Many new riders make these errors:
1. Wearing Street Clothes
Always wear your full riding gear. Boots, helmet, and even water pack can add 4–7kg, changing your sag numbers.
2. Measuring At Different Points
Always use the same spots on the axle and frame/fender. Even a few millimeters off can give a wrong reading.
3. Not Bouncing The Suspension
Before measuring, compress and release the suspension a few times. This helps the springs settle, giving a true number.
4. Ignoring Static Sag
Both static and rider sag are important. Too little static sag means your spring is too soft or preload is too high.
5. One-person Measurements
It’s possible, but a helper makes things much more accurate. If alone, use a wall or a plumb line for balance.
How Sag Affects Handling
Correct sag changes everything about how your dirt bike rides:
- Too much rear sag: The bike squats, turns slowly, and feels heavy in the front.
- Too little rear sag: The rear feels harsh; you may get headshake or a wandering front end.
- Wrong front sag: Can cause the bike to dive under braking or push wide in corners.
Here’s a summary of what you might feel:
| Sag Condition | Handling Effect |
|---|---|
| Too much rear sag | Slow steering, poor acceleration grip |
| Too little rear sag | Harsh ride, less traction, twitchy front |
| Too much front sag | Forks dive, unstable under braking |
| Too little front sag | Front feels stiff, skips over bumps |
Advanced Tips: Getting Sag Perfect
1. Check Sag Regularly
Your suspension settles over time. Check your sag every few rides, especially after a race or hard day.
2. Record Your Settings
Keep a log of preload collar turns and sag numbers. If you change terrain, you can quickly return to your best setup.
3. Consider Rider Weight Changes
If you gain or lose weight, even 3–5kg, your sag will change. Adjust as needed.
4. Spring Rate Matters
If you can’t get the correct sag with the stock spring (for example, the collar is maxed out), you likely need a stiffer or softer spring. For riders over 90kg, this is common.
5. Balance Front And Rear
Don’t just set rear sag and forget the front. The bike must be balanced for your style and the terrain you ride.
6. Use A Sag Tool
Several companies make easy-to-use sag measurement tools that make solo adjustments much easier.
Real-world Example: Setting Sag For A 2023 Yamaha Yz250f
Let’s walk through a quick example with actual numbers.
- Yamaha recommends 100–105mm rear rider sag.
- Rider in gear weighs 80kg.
- Bike on stand: M1 = 600mm
- Bike on ground, no rider: M2 = 570mm
- With rider: M3 = 500mm
- Static sag = 30mm (good)
- Rider sag = 100mm (perfect)
If the rider sag was 110mm, the spring would need more preload (tighten the collar). If it was 90mm, less preload.

Credit: www.youtube.com
Why Suspension Shops Use Sag
Professional suspension tuners always check sag first. It’s the foundation for advanced adjustments like compression and rebound damping. If your sag is wrong, no amount of clicker tuning will fix a bike that’s out of balance. Even factory race teams check sag every session. For more on suspension theory, see the detailed resources at Wikipedia.
Frequently Asked Questions
How Often Should I Check My Dirt Bike Sag?
Check your sag every few rides, after any suspension service, or if you change your weight or gear. Hard riding can cause springs to settle, so regular checks keep your setup consistent.
Can I Set Sag Alone, Or Do I Need Help?
You can set sag alone, but having a helper makes it much easier and more accurate. If alone, use a wall for balance and mark your measurement points carefully.
What Happens If My Static Sag Is Too Small?
If your static sag is much less than recommended, your spring may be too soft or you’re running too much preload. This can cause poor traction and a harsh ride. Consider a stiffer spring if you can’t adjust within the range.
Should I Adjust Sag For Different Tracks Or Terrain?
Yes, adjusting sag can help for specific conditions. For example, more sag for soft sand can improve stability, while less sag gives quicker steering for tight tracks. Always record your base setting to return to normal.
Is Front Sag As Important As Rear Sag?
Rear sag has the biggest impact, but front sag matters too, especially for technical riders. If your bike feels off in corners or under braking, check both front and rear sag for best results.
Setting sag is not just a pro-level detail. It’s a basic skill every rider should know. Take the time to measure and adjust, and you’ll feel the difference with more control, comfort, and confidence every time you ride.