Setting up a bike trainer can transform your home into a powerful training space. Whether you’re preparing for a race, looking to stay fit during bad weather, or simply want the flexibility to ride indoors, getting your bike trainer ready is a rewarding project. For those new to indoor cycling, the process can seem confusing—so this guide will walk you through every step, with useful tips and details that even many experienced cyclists overlook. By the end, you’ll have your trainer set up safely, efficiently, and ready for enjoyable rides.
Understanding Bike Trainers
A bike trainer is a device that holds your bicycle in place and provides resistance, so you can ride indoors. There are three main types: wheel-on trainers, direct drive trainers, and rollers. Each has its benefits and setup requirements.
- Wheel-on trainers clamp to your rear wheel, pressing against the tire to provide resistance.
- Direct drive trainers replace your rear wheel; you attach your bike’s chain to the trainer’s cassette.
- Rollers are cylinders that you balance your entire bike on, pedaling as if riding on the road.
Choosing the right trainer depends on your goals, space, and budget. For example, direct drive trainers are quieter and offer precise resistance, but they’re more expensive. Wheel-on trainers are affordable and easy to use but can wear down your rear tire faster.
Preparation Before Setup
Before you start, gather the necessary equipment and check your surroundings. A successful setup starts with the right groundwork.
Essential Items
- Your bike
- The bike trainer (with all included parts)
- Trainer skewer (for wheel-on trainers)
- Mat or old carpet (protects your floor and dampens noise)
- Riser block (levels your front wheel)
- Towel (for sweat)
- Fan (optional but highly recommended)
- Bike tools (Allen keys, wrench, etc.)
Choose The Right Space
Pick a spot with enough room for your bike and trainer, ideally with good ventilation. The floor should be flat and stable. Placing a mat under the trainer helps prevent slipping and protects against sweat or oil stains.
Inspect Your Bike
Check your bike for any damage, especially the rear tire and quick-release skewer. Clean your drivetrain to avoid excess noise and wear.
Non-obvious tip: Avoid rooms with thick carpet, as trainers can sink in and become unstable.
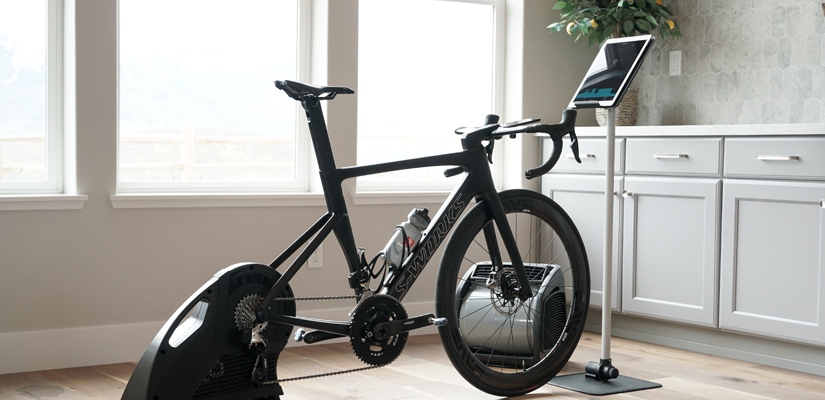
Credit: www.trainerroad.com
Step-by-step Setup: Wheel-on Trainer
Wheel-on trainers are the most common type for beginners. Here’s how to set one up safely:
1. Install The Trainer Skewer
Replace your bike’s rear quick-release skewer with the one supplied by the trainer. Trainer skewers are stronger and designed to fit securely in the trainer’s clamps. Never use a lightweight or carbon skewer—they can break.
2. Position The Trainer
Unfold the trainer legs fully for maximum stability. Place the trainer on your mat.
3. Mount Your Bike
Open the trainer’s clamps, position the rear wheel, and clamp it tightly. Make sure the bike is centered and upright. Check both sides for equal clamp pressure.
4. Adjust Resistance Unit
Turn the resistance roller until it contacts the tire firmly. Too loose, and you’ll slip; too tight, and you’ll wear the tire. A good rule: Spin the wheel by hand—it should move, but with slight resistance.
5. Stabilize The Front Wheel
Place a riser block under the front wheel to keep the bike level. This helps protect your frame and avoids putting strain on your wrists and back.
6. Plug In Electronics (if Applicable)
Smart trainers need power for connectivity and features. Connect to power and sync with your cycling app if you use one.
7. Double-check Everything
Before you ride, stand over the bike and rock it gently side to side. It should feel stable and secure.
Step-by-step Setup: Direct Drive Trainer
Direct drive trainers are popular for their accuracy and quiet operation.
1. Remove Rear Wheel
Shift your chain onto the smallest cog, then release the quick-release or through axle. Remove the rear wheel.
2. Install Cassette (if Not Pre-installed)
Some trainers come with a cassette; others do not. Match the cassette to your bike’s drivetrain for smooth shifting. Use a cassette lockring tool for installation.
3. Mount The Bike
Lift your bike and align the chain with the trainer’s cassette. Secure the frame with the quick-release or through axle.
4. Stabilize And Power Up
Place the trainer on a mat and plug it in if it’s a smart trainer. Sync to your preferred cycling app.
5. Check Alignment
Ensure the frame sits square on the trainer, and the chain runs smoothly on the cassette.
Practical insight: If your shifting feels off after mounting, micro-adjust the derailleur or cassette position. Direct drive trainers can highlight alignment issues you didn’t notice on the road.
Step-by-step Setup: Rollers
Rollers are less common but great for developing balance and pedaling technique.
1. Position The Rollers
Place them on a flat, open area. The front roller should align with your bike’s front axle.
2. Mount The Bike
Stand next to a wall or doorway for support. Step onto the bike, keeping one hand on the wall.
3. Start Pedaling
Begin slowly, focusing on a smooth, even pedal stroke. Gradually build confidence before riding without support.
Advanced tip: Practice mounting and dismounting several times before attempting a full ride. It’s normal to feel unsteady at first.
Comparing Trainer Types
To help you decide which trainer is best for your needs, compare the main types side-by-side:
| Trainer Type | Price Range | Noise Level | Setup Difficulty | Best For |
|---|---|---|---|---|
| Wheel-On | $100–$400 | Moderate | Easy | Beginners, Budget |
| Direct Drive | $500–$1500 | Low | Moderate | Serious Cyclists |
| Rollers | $150–$500 | Low | Challenging | Skill Training |
Setting Up Your Training Area
A dedicated space makes indoor riding more enjoyable and consistent.
- Ventilation: Use a fan to stay cool. Indoor riding is much hotter than outdoor cycling.
- Hydration: Keep a water bottle within reach. You’ll sweat more indoors.
- Entertainment: Set up a TV, tablet, or speakers for music or virtual rides.
- Storage: Keep towels, tools, and spare parts nearby.
Hidden insight: Place your bike in a spot where sweat won’t drip onto electronics or valuables. Sweat is very corrosive and can damage floors or devices over time.
Connecting To Apps And Devices
Many trainers are “smart” and can connect to apps like Zwift, TrainerRoad, or Rouvy. Here’s how to set up your digital experience:
1. Download Your App
Choose the app that fits your goals. Zwift offers virtual worlds, while TrainerRoad focuses on structured workouts.
2. Pair Devices
Most trainers use Bluetooth or ANT+. Open the app, find “pair devices,” and connect your trainer, heart rate monitor, and cadence sensor.
3. Calibrate Your Trainer
Most apps offer a calibration tool. Follow the instructions for accurate power readings.
4. Adjust Display
Position your screen where you can see it clearly but won’t sweat directly onto it.
| App | Main Feature | Monthly Cost |
|---|---|---|
| Zwift | Virtual worlds, group rides | $14.99 |
| TrainerRoad | Structured workouts | $19.99 |
| Rouvy | Real video routes | $12 |
Pro tip: Use a cheap USB extension cable for your ANT+ dongle. Place it close to the trainer for the best signal.

Credit: www.youtube.com
Common Mistakes To Avoid
Even experienced riders make errors when setting up a bike trainer. Here are the most frequent ones:
1. Ignoring Tire Pressure
For wheel-on trainers, always set your tire to the recommended pressure before each ride. Low pressure increases noise and wear.
2. Incorrect Clamp Pressure
Over-tightening can damage the frame; too loose risks slipping. Check the manual for the right amount of force.
3. Skipping Calibration
Smart trainers need regular calibration for accurate data.
4. Poor Bike Position
Not using a riser block can cause hand numbness and back pain.
5. Neglecting Noise Control
Skipping mats or not using trainer-specific tires can lead to angry housemates or neighbors.
Less obvious mistake: Not checking quick-release or through-axle tightness after each ride. Vibration can loosen these over time.
Maintenance Tips For Longevity
A well-maintained setup lasts longer and feels better to ride.
- Wipe Sweat Regularly: Use a towel to wipe your bike and trainer after every session.
- Lubricate Chain: Indoor riding dries out chains quickly—lube after every few rides.
- Inspect Trainer Parts: Check bolts and clamps monthly for tightness.
- Replace Tires: If using a wheel-on trainer, use a trainer-specific tire and replace it when worn.
- Update Firmware: For smart trainers, check for firmware updates through the manufacturer’s app.
Non-obvious insight: Unplug smart trainers when not in use to protect electronics from power surges.
Upgrading Your Trainer Experience
Once you’re comfortable, small upgrades can make indoor cycling more enjoyable.
- Rocking Plates: These let your trainer move side-to-side for a more realistic ride.
- Sweat Guards: Protect your frame and electronics from corrosion.
- Better Fans: Cooling is the #1 comfort upgrade for long sessions.
- Noise-Reducing Mats: Thicker mats absorb vibration and make riding quieter.
You don’t need everything at once—start with the basics, then add accessories as your budget allows.
Safety And Comfort Best Practices
Staying safe and comfortable is crucial for indoor cycling.
- Wear Proper Clothing: Use padded cycling shorts to reduce saddle discomfort.
- Warm Up and Cool Down: Five minutes before and after riding helps prevent injury.
- Monitor Room Temperature: Indoor riding can quickly overheat you; keep the room below 22°C (72°F).
- Stay Hydrated: Drink at least 500ml per hour.
- Check Trainer Stability: Make sure the bike doesn’t rock or slide during sprints.
Hidden insight: If you feel numbness or tingling, check your handlebar height and saddle position—indoor setups often need minor adjustments compared to outdoor riding.
Troubleshooting Common Issues
Sometimes things don’t go as planned. Here are solutions for the most common problems:
- Squeaking or Slipping: Check tire pressure, roller tension, and cleanliness. Clean the roller and tire with alcohol.
- Resistance Feels Wrong: Calibrate your trainer or update firmware. Check for app compatibility issues.
- Connectivity Drops: Move devices closer together, turn off interfering wireless devices, or use a USB extension for ANT+.
- Shifting Problems: Re-adjust derailleur or re-install cassette for direct drive trainers.
If problems persist, consult your trainer’s manual or visit a reputable cycling forum or the manufacturer’s support page for help.
For more detailed specs and user guides, you can refer to this Bicycle Trainer Wikipedia page.
Frequently Asked Questions
How Do I Know If My Bike Is Compatible With A Trainer?
Most road and hybrid bikes fit standard trainers, but check your axle type (quick-release or thru-axle) and rear dropout width. Some direct drive trainers need specific cassettes or adapters. If in doubt, consult your trainer’s specs or bring your bike to a shop.
Can I Use A Mountain Bike On A Trainer?
Yes, but wheel-on trainers work best with a slick rear tire to reduce noise and wear. For direct drive trainers, you may need a different cassette or adapter. Always check frame clearance and compatibility.
How Can I Make My Indoor Rides Quieter?
Use a trainer-specific tire (for wheel-on trainers), place a thick mat under the setup, and keep tire pressure consistent. Direct drive trainers are naturally quieter. Fans also help by masking noise.
Do I Need Special Software For A Smart Trainer?
Most smart trainers work with multiple apps, such as Zwift or TrainerRoad, but they can also operate in “standalone” mode with manual resistance. Software is not required but adds features and fun.
Is It Safe To Leave My Bike On The Trainer?
Yes, for most bikes and trainers, it’s safe to leave your bike mounted. However, check that clamps are not over-tightened, and wipe off sweat to prevent corrosion. For carbon frames, avoid storing under high tension.
Setting up a bike trainer opens a new world of riding, training, and fun at home. With careful setup and attention to detail, you’ll enjoy safe, effective workouts all year long. Whether you’re chasing personal records or just staying active, your trainer will be a valuable tool in your cycling journey.

Credit: www.theproscloset.com