Testing your e-bike battery can help prevent unexpected breakdowns, save money, and keep your rides safe. Many people think checking a battery is complicated, but with a multimeter and a few easy steps, you can do it yourself at home. This guide will walk you through everything you need to know to test your e-bike battery with a multimeter, even if you’re not an electrical expert. You’ll learn why testing matters, what tools you need, how to use them correctly, and how to understand your results.
Why Test Your E-bike Battery?
An e-bike’s battery is its heart. If the battery fails, your e-bike won’t run properly, and you could get stranded or damage your e-bike’s electronics. Regular testing helps you:
- Spot battery problems early.
- Avoid full battery failure during a ride.
- Extend your battery’s life by catching issues before they grow.
- Make better decisions about charging and replacement.
Many riders don’t realize that a battery can lose power slowly over time, not just suddenly die. By testing, you can track these changes before they become a problem.
What You Need To Test An E-bike Battery
Before you begin, gather these items:
- Digital Multimeter: This tool measures voltage, current, and resistance. Choose one with a DC voltage setting.
- Insulated Gloves: For extra safety when handling live wires.
- Screwdriver: If your battery is in a case or compartment.
- Safety Glasses: Batteries can sometimes leak or spark.
It’s important to use a digital multimeter because it gives more accurate readings than old analog types. Even basic models are good for home testing.
Credit: electricscooterparts.com
Understanding E-bike Battery Basics
Before testing, it helps to know some simple battery terms:
- Voltage (V): Shows how much electrical “pressure” the battery provides.
- Amp-hour (Ah): Tells how much energy the battery can store.
- State of Charge (SOC): The current charge level, like a fuel gauge.
Most e-bike batteries are lithium-ion, and their rated voltage is usually 24V, 36V, or 48V. The real voltage when fully charged is often slightly higher than the label.
Here’s a quick look at common e-bike battery voltages and what you can expect when fully charged or almost empty:
| Battery Nominal Voltage | Fully Charged Voltage | Empty Voltage |
|---|---|---|
| 24V | 29.4V | 20V |
| 36V | 42.0V | 30V |
| 48V | 54.6V | 40V |
Knowing your battery’s voltage is essential before you test.
How To Set Up Your Multimeter
A multimeter can look confusing, but you only need a few basic steps:
- Turn the dial to DC Voltage (V⎓): E-bike batteries use direct current (DC), not alternating current (AC).
- Choose a range: If your battery is 36V, set the range to 50V or 100V to be safe.
- Check the probes: The black probe goes into the “COM” port, and the red probe goes into the port labeled “VΩmA”.
If your multimeter is auto-ranging, it will pick the best range automatically.
Step-by-step: Testing E-bike Battery Voltage
Now you’re ready to test. Follow these steps carefully:
1. Make The Battery Accessible
Turn off your e-bike and remove the battery if possible. Some bikes let you test the battery while it’s still on the bike, but removing it is safer and easier.
2. Find The Battery Terminals
Look for the + (positive) and – (negative) terminals. They are usually marked and often have red (+) and black (–) wires or covers.
3. Set The Multimeter
Double-check your settings. The multimeter must be on DC voltage, with probes in the correct ports.
4. Connect The Probes
- Place the black probe on the negative terminal.
- Place the red probe on the positive terminal.
- Hold them steady, but do not let the probes touch each other.
5. Read The Display
The screen will show the voltage. Compare this number to your battery’s rated voltage. For example, a 36V battery that shows 41. 8V is fully charged. If it shows 30V or less, it’s nearly empty.
6. Interpret The Results
If the voltage is much lower than normal or the reading jumps around, your battery could be weak or faulty.
| Voltage Reading | Battery Condition |
|---|---|
| Close to “fully charged” value | Healthy |
| 1-2V below full | Partially discharged |
| More than 4V below full | Needs charging or possible problem |
| Very low (< nominal voltage) | Likely faulty |
Testing Battery Under Load
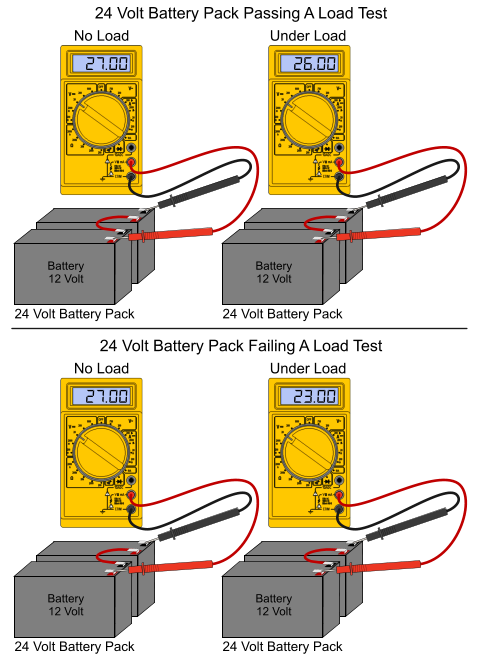
A battery can sometimes show the right voltage when not in use (no load) but drop quickly under stress (load). Testing “under load” gives a more realistic view of battery health.
How To Do A Simple Load Test
- Reconnect the battery to your e-bike.
- Turn on the bike’s lights or motor (without riding).
- Measure the voltage again at the battery terminals while the bike is on.
If the voltage drops a lot (for example, more than 2V for a 36V battery), your battery may not hold power well under real conditions.
Example:
- No load: 41.5V (looks good)
- Under load: 35.0V (big drop, possible weak battery)
A healthy battery’s voltage should drop only slightly under a small load.
Checking For Battery Balancing Issues
Battery balancing means all the individual cells inside the battery pack have the same voltage. If one cell is much lower, the whole pack can perform poorly.
Home users can’t check each cell unless their battery has a balance connector or a display that shows cell voltages. If your battery has a connector with many small wires (not just two big ones), you might be able to check cell groups.
Warning: Testing individual cells can be risky and may void warranties. Only do this if you understand battery safety.
Common Mistakes When Testing E-bike Batteries
Even simple tests can go wrong if you’re not careful. Here are mistakes to avoid:
- Setting the multimeter to AC instead of DC voltage. E-bike batteries use DC.
- Touching the probes together while they’re on the battery. This can short the battery.
- Testing while the e-bike is charging. Always test when the charger is disconnected.
- Not knowing your battery’s correct voltage. Always check the label or manual.
- Forgetting to wear safety gear. Gloves and glasses prevent accidents.
Advanced Testing: Capacity And Resistance
Voltage testing is a quick check. For a deeper test, look at battery capacity and internal resistance.
Capacity Testing
This checks how much energy the battery can deliver. You need a special tool called a battery analyzer or a “load tester” for this. It discharges the battery while measuring how much energy comes out. This goes beyond what a simple multimeter can do.
Internal Resistance
High resistance can mean the battery is aging. Some advanced multimeters have this function, but most home models do not. If you notice the battery heats up or loses power fast, resistance could be the problem.
How To Know When To Replace Your E-bike Battery
Testing tells you if your battery is healthy, weak, or failing. Signs you may need a new battery:
- Voltage is much lower than normal, even after charging.
- Voltage drops fast under load.
- The battery no longer holds a charge for long rides.
- Swelling, leaking, or strange smells.
If your battery is more than three years old, regular checks become even more important.
Safety Tips For E-bike Battery Testing
Working with batteries is mostly safe if you follow these tips:
- Always test in a dry area.
- Don’t touch both terminals at the same time.
- Keep metal objects (like rings or keys) away from the battery.
- Dispose of damaged batteries at a recycling center—never in the trash.
Practical Insights For Beginners
Many beginners don’t realize:
- Batteries can “look” full but be weak: A battery can show full voltage but still have little real power if the cells are old or unbalanced. That’s why load testing is so useful.
- Temperature affects readings: Cold batteries may show lower voltage. Test at room temperature for best results.
Also, if your multimeter gives confusing results, check the probes—they can wear out over time and give false readings.

Credit: www.youtube.com
Comparing Home Testing Vs. Professional Testing
Sometimes, a home test isn’t enough. Here’s a simple comparison:
| Home Multimeter Test | Professional Test |
|---|---|
| Checks voltage easily | Measures full capacity and resistance |
| Quick and cheap | More accurate, detects hidden problems |
| Cannot test individual cells easily | Can diagnose each cell in the pack |
If you suspect a serious problem, a professional shop can give you a detailed report.
What To Do With Your Test Results
- Normal voltage: Keep riding, but check every 2-3 months.
- Low voltage: Try charging fully, then test again.
- Fast voltage drop under load: Consider replacing the battery soon.
- Strange readings or battery damage: Stop using and get it checked by a technician.
Keeping a simple log of your test results helps track battery health over time.

Credit: macfoxbike.com
Frequently Asked Questions
How Often Should I Test My E-bike Battery?
Test your battery every 2-3 months, or before long trips. If you ride daily, check monthly. Regular tests help catch problems early.
Can I Use Any Multimeter To Test My E-bike Battery?
Most digital multimeters with a DC voltage setting will work. Make sure the voltage range covers your battery (for example, up to 50V for a 36V battery).
What Is A Dangerous Voltage For An E-bike Battery?
If your battery drops below 2. 5V per cell (for lithium-ion, that’s about 30V on a 36V pack), it can be unsafe or permanently damaged. Never use or charge a battery that reads very low.
Why Does My Battery Show Good Voltage But My E-bike Won’t Run Far?
This usually means the battery has lost capacity or has an internal problem. Voltage alone doesn’t show full health—test under load or get a professional test.
Where Can I Learn More About Battery Care?
You can find detailed battery care guides at Wikipedia: Electric Bicycle Battery and from your battery manufacturer.
Taking care of your e-bike battery with simple testing can save you money, time, and headaches. With a multimeter and these clear steps, you can catch battery issues before they ruin a ride. Remember, safety first—and don’t hesitate to ask a pro if your results are unclear. Regular checks mean a longer, happier life for your e-bike.